Control 2D and 3D Views
In WallMan there are different views on a database. There are 2D views and a 3D view. The 3D view is meant to give an overview of the database in all its dimensions and thereby gives a better idea of the structure than in 2D. However in 3D, it is not possible to make any changes to the database, this is only feasible in 2D.
When an indoor database is opened, there are four views: XY, XZ, YZ and 3D. Outdoor databases provide only an XY and a 3D view because the side views would be rather useless. Both types of databases also provide a “Single Object View” which can be activated by double-clicking on an object in a 2D view.
Changing the Views
To change the view in a part of the window just click on the part to activate it and then click on the icon of the view that should appear in that part of the window. For example, if the 3D view should appear in the (upper) left part of the window, click on the (upper) left part and then on 3D.
It is not possible to have two views of the same kind. When the 3D view is activated in the (upper) left part, the view that was in that part prior (for example, XY) will appear in the part where the 3D view was before. In other words: WallMan just swaps the views.
Navigating in 2D Views
The 2D views in WallMan show the database as a cross-section with a certain plane. The plane moves along the third axis (for example, the “Z” axis in the “X / Y” view) and its position is called “3rd coordinate”. The content of a 2D view can be changed with the following tools.
 Zoom in and zoom out and draw a zoom
rectangle. The zoom rectangle defines the area that will be visible in the view.
Zoom in and zoom out and draw a zoom
rectangle. The zoom rectangle defines the area that will be visible in the view.
![]() The Mouse pan-and-zoom tool allows an
intuitive change of the view. Pressing (and holding) the left mouse button while moving
the mouse will move the view. Pressing the right mouse button will zoom it.
The Mouse pan-and-zoom tool allows an
intuitive change of the view. Pressing (and holding) the left mouse button while moving
the mouse will move the view. Pressing the right mouse button will zoom it.
![]() Clicking the button restores
the default view settings.
Clicking the button restores
the default view settings.
![]() The
“New” button redraws the current view.
The
“New” button redraws the current view.
![]() The 3rd coordinate can be
changed by using the 3rd Coord Settings dialog. By default, this
window is visible whenever a 2D view is activated (it is not visible when the 3D view is
active). The display state of this dialog can be toggled by clicking on the icon in the
toolbar.
The 3rd coordinate can be
changed by using the 3rd Coord Settings dialog. By default, this
window is visible whenever a 2D view is activated (it is not visible when the 3D view is
active). The display state of this dialog can be toggled by clicking on the icon in the
toolbar.

Figure 1. The 3rd Coordinate Settings dialog.
Moving the slider at the left side of the window up and down changes the third coordinate. The current value is displayed right below the slider.
To ease navigation in large databases it is possible to define “Marks” which are some kind of bookmarks for the third coordinate. These marks are very useful in multi-floor indoor databases. A mark can be defined for each floor and the view can be brought to that floor with one click.
A bookmark to a particular value can be set by clicking on Add Mark. The new mark will appear in the Marks list. Clicking on a mark in the list sets the third coordinate according to that mark. A mark can be removed by selecting it and clicking on Delete Mark.
WallMan can also display the current cross-section plane in the 3D view when Show 3rd Coord in 3D is enabled. Enabling Show Marks in 3D shows the marked planes.
Single Wall View
The single wall view enables the user to view all objects located in the plane of a selected wall. To enter this view, a wall has to be selected by double-clicking the left mouse button using the edit tool in any 2D view window. To leave the single wall view just click on the icon of the view that should appear in that part of the window. This option is available for indoor databases only.
![]() Clockwise 90-degree rotation of the
single wall view.
Clockwise 90-degree rotation of the
single wall view.
![]() Enter a user-defined rotation angle for
the single wall view.
Enter a user-defined rotation angle for
the single wall view.
![]() Flip the single wall view, view the back
side of the selected wall.
Flip the single wall view, view the back
side of the selected wall.
Navigating in the 3D View
The 3D view can be freely shifted, rotated and zoomed. All operations are performed with the mouse. The following graphic explains the different functions.
|
|
|
|
|
|
|
|
|
Besides the mouse operations, the 3D view window offers the possibility to reset the view perspective by pressing the Total View button. Arbitrary camera perspectives can be stored, deleted and reloaded using the corresponding buttons as well as the drop-down box.
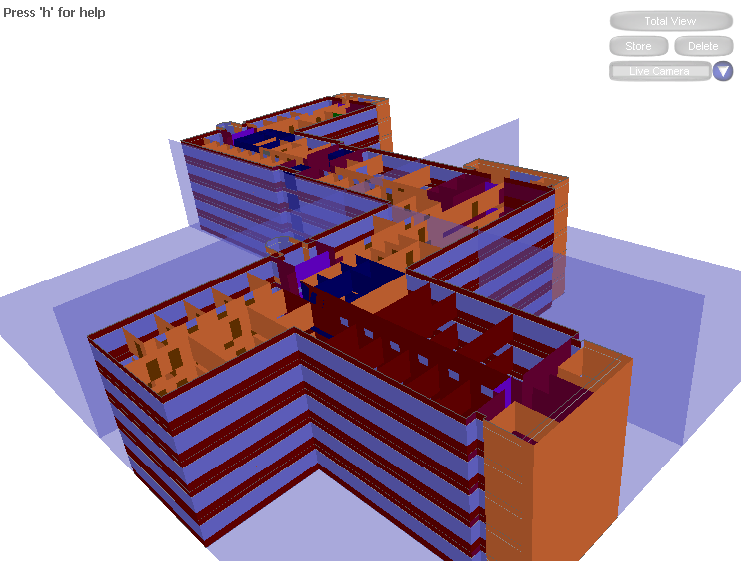
Figure 2. The 3D view window.
Stored camera perspectives are automatically saved to a file for later usage after closing the document or the 3D View, respectively.