Pattern
Create a linear or circular pattern of parts or faces.
Circular Pattern
Pattern parts or faces around an axis.
-
On the Geometry ribbon, in the
Pattern tool group, select the Circular
Pattern tool.

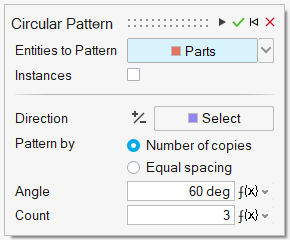
The guide panel appears.
-
In the guide panel, select the entities to pattern:
- Choose the type of Entities to Pattern:
- PartsNote: To make all of the parts in the pattern instances of the original part, turn on Instances.
- Faces
- Parts
- In the modeling window, select one or more parts or faces.Note: To deselect a feature, hold down Ctrl while clicking. To clear all selected features, in the microdialog click Clear Selection.
- Choose the type of Entities to Pattern:
-
Define the direction of the pattern:
- In the guide panel, next to Direction, click the Select button.
- In the modeling window, select a reference line, edge, or axis to which the pattern will be parallel.
- (Optional): To reverse the direction, click
 in the microdialog.
-
Select a pattern method:
- Number of copies: Select this option to specify the Angle between each copy and the Number of Copies.
- Equal spacing: Select this option to equally space the copies within a specified Angle.
-
Adjust the pattern:
To Do this - Change the angle between each copy (Number of copies method)
- Specify the angle within which the copies are equally spaced (Equal spacing method)
Enter an Angle. Change the number of copies Enter a Count. - Click Apply.
- Right-click and mouse through the check mark to exit, or double-right-click.
Linear Pattern
Pattern parts or faces along a direction.
-
On the Geometry ribbon, in the Pattern tool group,
select the Linear Pattern tool.

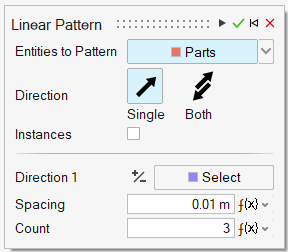
The guide panel appears.
-
In the guide panel, choose the type of Entities to
Pattern:
- Choose the type of Entities to Pattern:
- PartsNote: To make all of the parts in the pattern instances of the original part, turn on Instances.
- Faces
- Parts
- In the modeling window, select one or more parts or faces.Note: To deselect a feature, hold down Ctrl while clicking. To clear all selected features, in the microdialog click Clear Selection.
- Choose the type of Entities to Pattern:
-
Choose a Direction:
- Single (default): Pattern in one direction.
- Both: Pattern in both directions.
-
Define Direction 1 or Direction 2
of the pattern:
- In the guide panel, next to Direction 1 or Direction 2, click the Select button.
- In the modeling window, select a reference line, edge, or axis to which the pattern will be parallel.
- (Optional): To reverse the direction, click
 in the microdialog.
-
Adjust the pattern along Direction 1 or
Direction 2:.
To Do this Change the distance between two copies In the microdialog, enter the Spacing. Change the number of copies In the microdialog, enter the Count. - Click Apply.
- Right-click and mouse through the check mark to exit, or double-right-click.