Create an IES Light
To create an IES light, you need an IES file, which is a digital profile of an existing light. IES lights are useful to simulate physically accurate lights.
 Figure 1. Example of an IES Light with an ISO of 200
Turn on the Materials display mode, so you can see the changes as they are applied.
You may want to decrease the intensity of the global environment if you plan to add lights to your scene.
-
Click the Light icon.

Light Parameters
- Power Unit
- The default is Unitless, which measures intensity using arbitrary units
that do not directly relate to the power output of a lamp or any other
such physical measurement.
To simulate a real world commercial light bulb, select a specific unit of power (Lumens, Candelas, etc.).
- Efficacy
- (Only applies to Watts and Watts/sr.)
Define the luminosity of the light source in lm/Watt.
Tip: Specific light sources have specific values (e.g., a 100-Watt tungsten incandescent lamp has an efficacy of 12-18 lm/W, while a good LED light might have an efficacy of about 100 lm/W). You can find a table of data at http://en.wikipedia.org/wiki/Luminous_efficacy. - Attenuation
- Define the loss of light intensity based on the light-object distance.
- Color
- Define the color of the light by choosing a plain color from the color palette. It is recommended to use subtle, light colors for better results.
- Caustics Photons
- Caustics is a technique that mimics real light by calculating photons
that start at a light source. If Caustic Photons is enabled, these
photons are reflected, refracted, and bounce off the surface of a
mirror, for example. Some lights in your scene may not produce caustics;
for these, disable Caustics Photons to save rendering time.Note: This feature is not currently available in GPU+CPU mode.
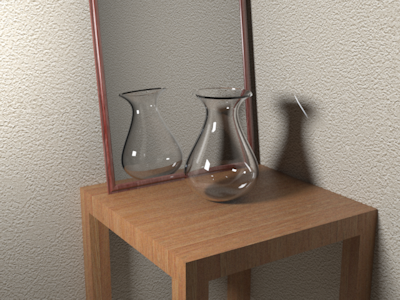 Figure 2. Caustics Off
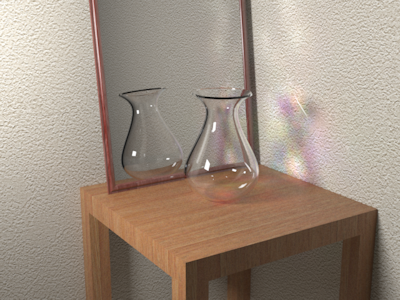 Figure 3. Caustics On
 - Shadow
- By default, all objects cast and receive shadows when illuminated by a
light source; however, there may be situations where this is
undesirable. For instance, certain objects cannot produce a visible
shadow due to the viewing position. Excluding these objects from shadow
calculations can result in improved rendering performance, both in terms
of increased speed and reduced memory usage.Note: This option only applies to Raytracing; it does not affect the Interactive Rendering or Full (Progressive) rendering engines.
- Reflection Based Positioning
-
- Select a light.
- Do one of the following:
- To place the light perpendicular to the point where you will click, for the Placement Method, select Illumination.
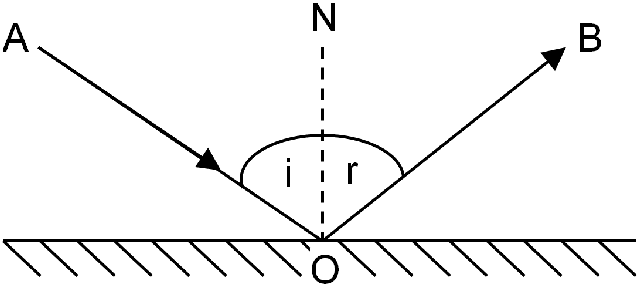
- To place the light in the opposite direction, for the Placement Method, select Reflection. In the figure below, if A is the camera and O the point where you click, the light will be placed at point B. This feature allows the camera to receive the maximum amount of reflection.
- To place the light on a surface, click the Place on Surface button, and then click the surface.
- Define OB:
- To make OB equal to AO, for the Placement Distance, select Same as Camera to Point.
- To define a custom OB, for the Placement Distance, select Custom, and then type a Distance Value.