Animation Timeline
Explore the features and options on the animation timeline.
Animation Timeline and Play Options

| Option | Description |
|---|---|
| Current Time |
Drag the Current Time slider to change
the time in the animation. Alternatively, click a time to change the current time. For example, if you click 5s, the animation will skip to the key frame at the 5 second mark. |
| Start Time |
Drag the Start Time slider to change the starting time of the animation. |
| End Time |
Drag the End Time slider to change the ending time of the animation. |
| Keyframe |
A key frame is a specific value that the property must have
at a certain time. The list of key frames for a property is
contained in a channel. Each key frame is represented by a diamond.
|
| Zoom | Drag left to zoom in on individual frames so you can see the
frame # and time in seconds. Drag right to zoom out. |
| Scroll bar | Use the scroll bar to scroll left or right along the animation timeline. |
| Go to beginning of the animation. | |
| Go back one frame in the animation. | |
| Play the animation. | |
| Go forward one frame in the animation. | |
| Go to the end of the animation. | |
| Play Mode |
Normal: Play the key frames in chronological order. This is the default play mode. Loop: Play the animation over and over again. Back and Forth: When the animation is played to the end, play it backwards to the beginning. Then repeat. |
| Set KF | Set the key frame. |
| Del selected KFs | Delete the selected key frames. |
Context Menu Options
Right-click a key frame or the timeline itself to display a context menu with additional options.
 |
 |
| Option | Description |
|---|---|
| Move Keyframes | Specify absolute time. |
| Copy Keyframes | Copy the selected key frames. |
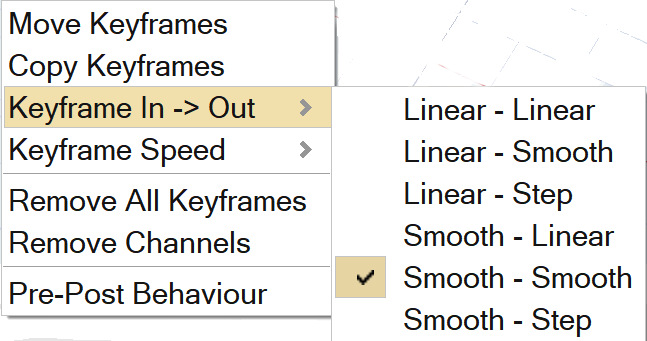
| Keyframe In → Out | This option defines how the channel is interpolated going
towards the key frame and how it is interpolated moving past the
keyframe. For example, for the Position channel, using Linear - Smooth means that the position is interpolated linearly (straight line) for the part that precedes the key frame and smoothly (curved smooth line) for the part the follows the key frame. On the other hand, for Step, let's say there are two key frames, A and B. The object doesn't move between A and B like it does for linear and smooth types of interpolation. The object will disappear from A and appear at B.
|
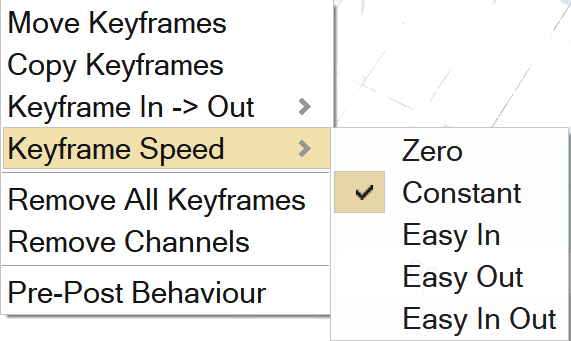
| Keyframe Speed | This option defines how the speed changes from one key frame
to the next.
|
| Remove All Keyframes | Remove all of the key frames from the time line. |
| Remove Channels | Remove some channels, not all. For example, Position and Rotation. |
| Pre-Post Behavior |
Define what the object does before the first key frame and after the last key frame. This is especially helpful when you are working with repetitive animations that don’t need intervention. Otherwise, you'd need to copy and paste the key frames multiple times or do additional work in a post-processing environment. Examples:
To define the pre-behavior and post-behavior for the Position, Rotation, and Scale channels, choose from:
|