In this tutorial, you will learn to add an existing library to the personal
repository, work with contents in a managed library, and become familiar with versioning and
life cycle operations.
Retrieve Library
Create locations to store the library and workspaces, such as C:\MyLibraries
and C:\MyLibraries\Workspaces.
Unzip SimulationProjects.zip from the HyperWorks Enterprise hwe.zip
directory to your library directory, C:\MyLibraries.
Add a Managed Library
Open HyperMesh.
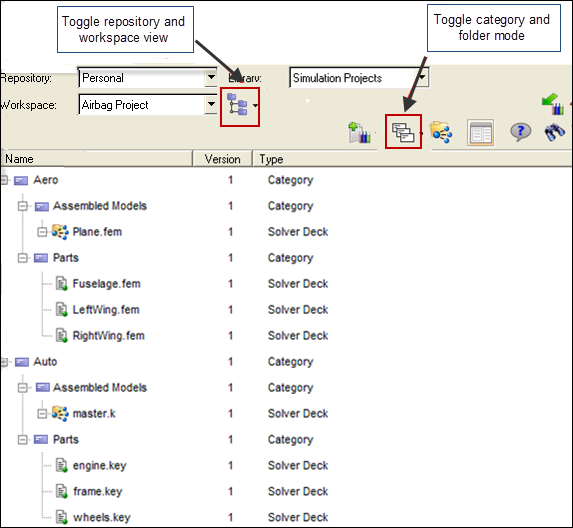
Click View > Organize to open the Organize browser.
Select Personal from the Repository list.
Select the Library drop-down and click
Add.
Click the Folder browser next to File Name, browse to,
and select C:\MyLibraries\Simulation Projects\Simulation
Projects.ldb.
Click Open.
Click OK.
The Simulation Projects is added to the Personal
repository.
Create Workspaces
Click the drop-down arrow next to Workspace and select
New.
Provide the following information: Name, Workspace 1,
and Working Directory, browse to and select
C:\MyLibraries\Workspaces.
Click OK in the
Browse for Folder dialog.
Click OK in the New
Workspace dialog.
Repeat Steps 1-4 to create a second workspace called Workspace 2 in
C:\MyLibraries\Workspaces.
Browse, Search and Retrieve Contents
Now you will look at the contents of the Simulation Projects library.
Begin by viewing the contents in the Repository View, Category Mode.
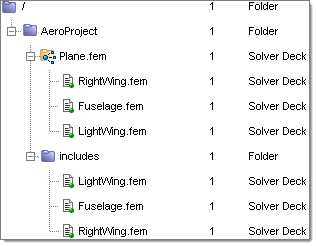
Figure 1.
The library contains two different master solver deck files,
Plane.fem and master.k, each of
which has three include solver deck files. The contents are organized by
different categories: Aero, Parts, Assembled Models, and so on.
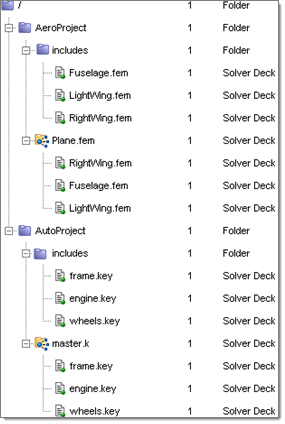
Switch the Category/Folder Mode toggle to Folder Mode,
.
Now you can see the folder organization of the same contents. The contents are
organized both within virtual categories, as well as physical folders.
Note: The
contents may belong to multiple categories, however, files may exist in only
a single folder.
Click the Show/Hide References icon, , to view the references.
Now you can see, for example, that Plane.fem refers
to its include files. Figure 2.
Note: With the references defined, all life cycle operations (Get, Check
Out, Check In) will be handled for the set of referenced
contents.
Click the drop-down arrow next to Workspace and select Workspace
1.
Click OK.
Workspace 1 is now the active workspace.
Click Plane.fem.
You can view the content’s properties in the Property panel.
Note: The
Property panel can be toggled on or off by clicking the icon. Notice that the document
Plane.fem is not retrieved. You can select any of
the referenced files and notice that they are also not retrieved. Because
this is a managed repository, the files are stored in the managed vault. To
view or edit files associated with contents, the files must be retrieved to
your workspace.
Right-click Plane.fem and select
Get from the context menu.
Plane.fem, along with its referenced include files,
is retrieved to Workspace 1.
Select Repository/Workspace, , and switch between Repository view, , and Workspace view, , to view contents in both locations.
Figure 3. Repository View Figure 4. Workspace View
The above views are shown in Folder Mode. They can be viewed in Category
Mode as well.
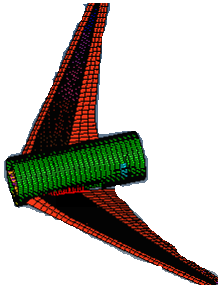
Right-click Plane.fem and select Import FE
Model.
The HyperMesh Import tab displays, with the path to
Plane.fem loaded.
Note: The list of HyperWorks integration options will change based on
the type of file selected and the active client (HyperMesh or HyperWorks Desktop active
client). Because plane.fem is a solver deck, you will
see the Import FE Model option.
Click Import.
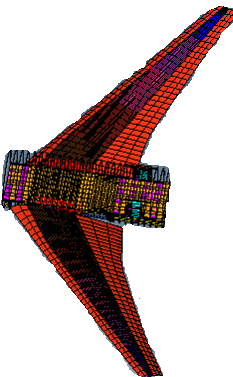
The plane model, master and includes, are loaded into HyperMesh. Figure 5.
Version Contents
Click Mesh > Delete > Elements > Delete Model to delete the model in HyperMesh so
that there is nothing in the current HyperMesh
session.
In the Organize tab, select the drop-down next to Workspace and select
Workspace 2 to set it as the active workspace.
There are no contents in the Workspace view because nothing has been retrieved
to this workspace.
From the Repository View, right-click Fuselage.fem and
select Check-Out.
The file is retrieved to Workspace 2, and the content is marked as
checked out.
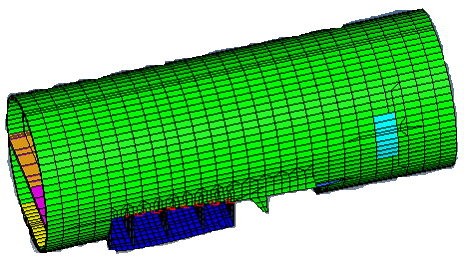
Right-click Fuselage.fem and select Import FE
Model.
Click Import.
The model is imported into HyperMesh. Figure 6.
Note: Now, you will make a change to the model and check it back in. The
change will be simple, but obvious, so that the changes will be easily
seen.
Click Mesh > Delete > Elements to open the Delete panel.
For File type select OptiStruct and for Template select
Standard format.
Click the File browser and browse to
Fuselage.fem in the Workspace 2 location where the
checked out solver deck resides:
C:\MyLibraries\Workspaces\Workspace2\Simulation_Projects\AeroProject\includes.
Note the full path, including sub folders. You should see the checked out
solver deck file, the one being modified, already in this location. You will
overwrite that file with your modified file.
Click Save.
Click Yes to replace the old
Fuselage.fem file.
Click Export.
Click Yes to overwrite.
In the Organize tab, right-click the checked out
Fuselage.fem and select
Check-in.
Enter some comments in the Check-In Dialog.
Click OK
Version 2 of Fuselage.fem is checked
in.
View Version History and Synchronize
Set Workspace 1 as the active workspace.
Notice that Plane.fem is flagged to indicate that it is
out of sync. This is because Plane.fem in Workspace 1 is
referring to Fuselage.fem version 1, which is no longer the
up to date version. This is also indicated on the
Fuselage.fem content being referenced by
Plane.fem.
Note: Click the icon to view references in the browser.
Right-click Fuselage.fem and select Version
History.
The Version History panel displays.
Click either version of Fuselage.fem to view its
properties in the Properties panel.
Click either version of Fuselage.fem,
hold the Control key, and click the other version so
that both versions are selected.
Right-click and select Compare Properties.
The two versions’ properties are displayed side by side with differences
highlighted in red.
Note: It is also possible to compare the file contents
themselves. Try setting a default diff program in the Collaboration Tools
Preferences (right-click and select Set Preferences
from the Organize browsercontext menu). Next, select the two versions of
Fuselage.fem, right-click, and select
Compare Docs Versions.
Click the Back to Standard View icon, , to return to the Organize tab standard view.
Right-click Plane.fem and select
Synchronize.
Version 2 of Plane.fem is created, using the up to
date version 2 of Fuselage.fem.
Click Yes to All to retrieve the updated plane and
references to Workspace 1.
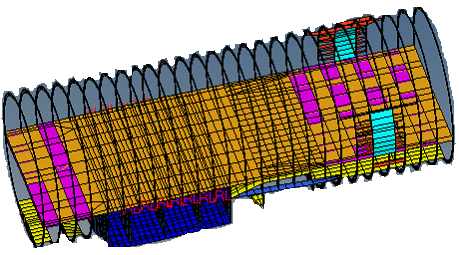
Right-click Plane.fem and select Import FE
Model.
The HyperMesh Import tab displays, with the path to
Plane.fem loaded.
Click Import.
The plane model, master and includes, are loaded into HyperMesh. Notice that version 2 of the plane contains
the latest version of the fuselage, with the skin component deleted. Figure 8.
Summary
In this tutorial you worked with the Organize browser to add an
existing managed library to your Personal repository.
You explored the contents of the library, and retrieved contents which were then
loaded in HyperMesh via the Collaboration Tools –
HyperMesh integration. You became familiar with life
cycle operations by checking out, modifying, and checking in a content and creating
a new version. You used the Version History panel to compare versions. And, finally,
you synchronized contents to work with the latest up-to-date information from the
repository.
 .
Now you can see the folder organization of the same contents. The contents are organized both within virtual categories, as well as physical folders.Note: The contents may belong to multiple categories, however, files may exist in only a single folder.
.
Now you can see the folder organization of the same contents. The contents are organized both within virtual categories, as well as physical folders.Note: The contents may belong to multiple categories, however, files may exist in only a single folder. , to view the references.
Now you can see, for example, that Plane.fem refers to its include files.
, to view the references.
Now you can see, for example, that Plane.fem refers to its include files.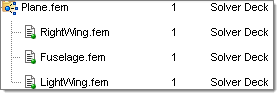
 icon. Notice that the document
Plane.fem is not retrieved. You can select any of
the referenced files and notice that they are also not retrieved. Because
this is a managed repository, the files are stored in the managed vault. To
view or edit files associated with contents, the files must be retrieved to
your workspace.
icon. Notice that the document
Plane.fem is not retrieved. You can select any of
the referenced files and notice that they are also not retrieved. Because
this is a managed repository, the files are stored in the managed vault. To
view or edit files associated with contents, the files must be retrieved to
your workspace. , and switch between Repository view,
  , to view contents in both locations.
 , to return to the Organize tab standard view.