Adaptive Wrapper
The Adaptive Wrapper is a useful utility to get a clean, water tight shell mesh out of 2D mesh containing several intersecting parts and small gaps which do not need to be modeled.
A hole-gap patching functionality with a user defined threshold helps to automatically close openings. You can define element refinement based on proximity, feature/intersection lines and refinement boxes. Before the wrapping process starts, the leak detection functionality can be used to check if the resulting wrapped surface mesh will create desired cavity or not with the given settings. Optional automatic surface remeshing of the wrapping result ensures good surface mesh quality.
To access this utility, from the menu bar, click .
- Wrapper selection
- Adaptive wrapper wraps the exterior of the entire input model. Using the Input
selection, select all elements for wrapping.
- Exclude volume by
- If you do not want to wrap a particular closed shell element, you need to create a seed point enclosed in those shell elements. These shells will not be present in the final results.
- Wrapper controls
-
- Features
- The features in the model that need to be refined. The three options are
Simple, Connected and User defined.
- Simple utilizes feature angles defined by you and extracts the features. Features that are extracted may be a closed loop of feature lines or floating feature lines.
- Connected also utilizes the feature angles you define and extracts the features, but this option only considers a closed loop of feature lines.
- You have to manually create features for refinement using the user defined option. For large models this option is useful if you do not want to refine features everywhere.
- Mesh parameters
-
- Max element size
- The maximum 2D element size in the model that will control the average element size.
- Min element size
- The minimum element size to be used for feature refinement. This controls how features are refined. If you want to precisely preserve features you should define the minimum element size accordingly.
- Gap patch tol
- A tolerance that is utilized to control which gaps should be closed. If two components/element groups have a gap between them within gap patch tolerance, the gap between them will be closed. To override the effect of the gap patch at specific components/element groups, you can define proximity control for them.
- Hole patch tol
- A tolerance that is utilized to control which holes will be closed. This will only consider closed loop free edges spanned within one component or multiple components.
- Proximity controls
- This utility is very useful to avoid contact between selected components and refine gaps between them. Consider proximity controls needs to be checked to consider refinement based on proximity.
- Refinement controls
-
- Element avg size
- Refines based on the average element size in the model.
- Curvature
- You have control over enabling or disabling refinement based on features. If this option is turned off refinement will not take place at features even though features are defined in wrapper parameters.
- Refinement Box
- You can create a refinement box to specify refinement at specific locations.
- Create
- Opens the Refinement box subpanel.
- Box
- Provides an option to select refinement boxes to be utilized for the wrapping job.
- Advanced options
-
- Create intersection lines
- If the input elements are intersecting and you want to refine wrapped mesh at those intersection lines, activate this option. If this option is not activated, intersection lines will not be specially treated.
- Organize wrap elements by base comps
- If this option is activated, the wrapped elements will split so that they are organized based on input components. Duplicate naming is not allowed, therefore the wrapped components will be named the original component name followed by _Wrap. If the Remesh with growth rate option is not activated, a component called Adaptive Wrapper will be created. If the Remesh with growth rate option is activated another component will be created called Adaptive Wrapper_Remesh.
- Remesh with growth rate
- This option will remesh the entire wrapped component with defined growth rate. The element size for remeshing will be automatically detected. If this option is selected along with the organize wrap elements by base comps option, then the wrapped components will be remeshed and named as the original component name followed by _Wrap_Remesh. Separate assemblies will be created for wrapped and remeshed components, as shown below.
-
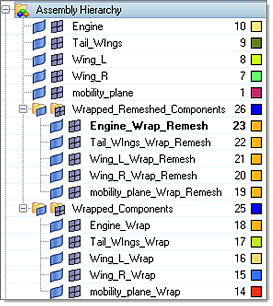
Figure 1.
- Quick leak detection
- For bigger models it is important to check for leaks before you start wrapping. For example, for external aero/underhood analysis, you want to make sure cabin, engine and fuel tank are properly sealed so that mesh will not be created there. After setting up all features, mesh parameters, proximity control and refinement settings define a node within shells to be enclosed by the wrapper. Clicking Check starts the leak detection process. If there are no leaks in the model, click Mesh. Using these parameters, if there are any leaks, they will be shown by 1D lines. You can close the bigger patches manually or increase the gap patch size to close theses gaps. By changing the parameters it might be possible that newly created patches might not seal the volume. It is always recommended to perform leak detection after all settings are defined.