Use the Add/Edit PolyNURBS tool to select a PolyNURBS sub tool or modify the shape of
a PolyNURBS object.
Location: Geometry ribbon, Create group
Editing PolyNURBS
Edit points, edges, and faces to modify the shape of a PolyNURBS object.
The shape of a PolyNURBS object can be modified by manipulating the shape of
its cage. To enter editing mode, select the main PolyNURBS tool or double-click a
PolyNURBS object.
Drag the cage's faces, edges, and vertices directly or use
the graphic manipulators to modify the cage.
Points can be dragged along the edges they connect and snapped to existing
points in the model.
Edges can be dragged along the faces they connect or along the edge itself.
Holding the Shift key while clicking creates an edge loop.
Faces can be dragged normal to their initial position. Holding the Ctrl key
while dragging a face creates a cage face and automatically activates push/pull
mode. Holding the Shift key while dragging creates a face inset.
When editing PolyNURBS, faces and edges can also be dragged and merged to other
PolyNURBS objects.
Edit a Point
Move or project a point to modify the shape of the PolyNURBS object.
To enter editing mode, double-click a PolyNURBS object.
Choose from the following options:
To
Do this
Move a point freely
Drag the point.
Move a selected point along an edge
When you select a point, three arrows appear.
Drag an arrow to move the point along the
edge.
Make selected points collinear
Click .
Project a selected point to the x-, y-, or z-axis
Click .
Edit an Edge
Move, lengthen, or shorten an edge to modify the shape of a PolyNURBS
object.
To enter editing mode, double-click a PolyNURBS object.
Choose from the following options:
To
Do this
Note
Move an edge freely
Drag the edge.
Move a selected edge within a plane
When you select an edge, arrows appear at the center of
the edge.
Drag an arrow at the center to move the edge within
the corresponding plane.
Lengthen or shorten a selected edge
When you select an edge, arrows appear at both ends of
the edge.
Drag an arrow at one of the ends to lengthen or
shorten the edge.
Hold down Ctrl while dragging to
lengthen or shorten both ends of the edge
symmetrically.
Edit a Face
Push, pull, scale, rotate, or project a face to modify the geometry of a
PolyNURBS.
To enter editing mode, double-click a PolyNURBS object.
Choose from the following options:
To
Do this
Note
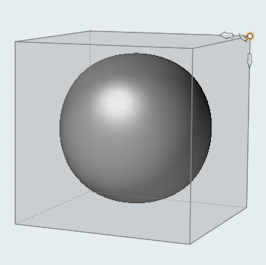
Push/pull a face (a precise distance)
Drag the face.
To push/pull the face a precise distance, enter a distance
in the microdialog.
Push/pull a selected face
When you select a face, an arrow appears at the center of
the face.
Drag the arrow at the center to push/pull the
face.
Hold down Ctrl while dragging to
create a new cage face.
Scale a selected face
When you select a face, planes appear at the corners of
the face.
Drag a plane at the corner to scale the face.
Hold down Ctrl while dragging
to scale the face about its center.
Hold down Ctrl+Shift while
dragging to scale the face about its center while
maintaining the original aspect ratio.
Rotate a selected face about its center
When you select a face, a curved arrow appears when you
hover over a corner or an edge. Figure 1. Hover over a cornerFigure 2. Hover over an edge
Drag the curved arrow to rotate the face about its
center.
Move an edge along the plane of a selected face
When you select a face, a straight arrow appears when you
hover over an edge.
Drag the straight arrow to move the edge along the
plane of the face.
Hold down Ctrl while dragging to
lengthen or shorten the original face symmetrically.
Project a selected face onto the dotted plane
Click .
Project a selected face to the x-, y-, or z-axis
Click .
Microdialog Options
Option
Description
Note
Open the Move tool to move the selected points, edges, or
faces.
Make the selected points collinear.
Only available when you select multiple points.
Flatten to face.
Clicking this icon will project the selected face onto the dotted
plane. If two edges are selected, clicking this icon will set the edges
parallel.
Project the selected point or face to the x-, y-, or z-axis.
Only available for points and faces.
Patch across free edges.
Only available when you have selected a connected set of PolyNURBS
edges. Double-click an edge to quickly select a connected set of
edges.
Tip: You can change the transparency of the underlying shape (STL or
optimization result) using the slider which appears next to the view
controls.
View Controls
The following additional view controls are available when editing
PolyNURBS.
You can change the transparency of the underlying shape (STL or optimization
result) using the slider which appears next to the view controls.
Click to toggle between showing PolyNURBS cages or
blocks.
Keyboard Shortcuts & Mouse Controls
To
Do this
Notes
Select all adjacent faces within a 30 degree tolerance
Select an edge
loop
Double-click
Temporarily disable snaps (PolyNURBS tool)
Change
the section preview so that it is aligned to the underlying shape rather than
parallel to the face (Wrap tool)
Alt
Change the transparency of the underlying shape (STL or optimization
result)
Alt+middle mouse scroll
Add to or remove from the selection
Create a new face when dragging a
face
Symmetric scaling of edges or faces when dragging certain graphic
manipulators
Ctrl
Uniform scaling of faces when dragging face plane manipulators
Ctrl+Shift
Delete selected points, edges, or faces
Delete edge loop
Delete
When you select points or edges on a solid PolyNURBS, the points or edges are
deleted and a solid is maintained. When you select a face on a solid PolyNURBS, the
face is deleted and a surface is created.
Delete selected points, edges, or faces
Delete+Shift
When you select points or edges on a solid PolyNURBS, the points or edges are
deleted and a solid is maintained. When you select a face on a solid PolyNURBS, the
face is deleted and a surface is created.
Hide polyNURBS, while keeping control cage visible
H
Create an edge loop when selecting an edge
Create an inset when selecting a
face
Shift
Exit tool
Right-click and mouse through the check mark to exit, or double-right-click.
 .
. .
.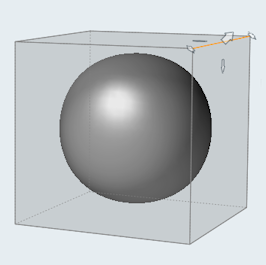

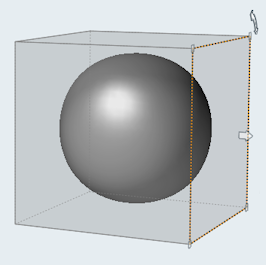 Figure 1. Hover over a corner
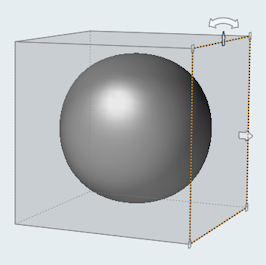 Figure 2. Hover over an edge
 .
.
 to toggle between showing PolyNURBS cages or
blocks.
to toggle between showing PolyNURBS cages or
blocks.