Roles
Overview
A Role is a group of Policies. Roles can be applied to any subject to create flexible and reusable authorization rules.
- Role
- This is the name of the Role. It must have the
role::prefix. - Subject
- The subject is the user, client or Role (yes, Roles can be inherited!) that will have the Role. A subject with a Role inherits all its permissions. Subjects can have multiple Roles.
As we said, a Role is a group of Policies, so it cannot exist if no Policies have been assigned to a Role. You have to create a Policy with your Role as a subject (even if it does not exist yet) before you can assign that Role to someone.
Root Role

Figure 1.
Example
guests Collection and invoke the
guest-function Function. We'll start by adding the Policies to the new Role:- Add Policy to grant access to the Collection:
- Subject:
role::guest. - Action:
#. - Effect:
allow. - Resource:
collections/guests/#.
- Subject:
- Add Policy to grant access to invoke the
Function:
- Subject:
role::guest. - Action:
#. - Effect:
allow. - Resource:
functions/guest-function/invoke.
- Subject:
- Finally we assign the Role to the user
imaguest:- Role:
role::guest - Subject:
imaguest
- Role:
Create a New Role
-
In , click New Role.

The New Role panel appears. The Name field is partially complete.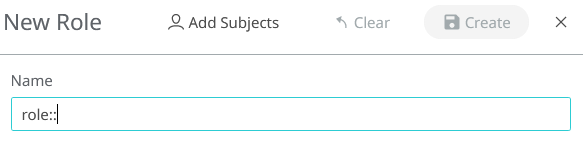
Figure 2. -
Click Add Subjects
 to select
the subjects (user, application or device) to assign to this role.
to select
the subjects (user, application or device) to assign to this role.
-
Enter the name of the subject to add.
An ID is generated for the added subject.
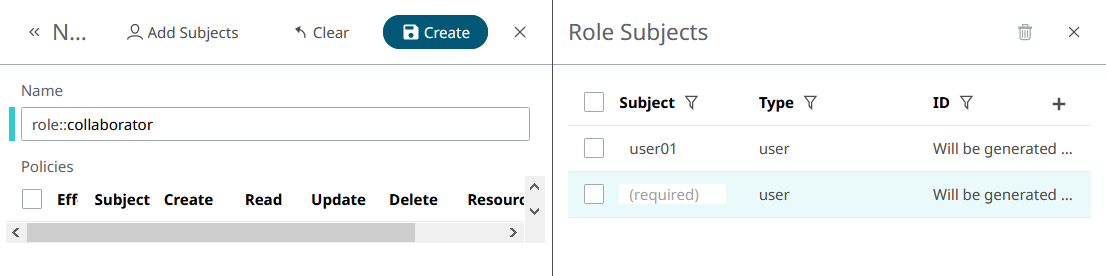
Figure 3. -
Some Policies appear by default. You can create more by
clicking the Add custom Policy button.
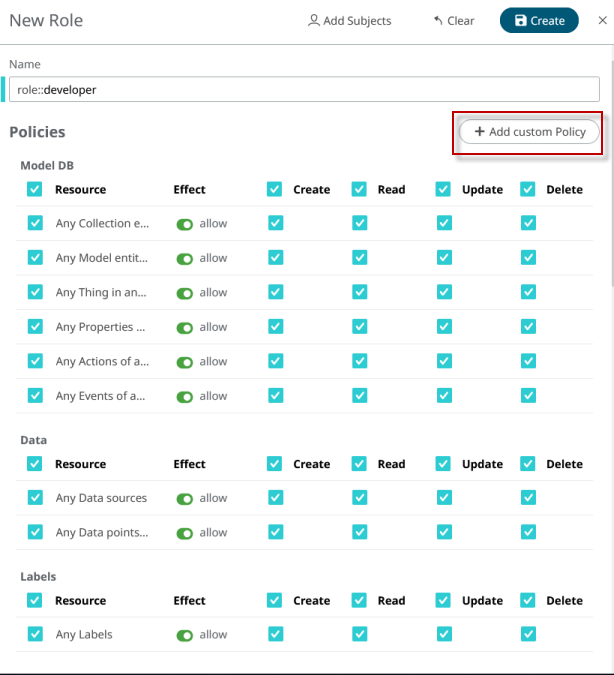
Figure 4.The Add Custom Policy panel appears.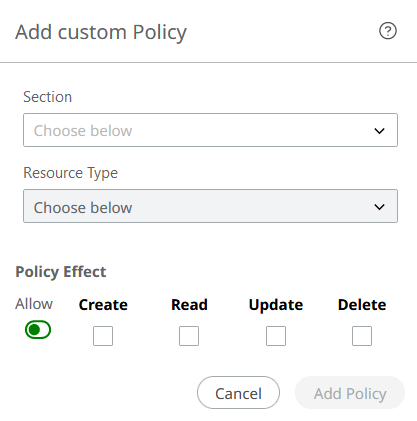
Figure 5. -
Select the configuration desired. In the example below, this Role allows for
all options: creating, reading, updating and deleting any resource.
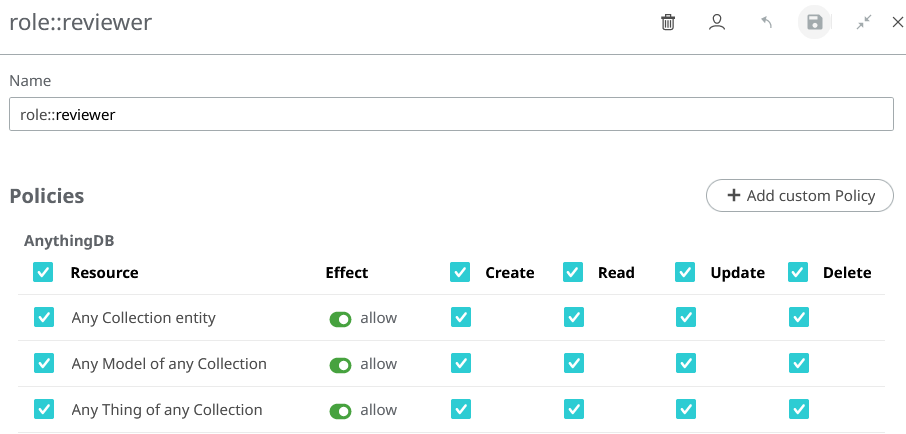
Figure 6.
Policies
Everything you can do in SmartWorks IoT is controlled by Policies. Policies are the individual permissions which you can assign to Roles, Users, Apps, and Things in the AnythingDB. Ultimately, Policies determine the level of access, which is then given out in the form of an Access Token.
- Subject (who this Policy applies to)
- Action (what a Policy can - or cannot - do with a resource)
- Effect (whether a Policy is permissive or restrictive)
- Resource (the entities or entity this Policy should rule)
Subject
SmartWorks IoT Policies can control Users, Clients, or Roles access to the application. These for the most part can be configured in the Access Control area of SmartWorks IoT.
Users (e.g. alice) are the people who log into SmartWorks IoT, either directly through the SmartWorks Studio
interface, or through the API, or even in the applications you create.
Roles (e.g. role::manager) are collections of permissions which can
be assigned to Users. These make it easy to assign the same set of permissions to
many different people.
Clients (e.g. app::01EZ4WV9NT61HQM1N7N69HP0F4) help you control
access to SmartWorks IoT data from external applications. This makes it
easy to limit or block access through known keys.
Action
- Create: Permission to add new resources.
- Read: Permission to read or retrieve the resource.
- Update: Permission to modify the resource.
- Delete: Permission to delete the resource.
When creating Policies via API, you can set more than one action
for the same Policy using a comma-separated list of actions
(e.g. read, read,update,
read,create,delete), or # as a shortcut for
create,read,update,delete.
Effect
Effect indicates if the Policy will grant access to a resource or
will deny it. Effect can be allow or deny.
Deny Policies always prevail over Allow Policies: If you have both allow and
deny
Policies over a specific resource, the subject will not be able
to access it.
allow effect and create
action over a resource will grant the subject to create that kind of resources.
However, the same Policy with a deny effect
will prevent the subject to create those resources.Resource
Resource, as the name suggests, indicates an entity or set of entities the Policy will rule over.
A resource is just a string that can describe one or multiple entities using a hierarchical notation. Resources can take wildcards, so they can be really flexible. Most Things in SmartWorks IoT can be controlled as resources.
Resource Notation
collections/warehouse/things/+warehouse
Collection". As you can see, every resource part is separated by /.
Let's analyze this resource in detail:collection: Resources, same as URLs, are hierarchical. Every Thing is inside a Collection, so the resource starts with the top level.warehouse: This is the name of the Collection that contains the Things for which you are creating the permission.things: The next level in the hierarchy: Things.+: This position should be occupied by a Thing ID, but instead there is a+character. This is a single-level wildcard. It means that this resource accepts any value in this specific position. So, this resource rules over all Things inside thewarehouseCollection.
+ wildcard in the Thing ID position, an
allow
Policy with this resource will grant the subject permission
to:- List all Things inside the
warehouseCollection or retrieve a specific Thing by its ID. This permission will require thereadaction. Note that listing is possible only because we used a wildcard. - Create a new Thing inside the
warehouseCollection. This permission will require thecreateaction. Creation will only be available if the resource have full access to what you want to create (Things in this case), so make sure to use a wildcard to allow full permission. Our resource has a+wildcard, so it's fine. - Update any existing Thing inside the
warehouseCollection. This will need theupdateaction. - Delete any existing Thing inside the
warehouseCollection. This will need thedeleteaction.Note: this resource example grants access to Things primary information, but not to their Properties, Actions or Events. This is because we used the single-level wildcard (+). Properties, Actions and Events are beyond the scope of this resource.
- Resources are hierarchical, so make sure you understand this hierarchy (or take a look at the resource table).
- Authorization Resources should be similar to URLs used to access that resource. This is not always the case, but it's a good rule of thumb.
- Use wildcards to allow (or deny) listing and creation of entities.
Resource Wildcards
When creating a Policy over a resource, it can specify an exact resource, or it can use wildcards to apply that Policy over multiple resources simultaneously.
_single-level and
_multi-level.- Single Level:
+ - As the name suggests, a single-level wildcard replaces one resource level. The plus symbol represents a single-level wildcard in a resource.
- Multi Level:
# - The multi-level wildcard covers many resource levels. The hash symbol
represents the multi-level wildcard in a resource. The multi-level
wildcard must always be placed as the last character in the resource and
preceded by
/.
Of course, you can combine wildcards in the same resource.
collections/+/things/#- YES:
collections/warehouse/things/+ - YES:
collections/warehouse/things/01EZ7E5PSQYZH2S3JHS1F1ZGBA/properties/temperature - YES:
collections/office/things/01EZ7E69ZQ4XMSCDD9E6WK1JR6
Resource Table
This is the complete list of resources that you can use in your Policies, and their scope (what a Policy rules over).
| Resources for Apps | Scope |
|---|---|
apps/<APP_ID> |
Apps. Use apps/+ for listing and creation
permission. |
| Resources for Edge Compute Platform | Scope |
|---|---|
build-configs/<BUILD_CONFIG_ID> |
Build-Configs (ECP). Use build-configs/+ for
listing and creating permission. |
build-configs/<BUILD_CONFIG_ID>/generate-file |
Build-Config generation (ECP). This is an action resource and
needs create action. |
resources/<RESOURCE_ID> |
Resource (ECP). Use resources/+ for listing and
creation. |
resources/<RESOURCE_ID>/params/<PARAM_ID> |
Update or delete a Resource Param (needs update
and/or delete action) (ECP). |
| Resources for Cluster Management | Scope |
|---|---|
clusters/<CLUSTER_ID> |
Clusters. clusters/+ for creation. |
clusters/<CLUSTER_ID>/reinstall |
Reinstall a cluster. This is an action resource and needs
create action. |
| Resources for ModelDB | Scope |
|---|---|
collections/<COLLECTION_NAME> |
Collections. Use collections/+ for listing and
creation. |
collections/<COLLECTION_NAME>/models/<MODEL_NAME> |
Models. Use
collections/<COLLECTION_NAME>/models/+ for
listing and creation. |
collections/<COLLECTION_NAME>/models/<MODEL_NAME>/versions/<VERSION_NAME> |
Model versions. Use
collections/<COLLECTION_NAME>/models/<MODEL_NAME>/versions/+
for listing and creation. |
collections/<COLLECTION_NAME>/things/<THING_ID> |
Thing. Use
collections/<COLLECTION_NAME>/things/+ for
listing and creation. |
collections/<COLLECTION_NAME>/things/<THING_ID>/properties/<PROPERTY_NAME> |
Retrieve or update Thing properties. |
collections/<COLLECTION_NAME>/things/<THING_ID>/actions/<ACTION_NAME> |
Retrieve or create a Thing Action (needs
read and/or create). |
collections/<COLLECTION_NAME>/things/<THING_ID>/actions/+/<ACTION_ID> |
Retrieve, update or delete a Thing Action history element. |
collections/<COLLECTION_NAME>/things/<THING_ID>/events/<EVENT_NAME> |
Retrieve or create a Thing Event (needs
read and/or create). |
collections/<COLLECTION_NAME>/things/<THING_ID>/events/+/<EVENT_ID> |
Retrieve a Thing Event history element. |
collections/<COLLECTION_NAME>/things/<THING_ID>/+/+ |
Thing Properties, Actions and Events (all at once). |
collections/<COLLECTION_NAME>/+/+ |
Models and Things. |
| Resources for Data Management | Scope |
|---|---|
sources/<SOURCE_ID> |
Source. |
sources/<SOURCE_ID>/data/<DATA_ID> |
Create, retrieve and delete data. |
| Resources for Labels | Scope |
|---|---|
labels/<LABEL_ID> |
Labels. Use labels/+ for listing and
creation. |
labels/<LABEL_ID>/relations |
Create, retrieve or delete label relations. |
| Resources for MQTT Management | Scope |
|---|---|
mqtt/labels/<LABEL_ID> |
Retrieve, update and delete MQTT Label Credentials. |
mqtt/credentials/<MQTT_CREDENTIALS_ID> |
Retrieve or update MQTT Credentials. |
mqtt/things/<THING_ID> |
Thing MQTT Credentials. Read only (needs read
action). |
mqtt/credentials-username/<USER_NAME> |
Update MQTT password (needs update
action). |
| Resources for Functions | Scope |
|---|---|
functions/<FUNCTION_NAME> |
Functions. Use functions/+ for listing and
creation. |
functions/<FUNCTION_NAME>/invoke |
Function invocation. The action depends on the HTTP verb used in the invocation request. |
functions/<FUNCTION_NAME>/async-invoke |
Function asynchronous invocation. Action resource (needs
create action). |
functions/<FUNCTION_NAME>/logs |
Function logs. Read only (needs read
action). |
functions/<FUNCTION_NAME>/code |
Function code. Read only (needs read
action). |
| Resources for Space and User Management | Scope |
|---|---|
invitations/<INVITATION_ID> |
Invitations. Manage sent invitations. Use
invitations/+ for sending invitations. |
users/<USER_NAME> |
Retrieve or delete users (needs read and/or
delete actions). |
| Resources for Role Management | Scope |
|---|---|
roles/<ROLE_ID> |
Roles. Use roles/+ for listing and
creation. |
An element with a placeholder like <COLLECTION_NAME>
in it means that you should replace that piece of the resource with the name of a
Collection.
labels/+ is a valid resource,
but +/my_label is not.+ wildcard. These are convenience resources that allows
to address more than one type of resource at once. You can replace this last
single-level + wildcard with a multi-level #
wildcard if you need a wider scope for your resource.# is a special resource you can use to give (or deny) full
access inside your Space. Use this power wisely.Manage Permissions
All the above resources can rule over a specific set of entities. However, even if you have permissions to, e.g. create Things, it does not mean that you can give the same permissions to some other user.
To be able to manage permissions you need a Policy with a resource over
Policies. These resources can easily be built by adding the
policies/ prefix to any of the shown resources.
For example, if alice has an allow
Policy with # action and resource
policies/collections/#, it means that alice
will be able to create, retrieve (or list), update or delete any Policy over
Collections, Things, Models... (note the # wildcard). However, it
doesn't mean that alice can create, retrieve, update or delete
Collections, Things... That Policy gives alice authorized only to
manage permissions.
In the same way, if bob has an allow
Policy with # action and resource collections/#,
bob will be able to create, retrieve, update or delete
Collections, Things, Models... but this Policy will not allow bob
to create, retrieve, update or delete Policies over these resources.
An exception to this is the # permission, which grants
full access also to Policies as well.
Policy Examples
The following are a few examples of how Policies can be used:
Example 1
Allow Alice to read and update the Properties of any Thing in
Collection my_collection.
- Subject:
alice, which is Alice's username. - Action:
read,update. - Effect:
allow. - Resource:
collections/my_collection/things/+/properties/+.
Example 2
say-hello. We want to "allow the App with
ID 01EZ7JBK6673BDSWERNBNHQ3B2 to invoke the say-hello Function".
Functions can be invoked synchronously or asynchronously. If we want our App to be
able to use both methods, we'll add two Policies:- Policy 1:
- Subject:
app::01EZ7JBK6673BDSWERNBNHQ3B2. This is the Client ID of our App. - Action:
create. We are giving permission to our App to invoke the Function only withPOSTrequests. - Effect:
allow. - Resource:
functions/say-hello/invoke.
- Subject:
- Policy 2:
- Subject:
app::01EZ7JBK6673BDSWERNBNHQ3B2. - Action:
create. - Effect:
allow. - Resource:
functions/say-hello/async-invoke.
- Subject:
Example 3
role::guest` to create, update or delete
the anything in the whole Space".- Subject:
role::guest. Remember that you can use a Role as subject! - Action:
create,update,delete. - Effect:
deny. - Resource:
#. This resource will have effect over everything in your Space.
Example 4
role::administrator to read, create, update or delete any
Policy".- Subject:
role::administrator. - Action:
#. You can use#as a shortcut forcreate,read,update,delete. - Effect:
allow. - Resource:
policies/#.