


|
Working with the Hub Element
As we mentioned in the previous lesson, the Hub element is an export element in Visual Process Designer that allows you to define how to group multiple input files and the order in which they are processed. In this lesson, we will look more closely at the Hub element and see how it handles multiple input files.
|
|
NOTES Before we proceed, make sure that you have a couple of input files to work on, as well as a model. We will use them in the sample Visual Process below. |
|
|
|
|
|

In the File inputs processing setting of the Hub element, you have three options, as we described previously.

Let’s see how these options differ by creating a new Visual Process.
Steps
1. Create a new process as you’ve learned in the beginning of Lesson 6. On the Navigation Tree, click Automator, click Visual Processes, and select Processes. Click the Add icon  , and then choose Blank Process.
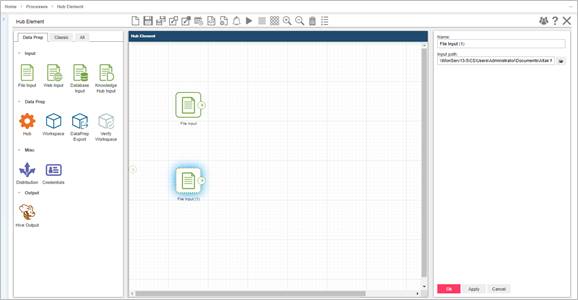
2. Rename the workspace accordingly (e.g., Hub Element), and then add two input files (e.g., File Input and File Input (1)). Apply the necessary changes in the Property panel.
Click Apply.
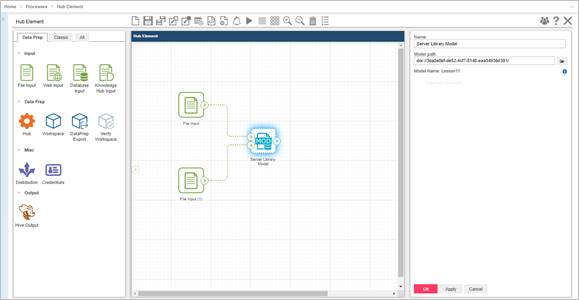
3. Add your desired model to the workspace by dragging the Server Library Model element found in the Classic tab of the Process Designer Library. Connect the two File Input elements to it, and modify the settings in the Property panel.
Click Apply.
4. Add a Hub element to the workspace, and connect to it the Server Library Model element.

Before we proceed with modifying the properties of the Hub element, let’s connect it first to a Table Export element to see how it treats an export.
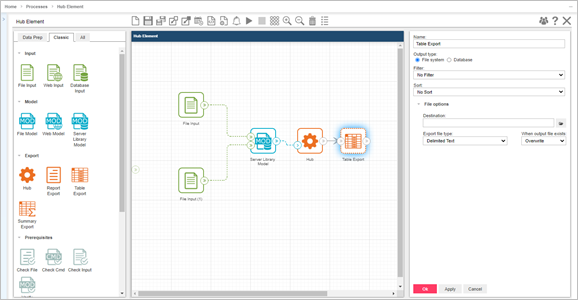
5. Add a Table Export element, and connect to it the Hub element. As usual, modify the settings in the Property panel.
Click Ok.
Let’s now add a Distribution element to clearly observe how the Hub element treats distributions in the Visual Process.
6. Add a Distribution element, and connect to it the Table Export element.
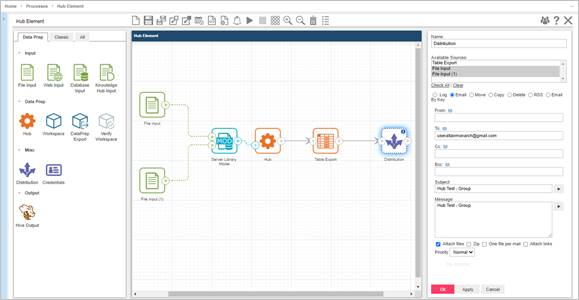
In the Property panel, modify the following settings:
· Under Available Sources, choose the two file inputs we used (i.e., File Input and File Input (1) in the screenshot).
· Choose Email distribution, and fill in the details.
· Choose Attach files so we can later observe how the Hub element treats the input files we used.
Click Ok.
Now we are ready to try out the file inputs processing of the Hub element.
File inputs processing: Group
The Hub element can process file inputs by group. Let’s go back to the Property panel of the Hub element and modify the settings.
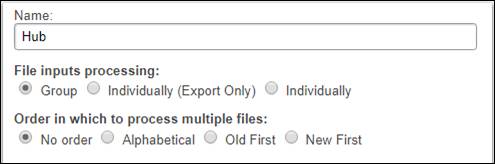
a. In the Property panel, give the Hub element a name.
b. Under File inputs processing, select Group.
c. In the Order in which to process multiple files, retain the default option (i.e., No order).
Click Ok.
d. With a complete Visual Process, let’s try running it by clicking the Save and Run button  .
.
Result – File inputs processing: Group
As we mentioned previously, the Group setting allows the Hub element to process the file inputs by group. Let’s look at how the Hub element treated the Table Export. In the Log Mode, the result should be something like this.


Here, the Hub element exported the file inputs as one file (i.e., Classic.pdf), as shown in the Export Location.
As for the email distribution, the result is as follows.

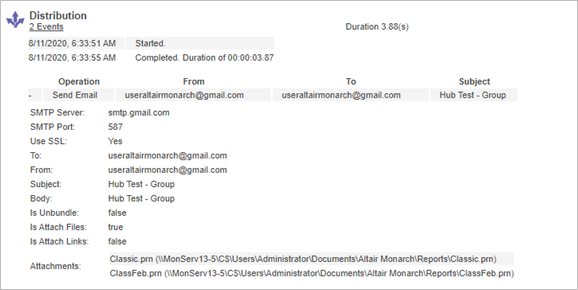
As we selected the two input files in the Distribution Property panel, both input files were sent as attachments in one email.
File inputs processing: Individually (Export Only)
The Hub element can process file inputs separately for export actions. Let’s go back to the Property panel of the Hub element and modify the settings.
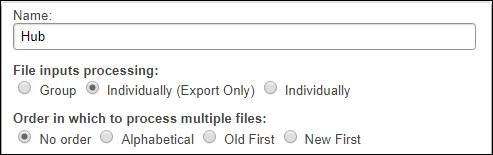
a. In the Property panel, give the Hub element a name.
b. Under File inputs processing, select Individual (Export Only).
c. In the Order in which to process multiple files, retain the default option (i.e., No order).
Click Ok.
d. With a complete Visual Process, let’s try running it by clicking the Save and Run button .
Result – File inputs processing: Individually (Export Only)
As we mentioned previously, the Individually (Export Only) setting allows the Hub element to process the file inputs separately during export. Let’s look at how the Hub element treated the Table Export. In the Log Mode, the result should be something like this.


Here, the Hub element exported the file inputs into two separate files simultaneously (i.e., Classic.pdf), as shown in the Export Location.
As for the email distribution, the result is as follows.


As we selected the two input files in the Distribution Property panel, both input files were sent as attachments in one email, similar to that under the Group setting. You will notice that the distributions of the two files were performed simultaneously.
File inputs processing: Individually
The Hub element can process file inputs separately for actions apart from export. Let’s go back to the Property panel of the Hub element and modify the settings.
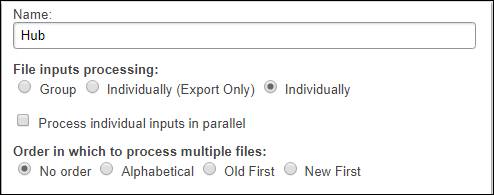
a. In the Property panel, give the Hub element a name.
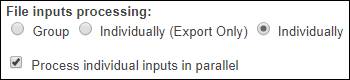
b. Under File inputs processing, select Individually. Leave the checkbox (Process individual inputs in parallel) unmarked.
c. In the Order in which to process multiple files, retain the default option (i.e., No order).
Click Ok.
d. With a complete Visual Process, let’s try running it by clicking the Save and Run button .
Result – File inputs processing: Individually
As we mentioned previously, the Individually setting allows the Hub element to process the file inputs separately for all actions following the Hub element. Let’s look at how the Hub element treated the Table Export. In the Log Mode, the result should be something like this.


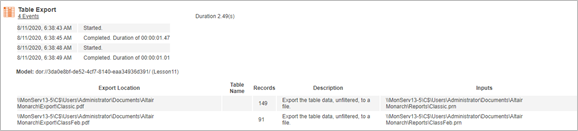
Here, the Hub element exported the file inputs into two separate files, as shown in the Export Location. But note that the export was performed consecutively and not simultaneously, as indicated by the pink boxes above. In sum, the export action for the first file input is started and completed first before the next export action for the second file input is started and completed.
As for the email distribution, the result is as follows.


As we selected the two input files in the Distribution Property panel, both input files were sent as attachments in two separate emails. Similar to the Table Export, the email action for the first file input is started and completed first before the email action for the second file input is started and completed. This is because the Hub element processed the input files separately and consecutively.
|
|
NOTES When we select the Individually option in the Hub element, a checkbox is shown, i.e., Process individual inputs in parallel.
Once this checkbox is selected, the icon of the Hub element changes from
The same change can be seen for the export elements when the Individually (Export Only) option is selected. For example, As for the Individually option, the same change in the appearance of icons is observed not only in the export elements but also in the distribution and script elements.
Note that only 10 inputs can be processed in parallel under the Individually setting because the default Max Threads setting in the Automator Dispatcher Service Host is 10. This value can be changed in Configurator. For more details about the Max Threads setting, refer to Monarch Server Configurator Guide (see Configuring Servers). |
|
|
|
|
|
 to
to  . This is because all actions after the Hub element are performed in parallel, meaning all actions are started consecutively and completed consecutively, as shown below.
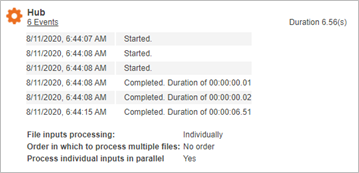
 becomes
  .
.
Go ahead and try out the Hub element using several file inputs.