


|
Adding a Global Distribution
Let’s try adding a global distribution to the project file. Remember that global distributions apply to any input files that are used in all processes when run, as well as to any export files and portable reports that are produced by all processes in the folders specified.
Steps
1. On the Navigation Tree, click Show Advanced options. Under Automator, click Standard Processes, and select Distributions.
2. Click the Add icon  to display the Distribution page.

3. In the Location field select your server location name from the drop-down list.
|
|
NOTES If the required server is not on the list, refer to the "Locations Management" topic in the web help. |
|
|
|
|
|

In case of a single server configuration refer to "Monarch Server Configurator Guide" to change location settings.
4. In the Path field specify the path to the Exports folder: C:\Users\Public\Documents\Altair Monarch\Export.
This field is used to specify the folder where the file(s) that we want to distribute will be located. We entered the path to the output file in order to distribute the output file of a process.
5. Click the Add Actions button to add action to the distribution.
6. On the displayed page click the Add New Action icon . The Action page where we can select the kind of distribution action to occur will be displayed.
7. Let’s assume that we want our global distribution to copy project output files. To do so, we should select the Copy option.
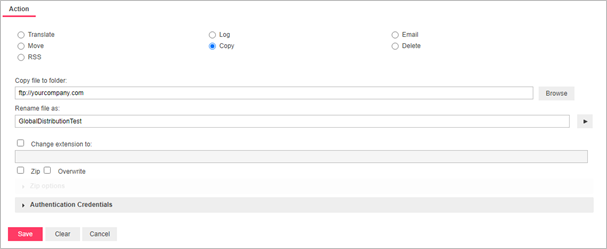
8. In the Copy file to folder field, specify the folder to which we want to copy the output file(s). Let’s assume we want to copy the output file(s) to a company’s FTP site so we enter the URL of the company’s FTP site (for example, ftp://yourcompany.com).
|
|
NOTES You may not follow along with the tutorial if you don’t have an FTP site to which you can copy files. If you prefer, you may copy the files to a local or network folder by using the Browse button to select the location. For more information, refer to the Copy Distribution Action topic in the web help. |
|
|
|
|
|
9. In the Rename file as field enter GlobalDistributionTest.
10. Click the Insert Macro button  to display the drop-down list of file-naming macros, and then select Job Number. This will add the job number to the file name we specified.
11. Click the Authentication Credentials drop-down arrow, which appears when you enter "ftp://" or "http://" in the folder path, to specify the authentication credentials:
· Enter your username and password in corresponding fields
· Specify domain (if required)
· Select the Ascii check box to specify an ASCII mode transfer for your FTP distribution rather than binary mode, which is the default
|
|
NOTES ASCII Mode should only be used for text-only files such as TXT, ASP, HTML, while binary mode can be used for anything else, for example, DOC, ZIP, XLS. If in doubt as to which transfer mode to use, go with the default mode of binary (to do so, do not select this check box). |
|
|
|
|
|
12. Click the Save button to add the action and save the distribution.
Note that the distribution is now listed on the Distributions page. If you were to run this process, the output file would be copied to your company’s FTP site.