Push/Pull Faces
Push and pull a face, line, or 2D edge to extrude it into a solid or surface, create or resize a hole, eliminate rounds, or modify wall thickness.
Extrude a Face, Line, or 2D Edge
-
Open the Push/Pull tool in one of the following ways:
- Press P.
- Double-click a part.
- On the Geometry tab, in the
Modify
group, click the Push/Pull Faces tool.

-
Push or pull it in one of the following ways:
- Drag the selected object. To make it a new part, hold down Shift or Ctrl while dragging.
- Type a precise distance in the microdialog. A positive value extends, whereas a negative value contracts.
- Drag the gray pyramid on the ruler to position the start point for the measurement, then drag the white arrow or enter a value in the microdialog to position the end point.
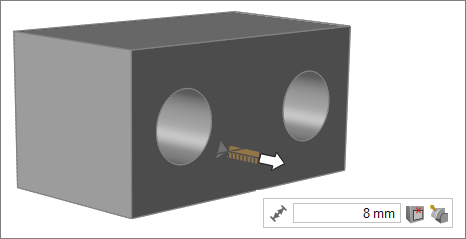
Figure 1. Pulling a Face
- 2D edges can only be pulled, not pushed.
- To place multiple solid bodies into separate parts, right-click, and then click Make new parts from solids on the context menu.
- Use snap points to align faces or subfaces so they are at the same level, or make one face flush with another. When pushing and pulling faces and subfaces, objects automatically snap to snap points such as end points, center points, quad points, and midpoints. When pulling, you need to drag the cursor towards a particular hotspot on the part you want to align to, or the face will not snap. If the right hotspot is not becoming active as you drag, try rotating the view slightly.
Create or Resize a Hole
-
Open the Push/Pull tool in one of the following ways:
- Press P.
- Double-click a part.
- On the Geometry tab, in the
Modify
group, click the Push/Pull Faces tool.
Eliminate Rounds
When you extend a face that has rounds adjacent to it, the rounds are moved with the face. Sometimes, complex rounds and blends will prevent a face from moving because they cannot be reconstructed at the desired position if the face is moved. If you do not care about retaining the rounds, you can often free up a stuck face by extending the round with the Push/Pull tool until it becomes a sharp corner. If the face is a simple cylindrical round, the radius should change as you pull. If the round does not change, the geometry is too complex for the Push/Pull tool to modify.
-
Open the Push/Pull tool in one of the following ways:
- Press P.
- Double-click a part.
- On the Geometry tab, in the
Modify
group, click the Push/Pull Faces tool.
Microdialog Options
| Option | Description |
|---|---|
| Autoheal |
Absorbs the face that you just pulled to into the surrounding face. |
| Don't preserve blends |
Breaks the continuity between a flat face and an adjacent round. |
Keyboard Shortcuts & Mouse Controls
| To | Do this |
|---|---|
| Activate the Push/Pull tool | P or double-click |
| Make the object a new part | Shift or Ctrl |
| Exit tool | Right-click and mouse through the check mark to exit, or double-right-click. |