|
»Click here to display Table of Contents«
|

Billet Skin Tracking |

|

|

|

|
|
Billet Skin Tracking |
|
|
|

|
|
»Click here to display Table of Contents«
|
Billet Skin Tracking |
|
|
|
|
|
Billet Skin Tracking |
|
|
|
|
Billet skin tracking is used to determine when the material in the billet skin area enters the product. Thus, you can detect when the impurities in the skin start to flow into the product and hence, determine the butt length.
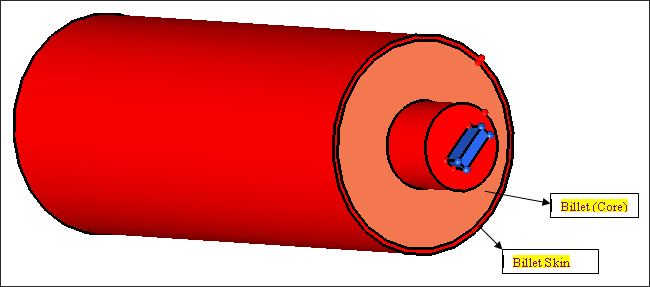
Prerequisite is the model should have two solids for Billet: 1) Billet (core) and 2) BilletSkin.
| 1. | In the Process Data page of Set Analysis Requirements, select Yes for the “Want to do SKIN TRACKING” question. |
| 2. | In the fourth checkbox in the Generate Mesh page of the Extrusion Wizard, click Mesh. The BilletSkin3D component is generated. |
There are four steps in setting up the problem for skin tracking analysis.
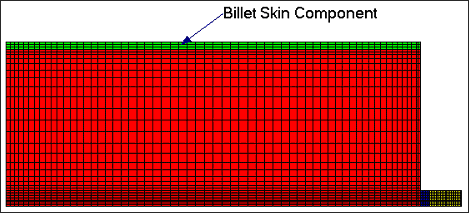
| 1. | Mesh the problem so that the skin elements of the billet are stored in a separate component. These elements should be on the billet surface and within 2-5 mm from the surface. This layer should have at least two elements through the thickness. The HX solver will identify the material in this component as the skin material and track how it is transported during the process. |
| 2. | Set the parameter Billet Skin Tracking in the Parameters dialog to on. You will be able to set this parameter only if the analysis type is transient. |
| 3. | In the same panel, set the Skin Component: field to BilletSkin3D. |
![]()
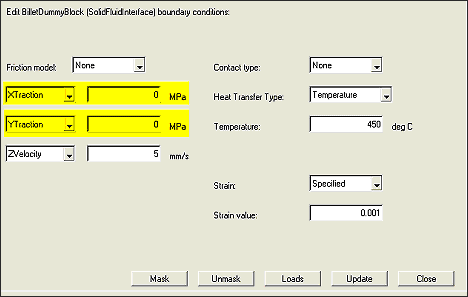
| 4. | In the Billet Dummy Block BC, you should specify the tangential tractions to zero (instead of the default condition – tangential velocities are zero). That is, if the extrusion direction is Z-axis, then X-Traction and Y-Traction should be set to 0. This will allow the material to slip on the back end. In order to specify this condition, use SolidFluidInterface BC for this BC instead of Inflow BC. |
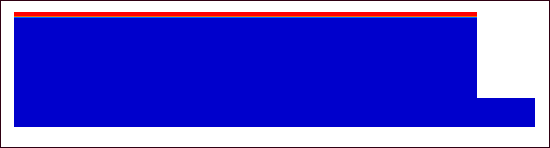
| 5. | To see sample results, refer to the example files SkinTracking2D.grf and SkinTracking2D.tcl in your installation directory. The following three images show how the billet material is transported as the extrusion proceeds. The image below shows the initial condition and the skin material is shown in red. |
The image below shows the state of skin material after 20 seconds; notice the skin material slipping on the back end.
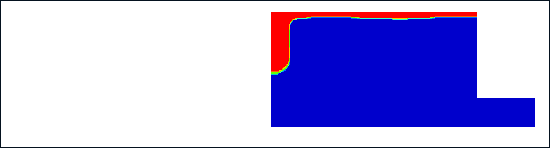
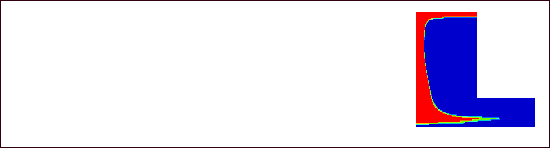
In this example, skin material enters the product after 30 seconds, which is shown in the image below. If the extrusion is not stopped at this point, skin impurities will affect the product quality. This criterion can be used to determine the butt length.