


|
REST Transform
A REST Transform can be used when you have access to a REST API that accepts a POST or PUT request, containing data in a JSON-formatted request body. The API is expected to apply a specific transform or calculation on the data and returns the resulting data set. Typically, any REST API used this way is created and made available by your own organization, since the owner of the REST API will be able to monitor any data handed to it. Using a REST Transform is an alternative to using a Python Transform or R Transform. There are various cloud services that facilitate the task of exposing your code as a REST API.
Steps:
1. Click the Transform Settings button on the Data Sources Setting pane.
The Transform Settings pane displays.
2. Click  .
.
The Transform Settings pane changes to display the REST Transform Settings.
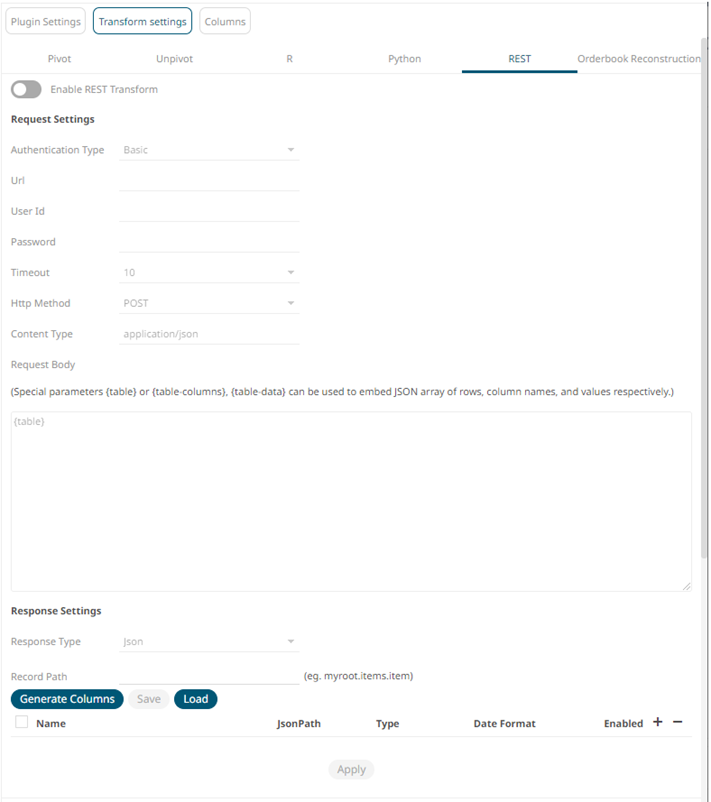
3. Tap the Enable REST Transform slider.
The
Transform Settings button and REST tab change to  and
and
 ,
respectively.
,
respectively.
4. On the Request Settings section, define or select the following required properties:
|
Property |
Description |
|
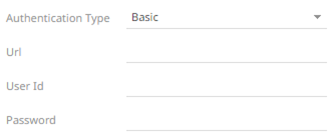
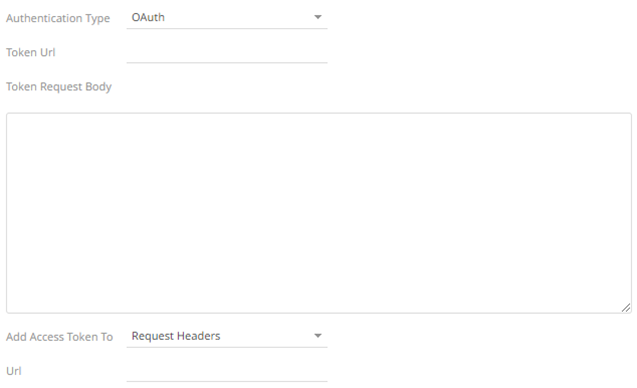
Authentication Type |
· Basic
Enter the URL of the REST API. Then enter the User Id and the Password that will be used to the connect to the REST API.
· OAuth
Then enter the following settings: o Token URL – The URL to retrieve the access token from. o Token Request Body – The request body used for access token requests. o Add Access Token To - The Access token retrieved from the Token URL can be added to headers, URL or request body, depending on how the REST endpoint needs the token.
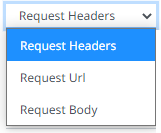
§ Request Header - A header is automatically added to the REST API request. § Request URL - The URL needs to be manually parameterised with a {access_token} parameter, before calling the REST API, the parameter is replaced with the actual token. § Request Body - The Request Body needs to be manually parameterised with a {access_token} parameter, before calling the REST API, the parameter is replaced with the actual token. o URL – The URL of the REST API.
|
|
Timeout |
The length of time to wait for the server response (10 to 300). Default is 10. |
|
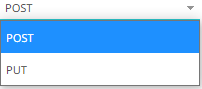
HTTP Method |
Select the appropriate HTTP method for the request from the following options:
· POST – add new data · PUT – replace existing data |
|
Content Type |
The only supported content type is application/json. This value cannot be changed. |
5. Enter the Request Body.
The request body is required to always be JSON formatted. The request body JSON should be structured to conform with what the target REST API is expecting. To the extent that the REST API you are using supports it, you can include any values or Panopticon parameter references in the request body. There are three special parameters to use for referencing the dataset you send as part of your request:
|
Parameter |
Description |
|
{table} |
Returns a JSON or Python dictionary along with the KEY and the values. For example, when used, the data in the response is: [{'ProductIds': 1.0, 'rel': 'a'}, {'ProductIds': 2.0, 'rel': 'b'}, {'ProductIds': 3.0, 'rel': 'c'}, {'ProductIds': 4.0, 'rel': 'd'}, {'ProductIds': 5.0, 'rel': 'e'}] |
|
{table-columns} |
Just the column names of the dataset. |
|
{table-data} |
Returns rows of pure data in the following form: [[1.0, 'a'], [2.0, 'b'], [3.0, 'c'], [4.0, 'd'], [5.0, 'e']] This example is a list of lists in Python. |
In the example below, a JSON object has been constructed, consisting of three name-value pairs. The first two are referencing a couple of parameters that have also been defined on the data table in Panopticon, and the third one is referencing the {table} parameter. Where {table] is referenced, Panopticon will insert a JSON array of dictionaries (JSON objects of one name-value pair per column, and one such object per row in the dataset).
{
"requestId":{reqId},
"requestTime":"{_current_time_utc}",
"data":{table-data}
}
6. Select the Response Type:
· JSON
If JSON is selected, enter the Record Path which allows the identification of multiple records within the JSON document (e.g., myroot.items.item)

· Text
If Text is selected, confirm the Text Qualifier, Column Delimiter, and if the first row of the message includes column headings.
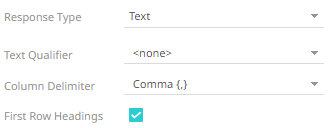
The Column Index controls the position of a column, ensure the value is >= 0.
· XML
If XML is selected, enter the Record XPath which allows the selection of records within the XML document (e.g., //myroot/items/item).
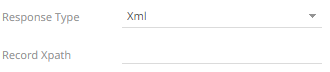
Prepend 'default:' for the elements falling under default namespace.
6 Click  to the fetch the schema based
on the connection details. Consequently, the list of columns with
the data type found from inspecting the first ‘n’ rows of the input
data source is populated and the Save button is enabled.
to the fetch the schema based
on the connection details. Consequently, the list of columns with
the data type found from inspecting the first ‘n’ rows of the input
data source is populated and the Save button is enabled.
7. You can also opt to load or save a copy of the column definition.
8. Click  to add columns and specify their properties:
|
Property |
Description |
|
Name |
The column name of the source schema. |
|
JsonPath/Text Column Index/XPath |
The JsonPath/Text Column Index/XPath of the source schema. |
|
Type |
The data type of the column. Can be a Text, Numeric, or Time |
|
Date Format |
The format when the data type is Time. |
|
Enabled |
Determines whether the message field should be processed. |
To
delete a column, check its  or all the column entries, check
the topmost
or all the column entries, check
the topmost  ,
then click
,
then click  .
.
9. Click  , then
  to see the output columns from
the REST transform.
to see the output columns from
the REST transform.
10. Refer to Enable Time Series Analysis for more information in enabling this feature.