


|
AMPS
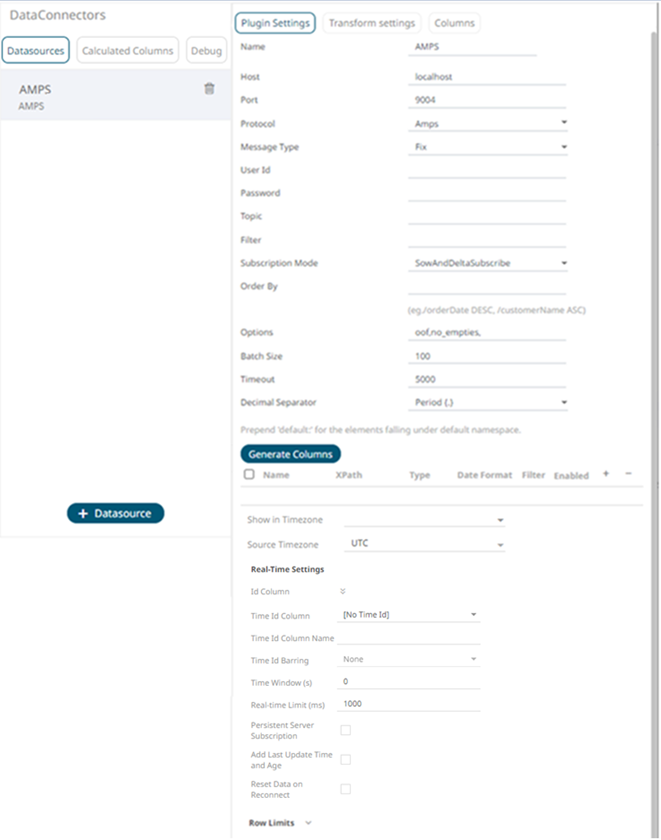
The AMPS connector allows connection to AMPS message bus on a real-time streaming basis. The connector allows Panopticon to subscribe to the Native FIX and XML message support. The data format itself is arbitrary, and in turn the connection includes the message definition.
Steps:
1. Select AMPS from the Data Sources pane. The AMPS Settings pane and the retrieved AMPS source are displayed.
2. Enter the Name of the AMPS data
source, then click  .
.
3. Enter the following information:
|
Property |
Description |
|
Host |
AMPS host address. |
|
Port |
AMPS host port. Default is 9004. |
|
User Id |
The user Id that will be used to connect to the AMPS service. |
|
Password |
The password to connect to the AMPS service. |
|
Topic |
The topic or queue physical name. |
|
Filter |
The filter expression. |
4. Select the Protocol. This will specify the format of the headers:
· Amps (default)
· Fix
· NvFix
· XML
5. Select the Message Type. This will specify the format of the data within the message:
· Fix (default)
· XML
· NvFix
· JSON
If JSON is selected, the Record Path field is displayed.

Enter the record path which allows the identification of multiple records within the JSON document (e.g., myroot.items.item).
6. Select from any of the following Subscription Modes:
· Sow
· SowAndSubscribe
· SowAndDeltaSubscribe (default)
· Subscribe
· DeltaSubcribe
7. Enter the Order By Statement in order to limit the returned data. For example:
/orderDate DESC
/custumerName ASC
8. Enter any of the following Option/s for the selected Subscription Mode:
· cancel
· live
· no_empties
· null
· no_sowkey
· oof
· pause
· replace
· resume
· send_keys
· timestamp
|
NOTE |
Leave the Options box blank if you selected the Subscribe subscription mode.
|
9. Enter the Batch Size. This is the number of messages that will be sent at a time as results are returned. Default is 100.
10. Enter the Timeout for the length of time to wait for the Server response. Default is 5000.
11. Select either the dot (.) or comma (,) as the Decimal Separator.
12. Click  to the fetch the schema based
on the connection details. This populates the list of columns with
the data type found from inspecting the first ‘n’ rows of the input
data source.
to the fetch the schema based
on the connection details. This populates the list of columns with
the data type found from inspecting the first ‘n’ rows of the input
data source.
This also populates the Id Column with the set of columns, of arbitrary type, that can be concatenated to form a unique row identifier.
13. Click  . This adds columns to the AMPS connection
that will represent sections of the message.
. This adds columns to the AMPS connection
that will represent sections of the message.
14. Provide the following information:
|
Property |
Description |
|
Name |
The column name of the source schema. |
|
Fix Tag/XPath/Json Path |
The Fix Tag/XPath/Json Path of the source schema. |
|
Type |
The data type of the column. Can be a Text, Numeric, or Time |
|
Date Format |
The format when the data type is Time. |
|
Filter |
Defined parameters that can be used as filter. Only available for Fix, JSON, and XML message types. |
|
Enabled |
Determines whether the message field should be processed. |
Fix

· NvFix

· JSON

· XML

To
delete a column, check its  or all the column entries, check
the topmost , then click
or all the column entries, check
the topmost , then click  .
.
15. Date/Time values of output data and Date/Time inputs, where supported, is by default unchanged.
You can opt to define the Show in Timezone and Source Timezone settings.
16. For this section:
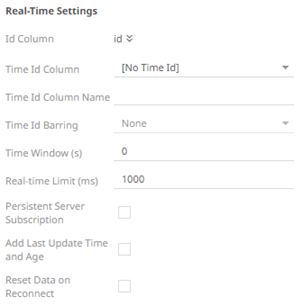
Refer to Define Real-Time Settings for more information.
17. Set the row limit of the data set.
18. Tap the Preview Selected Data Source slider to turn it on.
19. Click  to
display the data preview.
to
display the data preview.