Export an animation of a model to use in a presentation or report.
On the 3D View
contextual tabs set, on the Animate tab, on the
Animation group, click the Export animation icon.
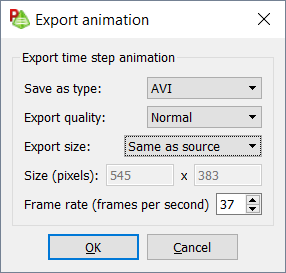
Figure 1. The Export animation dialog.
From the Save as type drop-down list,
select one of the following:
AVI
MOV
GIF
MKV
From the Export qualitydrop-down list, select one of the following:
High
Normal
Low
Setting the quality affects the compression ratio for the specified
screen size. For very high-quality exports, it is good practice to reduce the
screen size to as small as is need and setting the Export
quality to High.
From the Export sizedrop-down list, select one of the following:
Same as source
QQVGA (160x120)
QVGA (320x240)
VGA (640x480)
SVGA (800x600)
XGA (1024x768)
SXGA (1280x1024)
Custom
In the Frame rate (frames per second) field, specify the
frame rate. Setting the frame rate affects how “smooth” the animation
appears.
Click OK.
The Animation export file name dialog is
displayed.
In the File name field, specify the name of the exported
animation file.
In the Save as type, specify the file type of the
exported animation file.
Click Save to export the animation to file and to close
the dialog.
 Export animation icon.