Object Properties of Each Object in the Database
In WallMan every object has its own properties. They can be viewed and changed individually in the Properties dialog. Depending on whether the type of the database is indoor or urban, the appropriate dialog comes up.
To bring up these dialogs, select an object and click . Another way to get to the Properties dialog for an object is to click on the object with the right mouse button and choose the option Properties.
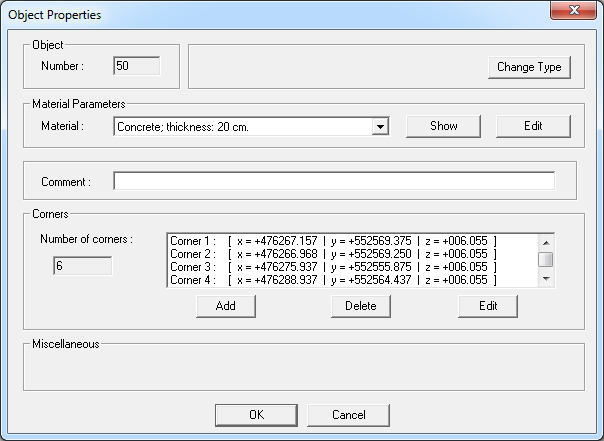
Figure 1. The Object Properties (urban) dialog.
The text field in the upper-right corner of the Object Properties dialog provides some general information about the object, for example, in indoor mode whether it is a subdivision or how many subdivisions are parts of this object or in urban mode whether the object is, for example, a virtual building. In the following, the other object properties are described in detail.
- Object Number
-
WallMan assigns a unique number to each newly created object in a database. In the Settings dialog you can choose whether WallMan displays the object numbers along with the objects. Repeatedly deleting and entering objects can lead to a situation where it is useful to renumber the database. The option assigns new numbers to all the objects in the database.
- Change Type
-
For indoor databases, the type of the selected wall can be changed.
In case the original wall is a subdivision of a wall the type can be changed so that the subdivision becomes a hole and vice versa, only.
For urban databases, building types can be changed as well.
- Material Parameters
- This section allows selecting a material from the Material Catalogue via a pull-down menu.
- Clutter Class
- This section replaces the Material Parameters section for Prediction Planes. In this case, it is possible to assign a clutter class from the Clutter to a prediction plane. Using the Edit button, the Clutter Table can be displayed and modified.
- Comment Text
-
An optional comment text can be entered for each object to provide additional information about the object.
CAUTION:The ASCII database formats (IDA and ODA) are not capable of saving the comments. This is only possible in the binary formats (IDB and ODB). - Corners
-
The Properties dialog contains a list of the object’s corners. To change a corner manually, it must first be selected by clicking on its entry in the corner list. Then the corner’s coordinates can be changed by clicking on the Edit button below the corner list. To delete the corner instead, click on Delete. To add a new corner behind the currently selected corner, use the Add button. The program will prompt you for the coordinates of the new corner.
Upon closing the Properties dialog, the changed corner coordinates are checked and the changed wall is rejected in case it is invalid (for example, because of invalid geometry).
Note: In urban mode, the Z-coordinate represents the height of the building. You only need to change it for one corner to change the building height. The Z-coordinates of the other corners is updated automatically. - Miscellaneous
-
- Surface Prediction (indoor databases)
-
Enable or disable prediction along the surface of a wall. The distance between the wall element itself and the surface prediction planes in front of and behind the wall has to be specified as well.
Efficient assignment of this option to multiple objects is possible. Click from the menu. Once defined, the surface prediction planes on both sides of the walls will be displayed in purple.
- Surface Prediction (urban databases)
-
Enable or disable prediction along the surface of a building. The distance between the building itself and the surface prediction planes on the sides of the building has to be specified as well.
Efficient assignment of this option to multiple objects is possible. Click from the menu. Buildings for which surface prediction planes were defined will be displayed in purple.