Scale and Position a Texture

After applying a material with a texture to one or more objects, you can scale and position the texture.

First, you need to apply a Full material (excluding Emitter and Shadow Catcher) and add a Texture to the objects. You can assign a texture for particular properties such as Color or Bump.

Since very few objects in the real world have a uniform appearance, textures are used to create visual irregularities that result in a more realistic appearance. Textures are applied using an image map, so they don't actually change the geometry of the object, only its appearance when rendered.

Turn on the Materials display mode, so you can see the changes as they are applied.

  1. Select one or more objects whose texture you want to resize and reposition.
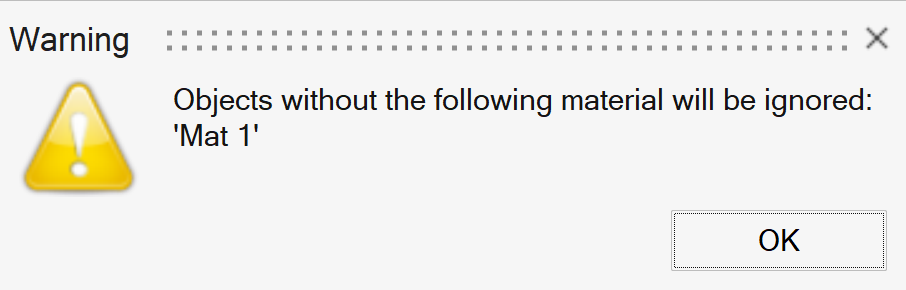
    Note: If multiple objects with the same material are selected, you can scale and position the texture for all objects at the same time. The material of the first selected object is the reference material.
    If objects with other materials are also selected, they won't be affected by any changes but will remain selected. A message like this is displayed:

  2. On the ribbon, click the Rendering tab.
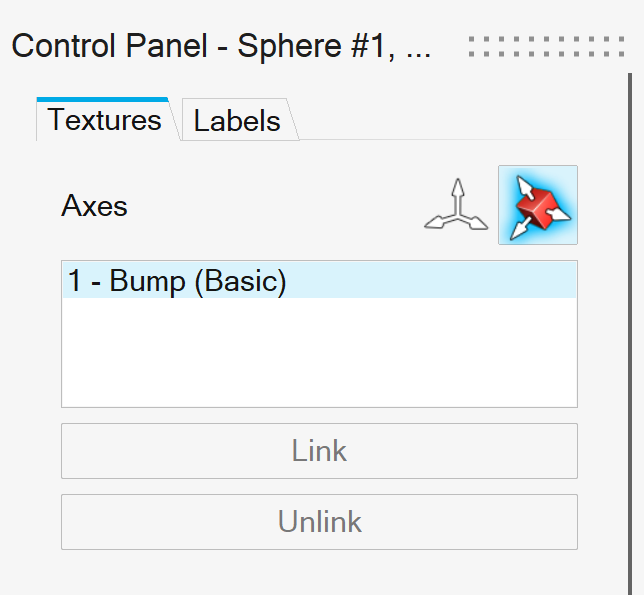
  3. Click the Texture Positioning icon.


  4. On the Textures tab, click the texture you want to modify.
  5. Optional: You can Link multiple textures so that their parameters can be edited at the same time.
    If multiple objects with the same material are selected, you can choose one of the Axes options to define how the mapping coordinates will affect the selected objects:

    • Global: All objects have the same absolute origin and orientation.
    • Local: The mapping of the first selected object is applied to the other objects along their local axes. This results in the same mapping for copied and rotated objects or instances.
    If the selected objects have different mapping, you will be asked to unify the mapping:

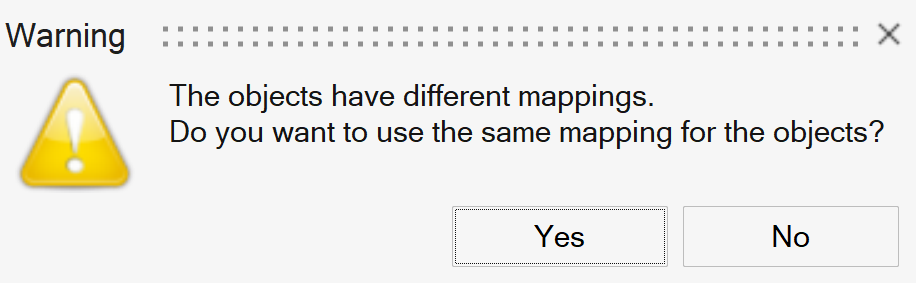
    • Yes: Copy the mapping of the first object to the others.
    • No: The objects with different mapping won't be affected by any changes but will remain selected.
  6. Select a Mapping method, and then reposition and resize the selected texture. For more details, see:
  7. Right-click and mouse through the check mark to exit, or double-right-click.

Autoaxis Mapping

Project the texture or label onto the object in the shape of an unfolded cube.

  1. Position the texture or label:
    To Do this
    Move the origin Drag the origin.
    Translate Drag the grid.
    Flip Select Flip Horizontal or Flip Vertical.
    Rotate
    • Drag the arrows.
    • Type a X Rotation, Y Rotation, or Z Rotation.
    • Select Free Rotation, and then drag the sphere.
    Align to an axis Select Snap to Axis (Shift), and then drag it to the axis.
    Center Click Center.
    Note: To return to the previous position, click Revert.
  2. Resize the texture or label:
    To Do this
    Scale
    • Type a Global Size.
    • Type Size X, Size Y, or Size Z.
    • Select Free Scale (Alt), and then drag the edges of the box.
    Define the aspect ratio Type an Image Aspect Ratio.

    You can also select Keep Aspect.

    Fit to surface Click Fit.
Note: To reset all parameters to the default values, click Reset.

Planar Mapping

Map the texture or label along a flat surface.

  1. Position the texture or label:
    To Do this
    Move the origin Drag the origin.
    Translate Drag the grid.
    Flip Select Flip Horizontal or Flip Vertical.
    Rotate
    • Drag the arrows.
    • Type a X Rotation, Y Rotation, or Z Rotation.
    • Select Free Rotation, and then drag the sphere.
    Align to an axis Select Snap to Axis (Shift), and then drag it to the axis.
    Center Click Center.
  2. Resize the texture or label:
    To Do this
    Scale
    • Type a Global Size.
    • Type a Size X or Size Y.
    • Select Free Scale (Alt), and then drag the edges of the box.
    Define the aspect ratio Type an Image Aspect Ratio.

    You can also select Keep Aspect.

    Fit to surface Click Fit.
Note: To reset all parameters to the default values, click Reset.

Spherical Mapping

Wrap the texture or label around a sphere.

  1. Position the texture or label:
    To Do this
    Move the origin Drag the origin.
    Translate Drag the grid.
    Flip Select Flip Horizontal or Flip Vertical.
    Rotate
    • Drag the arrows.
    • Type a X Rotation, Y Rotation, or Z Rotation.
    • Select Free Rotation, and then drag the sphere.
    Align to an axis Select Snap to Axis (Shift), and then drag it to the axis.
    Center Click Center.
  2. Resize the texture or label:
    To Do this
    Scale
    • Type a value for Scale Horizontal or Scale Vertical.
    • Select Free Scale (Alt), and then drag the edges of the box.
    Define the aspect ratio Type an Image Aspect Ratio.

    You can also select Keep Aspect.

    Fit to surface Click Fit.
Note: To reset all parameters to the default values, click Reset.

Cylindrical Mapping

Wrap the texture or label around a cylinder.

  1. Position the texture or label:
    To Do this
    Move the origin Drag the origin.
    Translate Drag the grid.
    Flip Select Flip Horizontal or Flip Vertical.
    Rotate
    • Drag the arrows.
    • Type a X Rot, Y Rot, or Z Rot.
    • Select Free Rotation, and then drag the sphere.
    Align to an axis Select Snap to Axis (Shift), and then drag it to the axis.
    Center Click Center.
  2. Resize the texture or label:
    To Do this
    Scale
    • Type a value for Height and Scale Horizontal.
    • Select Free Scale (Alt), and then drag the edges of the box.
    Define the aspect ratio Type an Image Aspect Ratio.

    You can also select Keep Aspect.

    Fit to surface Click Fit.
Note: To reset all parameters to the default values, click Reset.

UV Mapping

Project the texture or label directly onto the object's surface, which is useful when you want the texture or label to follow the irregularities of an uneven surface.

  1. Position the texture or label:
    To Do this
    Move the origin Drag the origin.
    Translate Drag the grid.
    Center Click Center.
  2. Resize the texture or label:
    To Do this
    Scale Type a value for Scale Horizontal or Scale Vertical.
    Maintain the aspect ratio Select Keep Aspect.
    Fit to surface Click Fit.
Note: To reset all parameters to the default values, click Reset.