Manage Handles and Domains for Solid Models
Create handles and domains, divide your solid model, and group, split, merge domains.
You can create a single 3D domain consisting of all the elements in a model. If the model is made up of more than one part, each part is placed in its own 3D domain. The surfaces of each 3D domain are covered with shell elements that are placed in a component named ^morphface. The elements in ^morphface covering each 3D domain are placed into 2D domains. If partition 2D domains is checked, these 2D domains are partitioned according to the settings selected in the parameter subpanel of the Domains panel. Once partitioned, edge domains are placed around the 2D domains and handles are placed at the ends of the edge domains. This procedure is automatic. In many cases, the domains and handles are generated where you want them to be. If they are not, you can add, edit, or delete the handles and domains to meet specific needs.
Create Single 3D Domains
Create a single 3D domain that consists of all the elements in a model.
- From the Tools page, click HyperMorph.
- Click Domains.
- Select the Create subpanel.
- Set the selector to 3D domains.
- Change the toggle to all elements, or manually select all of the elements in the model.
- Click create.
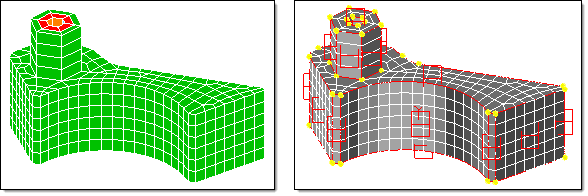
Figure 1. 3D Domain Created for Solid Model. The automatic creation and partitioning of 2D domains on the face of the solid and the creation of edge domains and handles for the 2D domains.
Create 3D Domains with Global Domains and Global Handles
- From the Tools page, click HyperMorph.
- Click Domains.
- Select the Create subpanel.
- Set the selector to auto functions.
- Click generate.
If there are any domains or handles in the model, you are asked if you want to delete all the current morphing entities. If you click yes, or if there are no morphing entities in the model, 1D, 2D, and 3D domains are automatically generated for the entire model, as well as a global domain and handles.
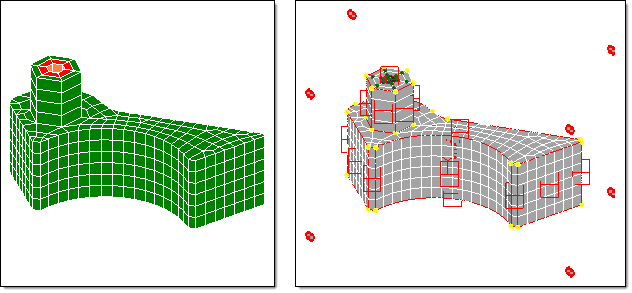
Figure 2. Automatic Generation of Domains on Solid Model. The addition of a global domain, global handles, and 1D domain, which produces dependent (green) handles.
Also, for first order tetra meshes, you may find it more effective to ignore curvature when automatically partitioning. To do this, in the parameters subpanel, change the uppermost toggle from curvature based to angle based. You may also want to lower the domain angle to 30 degrees. Partitions will be made only along edges in the model where the domain angle is exceeded. You can then manually divide the 2D domains where the curvature breaks should be located. This method is very helpful for meshes that began as first order tetra meshes but then were then transformed into second order meshes. For these meshes, a curvature break is detected at every element along a curve if the midpoint nodes of the elements have not been modified to capture the curvature. This results in a domain for every element on a curve which makes morphing impractical.
Solving the influence coefficients for 3D domains which contain more than 20,000 elements can become very time consuming even though it is only done after domain editing and during morphing operations such as radius change and map to geom. In these cases you may want to divide the domain into multiple domains using the subdivide 3D function in the update subpanel of the Domains panel, or lower the limit for the large domain solver. The large domain solver limit can be found in the global subpanel of the Morph Options panel. However, even though influence calculations for large domains are more rapid, morphing using the large domain solver can be time consuming, and thus subdividing 3D domains can often be the best solution for efficient morphing. Additionally, if you are only going to morph a part of your 3D mesh, you only need to create domains for that part.
Subdivide Solid Models
- From the Tools page, click HyperMorph.
- Click Domains.
- Select the Update subpanel.
- Set the selector to subdivide 3D.
- Select the 3D domains to be subdivided.
- Select any 2D domains on the surface of the 3D domain that are permissible for HyperMorph to split into more than one 2D domain.
- Click subdivide.
Divide Solid Models Manually
- From the Tools page, click HyperMorph.
- Click Domains.
- Select the Create subpanel.
- Set the selector to 3D domains.
- Select the elements to be placed into a new 3D domain.
- Click create.
When selecting elements for the new domain, you do not need to select only solid elements, other elements are automatically removed before the domain is created. Therefore, you do not need to be concerned about selecting the morphface elements.
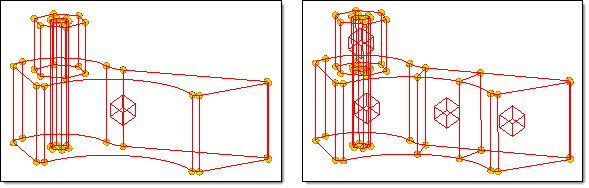
Figure 3. 3D Domain Split into Four 3D Domains. The influences of the handles will not extend across the boundaries between the domains.
Influences must be recalculated every time handles, domains, or symmetries are added, edited, or deleted. They are also recalculated during radius changes and geometry mapping. These calculations occur when you enter or leave a HyperMorph panel or when you leave the delete panel. For large models you will want to make all of your domain changes before exiting the Domains panel. The influences for handles are only recalculated in regions that have been edited.
- Create and edit all the 3D domains that you want first.
- Create and edit the 2D domains.
- Create and edit the edge domains.
Automatic partitioning does not always divide a mesh in the most useful ways. Occasionally, elements end up in domains adjacent to where you want them or placed in their own domain. Some cleanup may be required.
Organize Elements in Domains
Move elements from one domain to another.
- From the Tools page, click HyperMorph.
- Click Domains.
- Select the Organize subpanel.
- Change the selector to add nodes/elements.
- Select the elements to be moved.
- Select the target domain.
- Click organize.
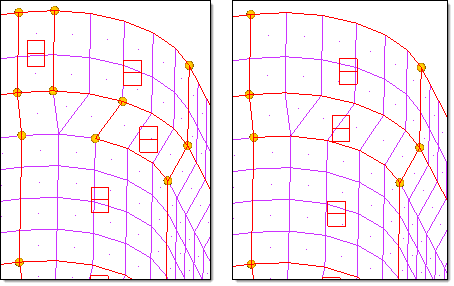
Figure 4. Move Elements. The model on the left shows problems that partitioning can encounter for some meshes. The model on the right has been corrected using the organize subpanel of the Domains panel. For this example, the retain handles option was left unchecked, resulting in the elimination of handles that are no longer on the corners of the 2D domains.
Group Domains
Group two or more domains.
- From the Tools page, click HyperMorph.
- Click Domains.
- Select the Organize subpanel.
- Change the selector to combine domains.
- Select the domains to be grouped.
- Click organize.
The selected domains are combined into a single domain, and the surrounding domains and handles are updated.
Edge domains are automatically partitioned when they are created. They are also updated whenever a change occurs for a domain of which they are on the edge. This is why you should edit the edge domains after the other domains have been edited. If you perform edge editing first, your changes may be erased when you edit the 2D and 3D domains.
Edge domains are used to make radius changes, so it is important to make sure that any radius in the model that you intend to change be captured correctly by edge domains. HyperMorph attempts to partition edge domains where curvature begins and ends, but in some cases, it will not identify the proper starting and ending points. You will need to correct this by hand.
Split Edge Domains
- From the Tools page, click HyperMorph.
- Click Domains.
- Select the Edit Edges subpanel.
- Change the selector to split.
- Select an edge domain.
- Select a node on that domain that is not on the edge.
- Click split.
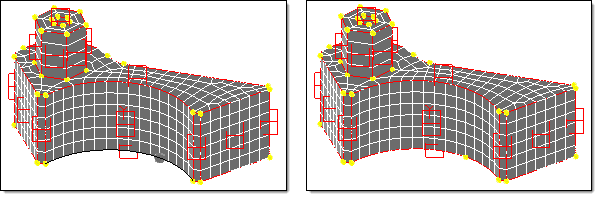
Figure 5. Split Edge Domains. The lower edge domain has been split at the gray node (left model), which becomes a handle (right model). Now the radius of each new edge domain may be modified independently of the other.
Merge Edge Domains
- From the Tools page, click HyperMorph.
- Click Domains.
- Select the Edit Edges subpanel.
- Change the selector to merge.
- Select any number of edge domains.
- Click merge.
The two edge domains are merged into one edge domain. This function only allows you to merge edge domains that lie end-to-end such that the resultant merged edge domain is a continuous series of nodes.
Create Dependent Handles along Edge Domains
-
Click create.
Dependent handles are created on the selected edge domains. These handles are dependent on the independent handles to either side of them along the edge domain.

Figure 6. Dependent Handles Created using the Handles on Edge FeatureCreating dependent handles in this way has two significant effects. The first is that since they are dependent, movements applied to any of the independent handles on the edge are transparently applied to the dependent handles. It will be as if they were not there. Secondly, when you make a radius change to an edge domain that has a handle at each of its nodes, the influences do not need to be recalculated, which makes the radius change process much faster for large models.