ToolBar

Figure 1. ToolBar Panel
The ToolBar panel contains the most common options, it is divided into 5 sections:
 Project options:
- New project -> Creates a newFASANT project.
- Open project -> Open an existing file project.
- Save project -> Save the current project.
 Geometry file options:
- Import file -> Import a geometry file.
- Export file -> Exports the geometry.

- Undo (CTRL+Z) -> The undo option is used to undo the previous change.
- Redo (Ctrl+Y) -> If the user has undone any changes it is possible to redo them with this option.
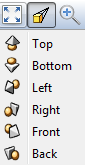
- Reset view (CTRL+R) -> This option resets the view settings of the Geometry view area to the default values. If you click with the right button can select the view.
- Perspective / Parallel projection -> Sets the perspective or parallel projection.
- Zoom in -> This option zooms in the current view of the Geometry.
- Zoom out -> This option zooms out the current view of the Geometry.
- Zoom selected -> This option zooms into the selected area of the Geometry.
- Invert selection -> This option inverts the geometry selection.
- Rotate -> This option allows to rotate camera with the left mouse button.
- Pan -> This option allows to translate camera with the left mouse button.
- Select -> This option allows to select objects with the left mouse button.
- Show axis -> This option toggles the visualization of the three axes in the view area.
- Reference plane -> Shows the reference plane panel.
- Lines -> Toggles render mode to lines.
- Shaded -> Toggles render mode to shaded.
- Shaded with lines -> Toggles render mode to shaded with lines.
- Material / Layer view -> Shows the color of the material or the layer.

- Control Points -> Shows the control points of a selected NURBS surface.
- Invert Normals -> View and invert normals of a selected objects. To invert normals click on the view area.