Configure the View
Configure a single view, configure the multiview layout, and change the view detail.
Configure a Single View
Choose from right, left, front, back, top, bottom, perspective, or a camera view. You set one of these views as the Home view.
- In the view controls, click Camera List
 , and then select one of the
following options:
, and then select one of the
following options:- [Right]
- [Front]
- [Top]
- [Perspective]
- Draw-Top (only available in the Die Design user profile)
- Draw-Front (only available in the Die Design user profile)
- Draw-Right (only available in the Die Design user profile)
- Duplicate camera
- Rotate the model with the View Cube.By default, the View Cube appears on the axis triad at the bottom-left corner of the modeling window.
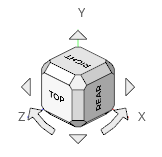
Figure 1.Clicking a major face (Top, Bottom, Right, Left, Rear, or Front) rotates the model to the nearest possible orientation of that face. If that orientation is not the standard, clicking the face again re-aligns the model back to the standard orientation. If the orientation is already standard, repeated clicks on a major face reverses the view.Note: The view is fit anytime a face is selected.Clicking the arrows incrementally rotates the view. Left- and right-clicking increments by + and - 15 degrees while middle-clicking inc`rements by 90 degrees.
Configure the Home View
You can set one of the single views as the Home view, so that you can quickly return to it by clicking the Home icon.
By default, in the Perspective view, the Home view shows the Top, Front, and Right view.
- To select one of the single views, see Configure a Single View.
-
To set the selected view as the Home view, hold down
Ctrl while left-clicking
 or right-clicking at the bottom left of the modeling
window
or right-clicking at the bottom left of the modeling
window
Configure the Multiview Layout
You can choose from 15 multiview layouts.
- From the View menu, select Layouts.
- Select a layout.