


|
Creating an Instance
To create an instance:
1. Select the Configurator tab, and click the Instances tab. The Instance page is displayed.
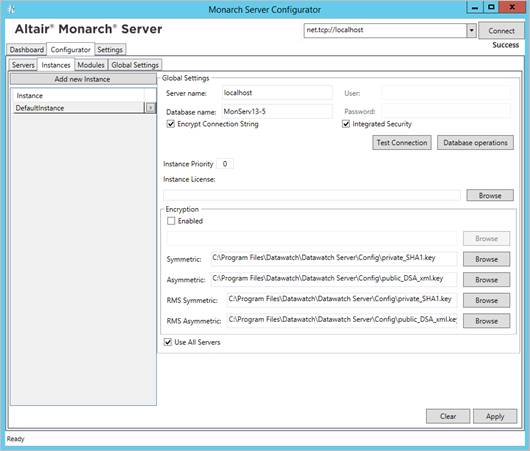
2. Under Global Settings, specify the database connection string parameters:
· Server name
· Database name
· User
· Password
|
NOTE |
This connection string will be used by services for database access. |
3. Select the Encrypt Connection String check box if you want to encrypt connection string.
4. Select the Integrated Security check box if you want to access SQL Server via Windows Authentication. If you do so, the fields User and Password become unavailable.
5. Click Test Connection. If connection is successful, you will be able to perform database operations.
|
NOTE |
If there is no database with the specified name, create a new database. |
6. In the Instance Priority field, enter value to define instance priority.
7. In the Instance License field, specify the path to the license file.
|
NOTE |
This license is used only for a particular instance. To set the global license used for all instances, see Global Settings. |
8. Under Encryption, specify the path to the encryption file. Note: You can specify the encryption file only if the Enabled check box selected.
9. Under Symmetric, specify the path to the private key file for checksum in symmetric mode for MS.
10. Under Asymmetric, specify the path to the public key file for checksum in asymmetric mode for MS.
11. Under RMS Symmetric, specify the path to the private key file for checksum in symmetric mode for RMS.
12. Under RMS Asymmetric, specify the path to the public key file for checksum in asymmetric mode for RMS.
13. The Database Common Time-out setting is configured manually in the config.xml file. Path to this file: C:\Program Files\Datawatch\Datawatch Server\Config\config.xml
This parameter is located in the <Database> of the <Instance>:
<Instance Name="DefaultInstance" Priority="1">
<Database>
…
<CommandTimeout>0</CommandTimeout>
</Database>
…
</Instance>
The default timeout is 0 (it means no timeout).
To define the servers available for an instance:
1. Under Servers available for Instance, click the  button and select servers from the drop-down list.
|
NOTE |
In this case, an instance will be able to use only those services that are installed on the selected servers. |
2. Select the Use All Servers check box, to allow instances use all servers.
3. Click Apply.
4. To add a new instance, click the Add new Instance button.
5. To delete an instance, click the  button by the instance name.