


|
Importing Data from an External Database
To illustrate Monarch’s database import capability, we’ll import data from an MS-Access database file called Employ.mdb. This file contains information about the employees of a fictitious company. We’ll use Monarch to open the file and import data from its Employee Roster database table.
Steps:
1. Ensure that Monarch is up and running.
2. Select File > Open > Database > Computer.
The Open Database File dialog displays. This dialog allows you to select the data source, either a data file from a local or network drive or an OLE DB/ODBC data source, such as a SQL Server, Oracle, or other OLE DB/ODBC compatible database server.
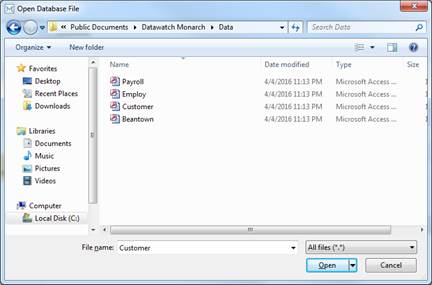
Figure 19-1. The Open Database File dialog.
Monarch can import data from the following local file formats:
File Format |
Versions |
Extension |
|
MS-Access |
2003 and earlier |
MDB |
|
MS-Access |
2007, 2010, 2013 |
ACCDB |
|
MS-Excel |
5.0, 8.0 |
XLS |
|
MS-Excel |
2007, 2010, 2013 |
XLSX, XLSM |
|
dBASE |
III, IV, 5.0 |
DBF |
|
Delimited text files |
|
CSV, TAB, ASC |
|
HTML |
|
HTM, HTML, ASP |
|
PDF files |
1.0, 1.1, 1.2, 1.3, 1.4, 1.5, 1.6 |
|
|
XPS |
1.0 |
XPS |
If you wanted to import from an OLE DB-compatible database (and you have the driver installed), you would select the OLE DB option, instead of Computer, and then choose whether to import data via the Data Link Wizard or a Data Link File. Note that OLE DB is usually faster than ODBC, so if you have a choice of connections to your database, choose OLE DB. If you have existing projects and models that use ODBC, then you may want to change the connection method to benefit from enhanced performance.
If you wanted to import data from an ODBC compatible database you would select the ODBC connection option, and then use the Select an ODBC Data Source dialog that displays to select the ODBC data source name (DSN) that connects to your ODBC data source. Monarch can import data from ODBC data sources for which you have established an ODBC Data Source Name definition (referred to as a DSN). Monarch does not create a DSN for you – you must create a DSN using the Windows Control Panel ODBC Data Sources applet or a similar utility.
3. Open the Employ.mdb file from the Datawatch Monarch\Data folder.
4. Click the Open button to open the data source.
Monarch displays the path to the Employ.mdb file in the dialog’s Data Source box.
5. Click the Select Table button to launch the Select Table dialog.
The Select Table dialog displays all of the database tables and queries that are available within the selected database. This list does not include system tables or queries, which hold information about the database structure.
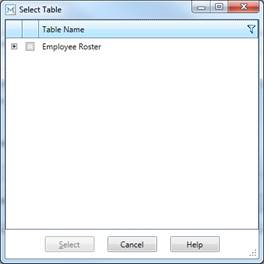
Figure 19-2. The Select Table dialog.
Our sample Employ.mdb database file holds only a single database table, called Employee Roster.
6. Check the box for Employee Roster.
Expanding the node  beside the table name displays all of the fields
associated with the selected table.
beside the table name displays all of the fields
associated with the selected table.
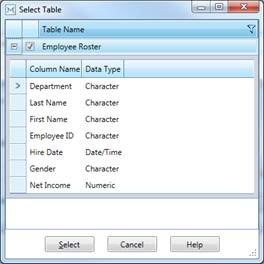
Figure 19-3. Fields associated with the selected table.
7. Click Select to close the dialog.
|
|
NOTE If you wanted to apply a filter to the data,
you could do so by selecting the Apply Filter |
|

 button located on
the upper right-hand corner of the dialog box to launch the
Filters menu.
button located on
the upper right-hand corner of the dialog box to launch the
Filters menu.
The left side of the File screen reflects the selections you have made.
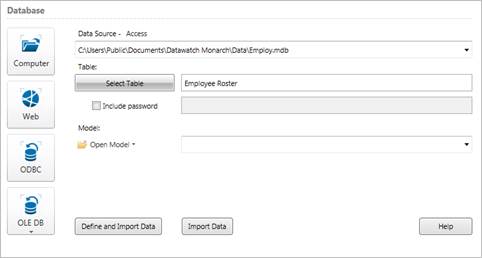
Figure 19-4. Reviewing table(s) to open from a database.
The Model field allows you to specify a model file to apply to the database. Applying a model to a database is similar to applying a model to a report. The model holds parameters that indicate which fields to extract from the database, along with field properties for each field and filter, sort, calculated field, and summary definitions.
8. Select Import Data to bring your data into Table view.
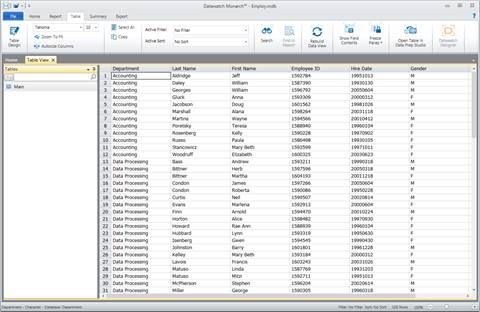
Figure 19-5. The results of our Open Database operation.
9. If you want to define how the fields of the table should be displayed in table view, in Step 8, choose Define and Import Data instead of Import Data.
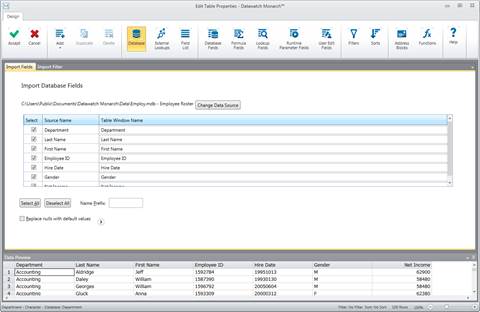
Figure 19-6. When you select Define and Import Data, the Edit Table Properties screen displays.
In the Edit Table Properties screen that displays, two tabs may be observed: one to specify which database fields you want to import and another to specify a filter to apply. By default, all of the fields are selected for importation. Note also that import fields and filter definitions are only saved in project files.
You can manually edit the way import column names will appear in Table view by clicking on the appropriate cells under the Table Window Name column in the Import Fields tab.
You can also add a name prefix to one or more of the import column names. To do so, however, you must enter the prefix in the Name Prefix box before selecting any of the columns to import. After specifying the prefix, you can then either click the Select All button or select individual columns via their check boxes. The names for the columns you chose to import will then be displayed, preceded by the name prefix (e.g., if you specified a Name Prefix of “Test”, for example, the import column name for the “Department” source column would be “TestDepartment.”
10. Since we want to import all fields,
leave the default settings as they are and click Accept
 .
.
Monarch
launches Table view and populates it with data imported from the Employ.mdb
file’s Employee Roster table. Select Autosize Columns
 to display the fields properly.
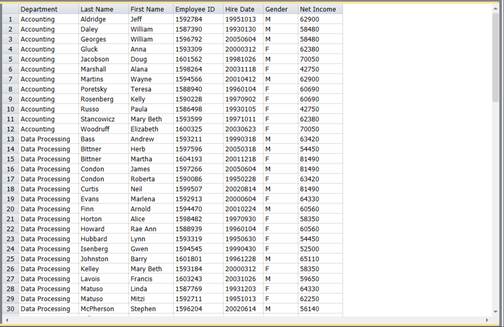
Figure 19-7. Monarch’s Table view is populated with the data imported from Employ.mdb – Employee Roster.
|
|
NOTE The Table view may be initially populated using data extracted from report files or using data imported from an external database. You cannot draw data from both sources at the same time to populate the table. If you start a Monarch session by opening a report file, you will not be allowed to import data from an external database in that Monarch session. Conversely, if you start a Monarch session by importing data from an external database, you will not be allowed to open any report files in that Monarch session. These two means of initially populating Monarch’s Table view are mutually exclusive. |
|