


|
Capturing a Multiple-Line Field
To capture a multiple-line field, you need to tell Monarch where the field begins and ends. Typically, locating the beginning of a multiple line field is easy - most multiple line fields begin at an absolute offset from the first line of the template. Locating the end of a multiple line field is sometimes more difficult. Since the number of lines in the field often varies, you can’t tell Monarch how big the field is in absolute terms. Instead, you must describe some characteristic that is common to the end of the field. For example, the field may end when a blank line is reached or when another field is encountered. Monarch includes these and several more options that you can use to indicate where your multiple line field ends.
Steps:
1. Select Report Design  to switch to the
Report Design (Template Editor) view.
to switch to the
Report Design (Template Editor) view.
The Template Editor displays, showing several lines of the detail template. In this example, the detail template contains a total of 16 lines.
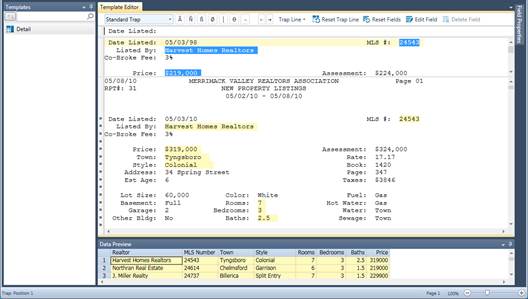
Figure 15-2. The Sample Text box displays several sample lines.
We can scroll the template sample text to view the remaining sample lines. The last line of the template contains the beginning of the Remarks field. Let’s scroll down until that line is displayed.
2. Scroll down in the Sample Text box until the Remarks field is visible, as in Figure 15-3.

Figure 15-3. The last template sample line represents the beginning of the Remarks field.
Let’s also scroll the report to display the first instance of the Remarks field. Having this field displayed on screen will provide valuable feedback during the capture process.
3. Use the vertical scroll bar on the right side of the Template Editor (the lower of the two vertical scroll bars that are visible on screen) to scroll down so that the Remarks field is fully visible on screen, as shown in Figure 15-4.
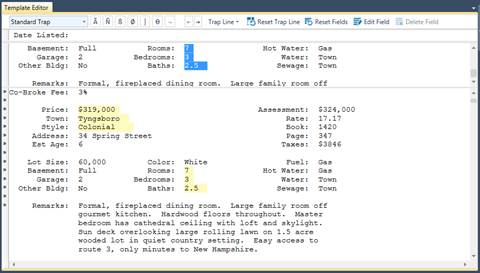
Figure 15-4. Displaying the multiple line Remarks field in the Report view to provide feedback.
Now we’re ready to capture the multiple-line Remarks field.
4. In the Sample Text line, use the mouse or the keyboard to highlight only the first line of the Remarks field. Highlight this entire line, making sure to extend several spaces toward the right to capture all of the data for all of the records in the report.
The field highlight should look like that shown in Figure 15-5.

Figure 15-5. The last template sample line represents the beginning of the Remarks field.
Note that the first line of the field in the report is now highlighted.
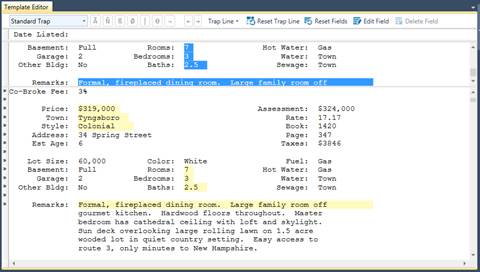
Figure 15-6. The Sample Text box displays several template sample lines.
You might be wondering why we highlighted only the first line of the field. Why not highlight the entire field? For a multiple line field, we must indicate the horizontal size of the field and the vertical size. The horizontal size is indicated by highlighting the first line of the field. However, the vertical size cannot be indicated by highlighting multiple lines because the number of lines occupied by each instance of the field varies. What would be correct for the first instance of the field may be incorrect for the others. To indicate the vertical size of a multiple line field, we must tell Monarch where the field begins and where it ends. To do this, we’ll use the Field Definition window.
5. Select Edit Field  on the Action bar of the Template Editor.
The Field Definition window appears, showing all of the fields defined for the Detail template. Note that at the bottom of the list of fields, the field name eg_Formal, fireplaced dining ro… may be found. This is the field we are extracting in the current lesson.
6. Select the field eg_Formal, fireplaced
dining ro… to display its properties. Rename this field Remarks
and then select  .
.
7. Click the Advanced tab.
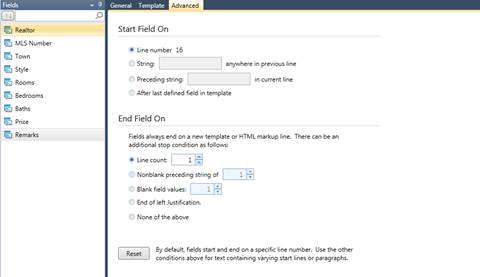
Figure 15-7. The Advanced tab.
The Advanced tab includes options for indicating the beginning and ending locations of the field. Let’s begin by examining each of the Start Field On options. These options tell Monarch how to locate the beginning of a multiple line field. The Start Field On options are:
· Line Number
The Line Number option indicates that the first line of the field begins at an absolute offset from the top of the template. The line number represented by this setting is determined by the position of the field highlight in the template sample. Since we painted the first line of the Remarks field at Line Number 16, this option displays as Line Number 16.
|
|
NOTE The Line Number option is almost always the correct choice for indicating the beginning of a multiple line field. The only time the Line Number option would not be the correct choice is when the multiple line field begins after another multiple line field. In this case, the first multiple line field, if it contains a varying number of lines, would cause the beginning position of the second multiple line field to vary (see Figure 15-8). Only then would you need to employ one of the other Start Field On options. |
|

· String
The String option indicates that the first line of the field begins on the next line down from (i.e., the line below) a line containing a string. This option is particularly useful when trapping HTML data. To use this option, enter the string in the adjacent box.
· Preceding String
The Preceding String option indicates that the first line of the field begins to the right of a string, such as a label. To use this option, you simply enter the string in the adjacent box. Figure 15-8 shows a modified version of the Homes report where the Remarks field falls after another multiple line field, the Directions field. Here the Line number option would not work because the varying length of the Directions field would cause the beginning of the Remarks field to bob up and down. In this case, the preceding string option could be used by entering the label "Remarks:" (without the quotation marks).
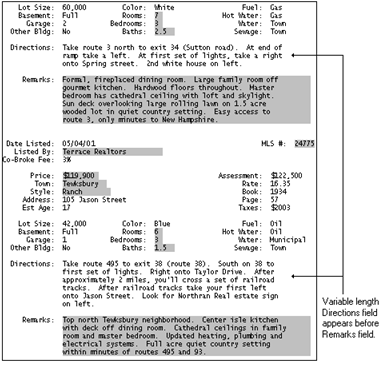
Figure 15-8. Offset of Remarks field varies due to preceding multiple line Directions field.
· After Last Defined Field in Template
The After Last Defined Field option indicates that the first line of the field begins two lines below a previous multiple line field. Figure 15-9 is an excerpt from Figure 15-8, except this time there is no identifying label next to the Remarks field. In this case, you could use the After Last Defined Field option to indicate that the Remarks field begins immediately after the Directions field. To do this, you must also capture the Directions field so Monarch will know where it ends.
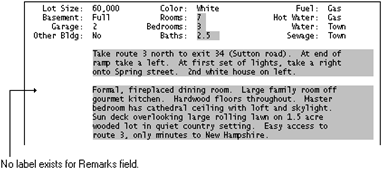
Figure 15-9. Use After Last Defined Field if no label exists to mark the beginning of the second multiple line field.
Since the Remarks field always begins on the same line in the template (Line Number 16), we’ll use the Line Number option to indicate where the field starts. Line Number is the default option, so it’s already selected.
Next, we need to indicate where the multiple line field ends. To do this, we’ll select an End Field On option. The End Field On options tell Monarch how to locate the end of a multiple line field. Let’s examine each option.
· Line Count
The Line Count option terminates a multiple line field after a fixed number of lines. This option should be used only when every instance of the field has the same number of lines. This won’t do for our Remarks field, as each instance contains a different number of lines.
· Nonblank Preceding String of
The Nonblank Preceding String option terminates a multiple line field when any nonblank character appears within a specified number of columns to the left of the field. Typically, the character is part of a label that appears to the left of a subsequent field. As an example, let’s suppose our fictitious Directions field appeared immediately after the Remarks field rather than before (see Figure 15-10). With no blank line to separate the fields, it is difficult to determine where the Remarks field ends, but we can find the label "Directions:" preceding the first line of the Directions field. We can use this label to terminate the Remarks field by selecting the Nonblank Preceding String of option and specifying 3 or more columns.
Monarch will look for any nonblank character in these columns, terminating the field when it encounters the colon (:) in the "Directions:" label.
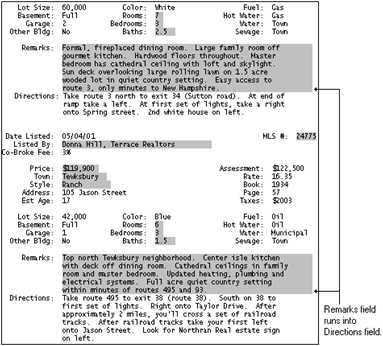
Figure 15-10. Use Nonblank Preceding String to terminate a field when another field is encountered.
The Nonblank Preceding String option cannot be used to indicate the end of the Remarks field in the report that we are using for this lesson because there is no label in an appropriate position near the end of the Remarks field.
· Blank Field Values
The Blank Field Values option terminates a multiple line field when Monarch encounters a single blank line or a pair of blank lines. Monarch does not require the entire line to be blank, only the column positions immediately under the field. Since our Remarks field is always followed by a blank line, this option is a good choice.
In the case of a large text block containing multiple paragraphs, like the one shown in Figure 15-11, you would indicate 2 blank lines - to prevent Monarch from terminating the field when it encounters the blank line that falls between the first and second paragraphs.
Note that using two blank lines to terminate a multiple line field is possible only when the entire text block is followed by at least two blank lines, as is the case in our example below.

Figure 15-11. Example of a multi-paragraph text block with a single blank line between paragraphs.
· End of Left Justification
This option terminates a multiple line field when Monarch encounters a line with a blank in the first column position of the field or any nonblank character in the column immediately preceding the field. Either condition indicates that left justification within the field has ended. This option is useful for capturing left aligned text blocks. However, if the text block contains a blank line, such as that found between paragraphs, Monarch will consider the blank line an end to left justification and will therefore terminate the field. Although this option could be used to terminate the Remarks field, the Blank Fields option is preferable as it better describes the way that the field is actually terminated.
· None of the Above
This option terminates a multiple line field only when Monarch encounters another template, including another instance of the template in which the multiple line field resides. Monarch will also terminate a multiple line field after it extends two pages. The field will be terminated on the second page where the page break character (ASCII 12) is encountered. This prevents a field from continuing without end if the selected End Field On action is not appropriate to end the field.
This option should be used only when none of the other End Field On options are suitable. By employing the minimum actions, you might capture more data than is actually occupied by the field.
|
|
NOTE The minimum actions described above are always enforced by Monarch, even when the None of the Above option is not selected. Select this option only when none of the other options would apply. |
|
From our review of each of the End Field On options, we find that either the Blank Field Values option or the End of Left Justification option will properly terminate the field. We recommend using the Blank Field Values option in such cases, since it is more descriptive of how the field ends.
8. Select the Blank Field Values option to indicate to Monarch that the field will end when a blank line is encountered. The default value is 1, which tells Monarch that the field should end as soon as 1 blank line is found.
9. Select Accept  to
accept your changes and close the window.
to
accept your changes and close the window.
Note that Monarch has correctly highlighted the first instance of the Remarks field.

Figure 15-12. Testing the multiple line field definition.
Let’s double check the field definition by inspecting several more instances of the multiple-line field.
10. Scroll down in the report to the next Remarks field.
Note that the second instance of the Remarks field is also correctly highlighted.
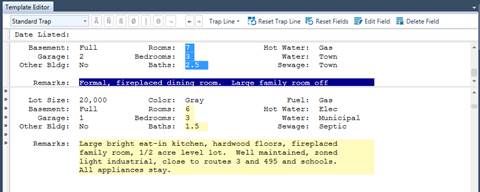
Figure 15-13. Double checking the multiple line field definition.
11. Select Accept  to
accept your changes and close the Template Editor.
to
accept your changes and close the Template Editor.