


|
Creating a Sort Order Definition
The Classic report is sorted by Customer and Ship Date. When the report data is extracted and assembled as records in the Table view, the records appear in the same order. Records for Betty’s Music Store appear first, then records for Big Shanty Music, and so on. Within each customer, the records are sorted by ship dates. While this sort order is useful, you may want to view the data in another order. Let’s sort the table based on the Description field.
To sort the table, you use the Sort Order Definition window to create a sort definition.
Steps:
1. Select Table Design  from the ribbon to
launch the Table Design interface and then click Add > Sort
from the ribbon to
launch the Table Design interface and then click Add > Sort
 from the Table Design ribbon.
The Sort Order Definition window displays.
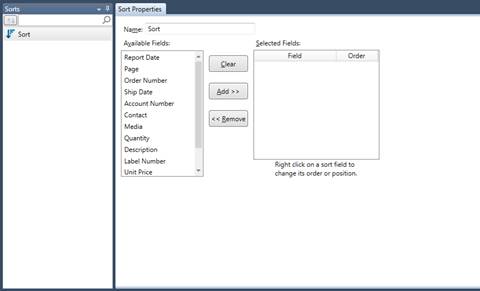
Figure 11-1. The Sort Order Definition window.
From this window, you can create multiple sort definitions and switch between them to see different views of the table.
The Available Fields box displays the fields from the table. The Selected Fields box displays the fields used in the sort definition, from highest sort level to lowest. To add a field to the definition, select the field from the Fields box, then click Add >>. To remove a field, select the field from the Selected Fields box, then click << Remove.
2. Type Product Description in the
Name box then select  .
.
|
|
NOTE Sort definition names may be up to 31 characters in length and may contain uppercase and lowercase characters, spaces, and punctuation. However, periods (.), exclamation points (!), accent graves (`), and brackets ([ ]) may not appear in any part of the name. As well, names may not begin with spaces. If a name is entered with leading spaces, the name is accepted but the leading spaces are trimmed. |
|

3. Select the Description field from the Available Fields box, and then click the Add >> button.
The Description field appears in the Selected Fields box. When a field is added to the Selected Fields box, its initial sort order is Ascending. To change the sort order of a field, right-click on the field to display a context menu and select Change Order from the menu. Since we want to sort the field values in ascending order, we’ll leave the sort order as it appears.
4. Choose Accept  to
accept the sort definition and close the Sort Order Definition
window.
to
accept the sort definition and close the Sort Order Definition
window.
5. On the Table ribbon, select the drop-down button of the Active Sort box and then select Product Description.
The data in the Table view is rearranged according to the Product Description sort order.
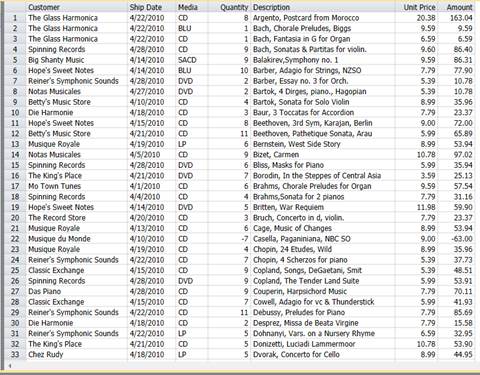
Figure 11-2. Table view sorted by the Description field values.