


|
Creating a Page Header
Monarch allows you to add a descriptive title to the top of each printed page via the Header Layout settings of the Page Setup dialog.
A page header is divided into three sections, Left, Center, and Right, all of which represent locations in which you may want to add information. You can dynamically add information to the page header, including page numbers, the print date and time, the names of the active filter and sort, as well as the first value of any field in the table. You can also add any text you wish and even specify the font to use in the header.
Before we begin, ensure that you have the Classic.prn report and Lesson1.dmod model open and that you are in Table view.
Steps:
1. Select File > Page Setup  .
.
Note that because you have both a report and a table open in the current Monarch session, the Page Setup dialog slightly differs from the dialog we saw in Chapter 6.

Figure 10-13. Adding a page header to the printout.
2. On the left-hand side of the dialog, select Table from the list of available views.
The Page Setup dialog displays page options available for Table view.
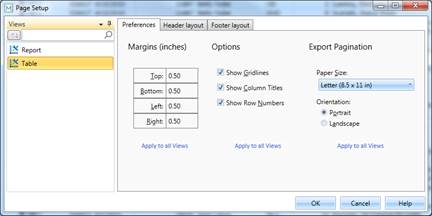
Figure 10-14. Page preferences for Table view.
3. Select the Header Layout tab.
4. Double click on the first cell of the column labeled Left.
A menu options arrow displays on the cell.
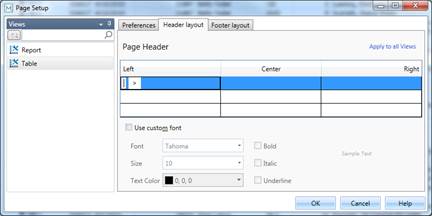
Figure 10-15. Adding a page header to the printout.
5. Click the arrow that appears and then select Date from the options that display.
6. Double-click on the first row of the column labeled Center.
7. Type Classical Music Distributors into the cell.
8. Double-click on the first row of the column labeled Right.
9. Click the arrow on the cell and then select Page Number from the options that display.
10. Double-click on the second row of the column labeled Left.
11. Type Report: followed by a space, and then click the arrow on the cell. Select Input Name from the options that display.
12. Double-click on the third and last row of the column labeled Left.
13. Type Model: followed by a space, and then click the arrow on the cell. Select Model File Name from the options that display.
This is how the Page Header section of your Page Setup dialog should look when you are finished.
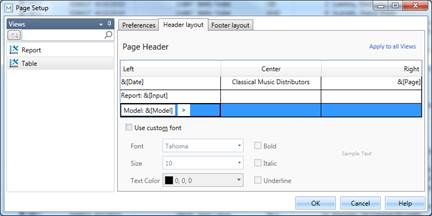
Figure 10-16. A fully set up page header.
14. ClickOK to accept your changes and close the Page Setup dialog.
15. To view your new header, select File
> Print  > Print Preview.
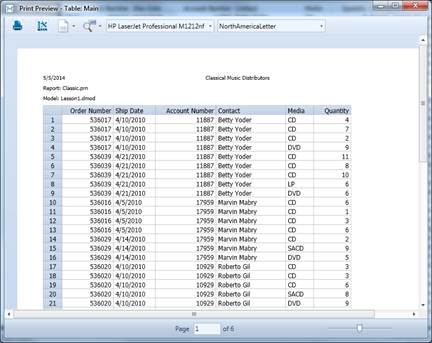
Figure 10-17. A fully set up page header.
|
|
NOTE If your table is wider than it is long, you
may wish to change your paper orientation to landscape.
To do so, select the Paper Orientation |
|

 icon on the
Print Preview window and then select Landscape.
icon on the
Print Preview window and then select Landscape.