


|
Getting to Know Table Design View
The Table Design interface allows you to actively work with your data to obtain the information you need using the fields you extracted in a report. This interface initially shows you a list of all of the fields you extracted, as well as their properties, and a ribbon from which you can select several tools to further build your data table.
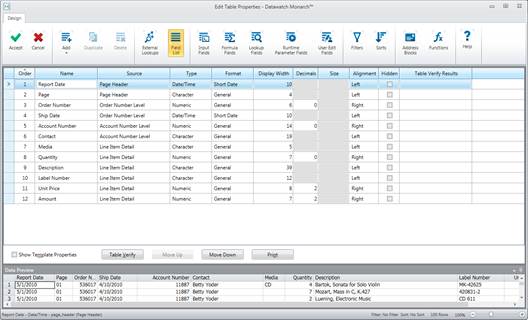
Figure 10-2. The Table Design interface.
At the bottom of the Table Design interface is a Data Preview panel, which functions exactly like the Data Preview of the Template Editor. This panel will show you how your Table view is going to look once changes made using the Table Design interface have been applied.
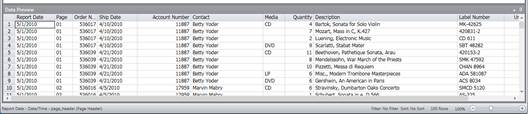
Figure 10-3. The Data Preview panel provides users with a real-time preview of changes made to any of the table fields.
The following table summarizes the functions of each of the buttons in the Table Design ribbon.
|
Use this button… |
To… |
|
|
Accept the new template or changes to an existing template |
|
|
Cancel the new template or changes to an existing template |
|
|
Add a new field to the table. This table could be a formula field, a lookup field, a runtime field, etc. |
|
|
Duplicate the summary |
|
|
Delete a selected field |
|
|
Add an external lookup to the table |
|
|
Display the field list |
|
|
Display the properties of each input field |
|
|
Display the properties of each database field |
|
|
Add a formula field to the table |
|
|
Add a lookup field to the table |
|
|
Add a runtime parameter field to the table |
|
|
Add a user-edited field to the table |
|
|
Add a filter definition to the table |
|
|
Add a sort definition to the table |
|
|
Extract data from addresses |
|
|
Add a field function to the table |
|
|
Launch the Help file |

 Cancel


