


|
Merging Columns
You can easily merge columns by highlighting the columns you want to merge and selecting Merge Columns. You can select to do a quick merge or build the merge using the Define Merge dialog.
A merge operation always produces a (merged) column with a text data type.
Merging columns using Quick Merge
Steps:
-
Select the columns you wish to merge.
-
Right-click on the highlighted columns select Merge Columns > Merge Selected Columns.
-
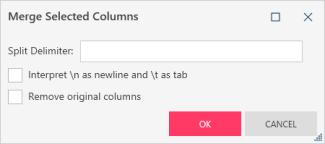
Enter a split delimiter: a character (or set of characters) that will separate the merged values in the output column. For example, you can use a comma and a space character to separate the two address fields.
-
Tick the Interpret \n as newline and \t as tab checkbox to use these characters (i.e., \n, \t) as advanced delimiters.
-
Tick the Remove original columns checkbox if you wish to remove the original (i.e., unmerged) columns from the resulting table.
-
Select OK. The selected columns are merged.
You may select as many columns as you need.

The Merge Selected Columns dialog displays:
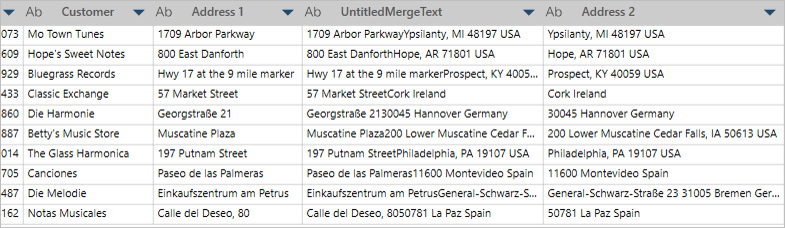
By default, the new column is named <First column name>MergeText. Rename the Merge output as needed.
Merging columns using the Define Merge dialog
The Define Merge dialog allows you to define a more complicated merge. It also allows you to select additional merge columns on the fly.
Steps:
-
Select the first column you want to merge.
-
Right-click on the highlighted column and then select Merge from the options that display.
-
Build your merge column.
-
Add Columns to Merge
-
Move columns to define the merge order
-
Delete Columns
-
Add Delimiters
-
Add All Columns
-
Clear Columns
-
Tick the Remove original columns checkbox if you wish to remove the original (i.e., unmerged) columns from the resulting table.
-
Click OK when you are finished.
The Define Merge dialog displays.
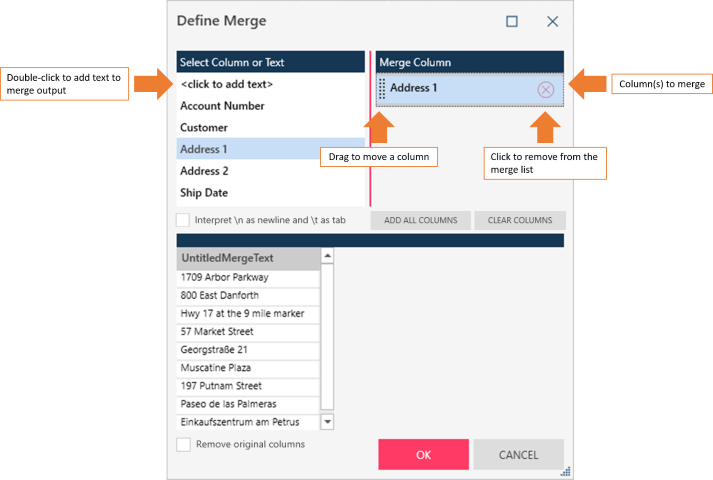
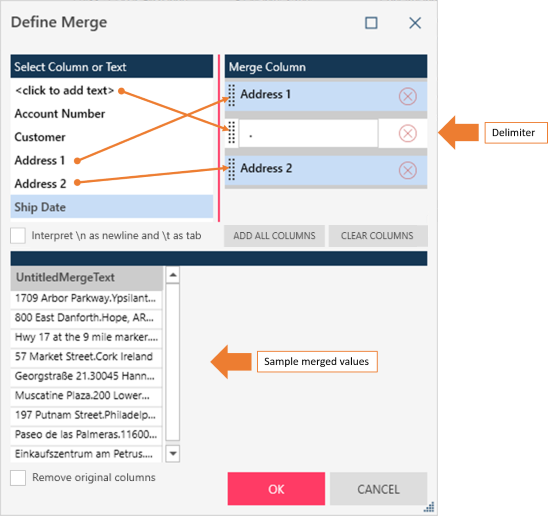
Double-click a column on the Select Column or Text panel to add the column to the Merge Column panel. All columns in the Merge Column panel will make up the new merge column. Values are merged in the order the columns are listed on the Merge Column panel, including any delimiters between each column.
Drag the double bar located to the left of each column to move columns up or down in the Merge Column panel. This will define how values are displayed in the new column.
Use the delete icon at right of each column to remove columns from the Merge Column panel if you decide you no longer want to include a column in the merge.
Double-click <click add text> on the Select Column or Text panel to add a text box to the Merge Column panel. You can then enter a text delimiter to separate columns.
Tick the Interpret \n as newline and \t as tab box to use these characters (i.e., \n, \t) as advanced delimiters.
Click the Add All Columns button to instruct Monarch Data Prep Studio to add all of the columns in your table to the Merge Column panel, essentially merging all of the columns in your table into a single column.
Click the Clear Columns button to remove all columns added to the Merge Column panel.