


|
Exporting Data in Data Prep Studio
You can export individual or multiple tables after combining and transforming these.
Tables may be exported in Data Prep Studio via two ways:
-
Named Exports - These exports are set up using the Export window and saved with the workspace.
-
Quick Exports - These exports are set up from the Prepare window via the table list context menu or by right-clicking on a table in the Export window. Quick exports are not saved with the workspace.
To set up a named export:
-
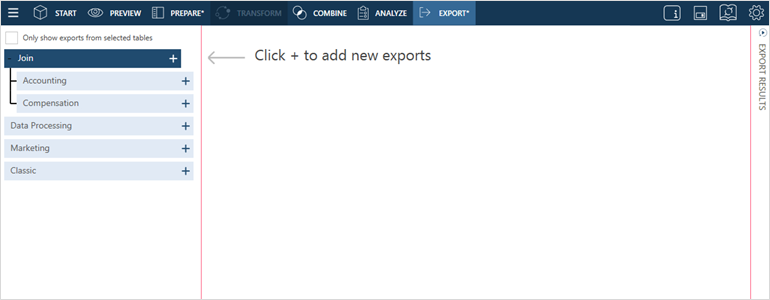
Select Export from the Data Prep Studio toolbar.
The Export Window displays:
-
Click the Add Export
 button
located to the right of the table you wish to export and, from the
options that display, select an export format.
button
located to the right of the table you wish to export and, from the
options that display, select an export format.You can export tables to the following formats:
-
Microsoft Excel
-
CSV
-
IBM Cognos Analytics
-
Microsoft Access
-
Microsoft Power BI
-
Tableau Server
-
Tableau TDE
-
Qlik
-
SAS
-
Angoss
-
JSON
You can also export to:
-
-
Altair Panopticon
-
Altair Knowledge Studio
-
Altair Knowledge Hub
-
Rename the export if you wish by clicking on the Edit
 button located to the left of the Export name (in the figure above,
"Join - Microsoft Excel") and then entering a new name into
the field.
button located to the left of the Export name (in the figure above,
"Join - Microsoft Excel") and then entering a new name into
the field. -
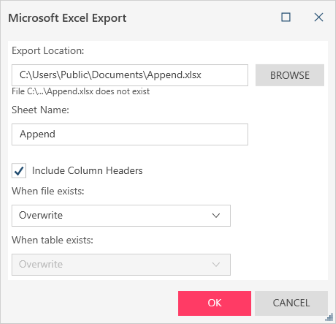
Specify general export settings as necessary. Your export options will vary depending on the export type. The table below describes these settings.
Field
For Export Type
Description
Table Name
All
Each export is assigned a name using the convention <Table Name> - <Export Format>. Click on the edit button of this field to change the name of your export if you wish.
Export Type
All
This field is prepopulated with the value you selected from the Export type drop-down.
Export As/Export Location
-
Excel
-
CSV
-
Access
-
Panopticon Designer
-
Qlik
-
Tableau TDE
-
SAS
-
Angoss
-
JSON
This setting describes where the export file will be saved and what its name will be. Enter the path and name of the export file.
Sheet/Table Name
-
Excel
-
Access
-
Panopticon Designer
-
IBM Cognos Analytics
-
Power BI
-
Knowledge Hub
This setting specifies the sheet or table name data will be exported to. Enter the name of the table to which data will be exported.
When File Exists
-
CSV
-
Excel
-
Access
-
Panopticon Designer
-
Angoss
-
JSON
This setting specifies what Data Prep Studio should do if a file with the same name exists in the folder you specified in the Export As field. Select an action if the export file already exists:
-
Overwrite the file.
-
Append records to the existing file
-
Skip the export operation.
When Table Exists
-
Excel
-
Access
-
Panopticon Designer
-
Qlik
This setting specifies what Data Prep Studio should do if a table or sheet with the same name you specified exists in the file you indicated in the Export As field. Select an action if the export table already exists:
-
Overwrite the table.
-
Append records to the existing table
-
Skip the export operation.
Include Column Headers
-
CSV
-
Excel
-
Panopticon Designer
Checking this setting instructs Data Prep Studio to include the column header in the export file. This header will become the first line in the export file.
Overwrite Existing Table/File
-
Qlik
-
Tableau
-
IBM Cognos Analytics
-
Power BI
Checking this setting instructs Data Prep Studio to overwrite the export table or file if this already exists.
If you do not select to overwrite but the file already exists, a message will display telling you that the export operation will be skipped.
Delimiter
-
CSV
This setting specifies data delimiter for CSV files. Select a delimiter from the drop-down. The delimiter will be used to separate column values.
Text Qualifier
-
CSV
This setting specifies a text qualifier for CSV files. Select a text qualifier from the drop-down. The text qualifier tells you where text values begin and end. This is useful when you have text values that may contain the delimiter character you selected above.
Encoding Type
-
CSV
This setting specifies which encoding type to apply to the CSV file. At present, the encoding types Code Page, UTF-8, UTF-16LE, and UTF-16BE are accepted.
Code Page
-
CSV
When the encoding type selected is Code Page, this setting specifies which code page to apply to the CSV file.
Export All / Limited Rows
All
This setting specifies whether your defined row limit should be respected when exporting tables. Tick the appropriate checkbox to instruct Data Prep Studio to export all rows or only those rows that fall within the limit you have set.
-
-
If you wish to export other tables, set them up by repeating Steps 2 to 4.
-
If you wish to limit the exports displayed in the Export Management panel to only those created from specific selected tables, tick the Only show exports from selected tables box located at the top of the table selector.
-
In the Export Management panel, tick the boxes of the tables you wish to export and then click Export Checked when you are finished.
If you wish to export all of the tables in the panel, click the Export All button instead. There is no need to select individual tables in this case.
The table you selected displays in the Export Management panel and its properties display in the Export Properties panel.
To set up a quick export:
-
In the Prepare window, click on the drop-down arrow located to the right of a table you wish to export to display its context menu and then select Export Table from the options that display.
Alternatively, you can select this table in the Export window, right-click on your mouse and then select Export Table.

The Select an Export Type dialog displays.
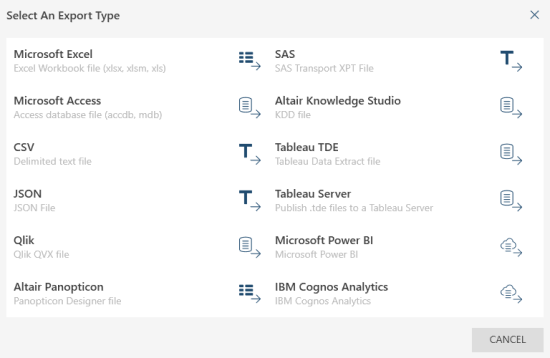
-
Choose a file type to which your table should be exported.
Doing so displays an Export Properties dialog.
-
Modify the properties of your export using the table provided above as a guide and then click OK when you are finished.
To track export results:
The export results display in a panel located to the right of the Export window. Although hidden by default, this panel is automatically launched when an export operation is completed.
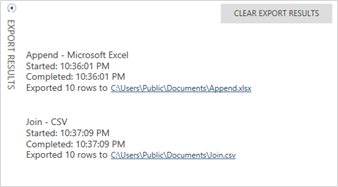
You can erase all export results from this panel by clicking on the Clear Export Results button located at the top right-hand corner of the panel.
To cancel an export operation:
You can cancel an export operation from the Export Results panel provided that the operation has not yet been completed.
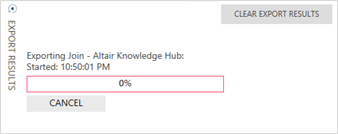
Click the Cancel button provided to cancel a non-completed export operation.
To view export results:
To view the exported file, click on the export link provided in the Export Results panel. Doing so copies the path indicated, and you can use your mouse to paste this path into your file explorer to navigate to the location of the file.
Related Topics