Altair® Monarch®


Connector Dialog for Oracle

Enter values into the dialog box to connect and fetch data from your Oracle data source.

Options

Field

Description

Connection Type

Select to connect via standard connection or by using TNSNames.

Host Name

The name of the machine or domain containing the data source. This host must be accessible from the box where Monarch Data Prep Studio is installed.

Port

Port Number required to access the data source. A list of default connector ports is available here.

SID/ServiceName

Select SID or Servicename from the drop-down.

Oracle SID is the unique name that uniquely identifies your instance/database.

Service Name is the TNS alias that you give when you remotely connect to your database and this Service name is recorded in Tnsnames.ora file on your clients and it can be the same as SID and you can also give it any other name you want.

User ID

A valid User ID required to log-on to the data source.

Password

A valid Password required to log-on to the data source. This password must match the User ID above.

Connection Settings

Click the arrow to hide or display the following connection  settings:

  • Encryption Method: Select the method the driver uses to encrypt data sent between the driver and the database server. If the specified encryption method is not supported by the database server, the connection fails and the driver returns an error.

  • Crypto Protocol Version: Check the box corresponding to the cryptographic protocols to use when SSL is enabled using the Encryption Method connection option. When multiple protocols are checked, the driver uses the highest version supported by the server. If none of the specified protocols are supported by the database server, the connection fails and the an error is returned.

  • Validate Server Certificate: Click to validate the certificate that is sent by the database server when SSL encryption is enabled.

  • Truststore: The directory that contains the truststore file and the truststore file name to be used when SSL is enabled and server authentication is used. The truststore file contains a list of the valid Certificate Authorities (CAs) that are trusted by the client machine for SSL server authentication. Click Browse to locate and select the truststore file.

  • Truststore Password: Enter the password that is used to access the truststore file when SSL is enabled and server authentication is used.

  • Key Store: The name of the directory containing the keystore file to be used when SSL is enabled. The keystore file contains the certificates that the client sends to the server in response to the server’s certificate request. If you do not specify a directory, the current directory is used. Click Browse to locate and select the truststore file.

  • Key Store Password: Enter the password used to access the keystore file when SSL is enabled and SSL client authentication is enabled on the database server.

  • Host Name In Certificate: A host name for certificate validation when SSL encryption is enabled and validation is enabled. This option provides additional security against man-in-the-middle (MITM) attacks by ensuring that the server the driver is connecting to is the server that was requested.

  • Other Connection Options: Other connection options required to connect to the data source. If you need multiple string connection options, separate these by a semi-colon.

  • Edition Name: The name of the Oracle edition the driver uses when establishing a connection. Oracle 11g R2 and higher allows your database administrator to create multiple editions of schema objects so that your application can still use those objects while the database is being upgraded. This option is only valid for Oracle 11g R2 and higher databases and tells the driver which edition of the schema objects to use.

  • When the specified edition is not a valid edition, the driver generates a warning indicating that it was unable to set the current edition to the specified edition.

Edition Name

Name of the edition you are connecting to.

Tables and Views Section


Allows you to load, and then select, the tables from your database by manually selecting from a list.

To load tables and views via search and select:

  1. Select the Tables and Views tab.

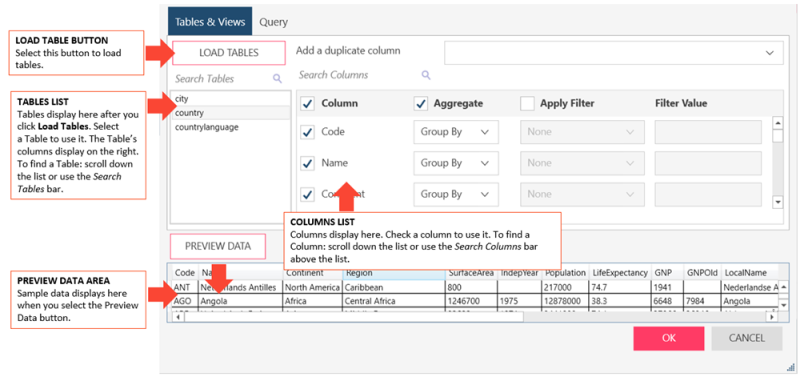
  2. Click Load Tables to load a list of predefined tables or views. These are displayed on the Tables List (at the left side of the dialog box).

  3. Select a table from the Tables List.

  4. The columns of the table are displayed in the Columns List (beside the Tables List).

  5. Select the columns to add to your data table by checking the column boxes.

Note: If you wish to add a duplicate column, select this column from the Add a duplicate column drop-down list provided.


To select a column:

Check the boxes beside the columns you want to use. If you want to use all columns check the Column box on the header.


To aggregate columns:


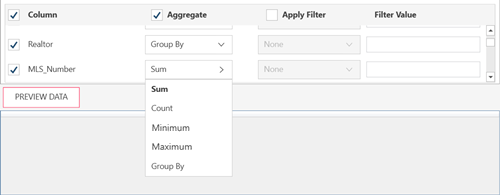
If the data returned are to be aggregated, check the Aggregate box on the header, then select the aggregation method you want to use for each column. The following aggregation methods are possible for each data type:


To filter columns:


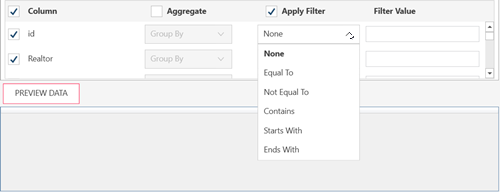
If the data returned are to be filtered, check the Apply Filter on the header. Then, for each column, select a filter method from the filter drop down and then enter the filter value in the Filter Value box.

Note that some data sources require case-sensitive filter values. Refer to this list to check which data sources have case-sensitive filters.

To load tables and views using an SQL Query, select the Query tab

Query

Allows you to load, and then select, the tables from your database by entering a SQL Statement.

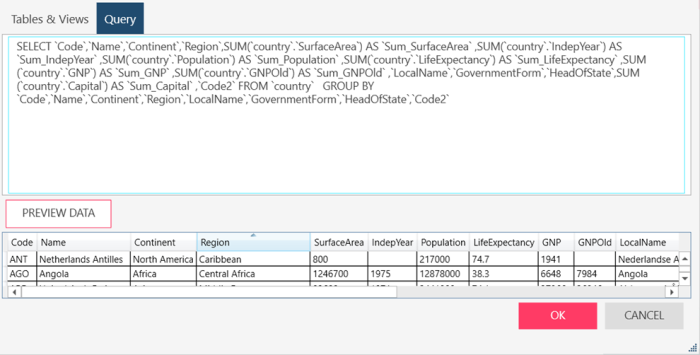
If you already selected Tables and Views, this box is updated to show the corresponding  SELECT * FROM TABLE query.


If you want to define the query, enter the SELECT and/or EXEC statements to execute.

Notes:

  • Currently, only Select and Exec statements are allowed. To minimize security risks and prevent SQL Injection attacks, the following are currently not allowed:

    • Comment characters ( -- )

    • Semi-colons ( ; )

In cases you need to use a series of SQL statements with or without comments, we recommend you use stored procedures to contain these statements. The stored procedure can then be executed from the form.

  • The Preview Data and OK buttons are only enabled if the connection is active and the query is correct. Check your connection or your query if one of the buttons is disabled.

Preview Data

Click to fetch data using the credentials and criteria you have specified. This allows you to confirm your connection, ensure you have connected to the correct table, check your query, and verify the information that will be loaded.

Notes:

  • Only 10 records are displayed to allow you to verify that you are selecting the correct data. This limit prevents system slow down.

  • The button is only enabled if the connection is active and the query is correct. Check your connection or your query if one of the buttons is disabled.