Use the Line Edit panel to split, join, or extend lines.
Panel Usage
The panel consists of several subpanels, listed along the left edge. Criteria for each subpanel function display in the middle of the panel. Some panels' functions execute automatically when lines are selected, but other panels (split at line, split at plane, smooth, and extend) require you to click a green command button located on the right side of the panel.

Subpanels and Inputs
The Line Edit panel contains the following subpanels and command buttons:
Use the Combine subpanel to create a new continuous line segment between two existing lines, resulting in a single seamless line.
Panel Inputs
Input
|
Action
|
1st line
|
The first of two lines to combine. Once a line is selected for this input, the selector automatically advances to select the 2nd line.
|
2nd line
|
The second of two lines to combine. When both lines are selected, they combine automatically.
|
smooth / straight
|
Connections made between non-collinear lines will be a curve if this switch is set to smooth, or a straight line with angles at the points where it meets the input lines.
|
|
Use the Split at Point subpanel to split an existing line into two separate line segments. The split occurs at a point which you select by clicking the line.
Panel Inputs
Input
|
Action
|
line
|
With this collector highlighted, click the input line to select it.The selected line will remain highlighted. Then, click the point on the line where you wish the split to occur, and the split will be made automatically
|
|
Use the Split a Joint subpanel to split a line into separate segments at a joint. Joints exist where lines have been previously combined, or where geometric features dictate. Joints are part of the line definition history, so depending on how the line was created; it may or may not have joints.
Panel Inputs
Input
|
Action
|
lines
|
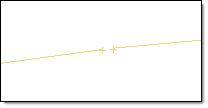
With this collector highlighted, click the input line to select it. The line will remain highlighted, and any joints associated to that line will be indicated with a red “V”.
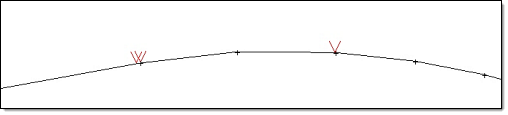
Click any of the displayed joints to split the line at that location, and the split will be made automatically.
|
|
Use the Split at Line subpanel to split each of the input lines at the point where they are crossed by another line or lines. You must specify the lines to be split and the lines that determine the split location separately.
Panel Inputs
Input
|
Action
|
lines
|
Use this collector to specify the lines that you wish to be split.
|
cut line
|
Use this collector to pick the line that crosses the input lines where you wish them to be split.
| Note: | You can only specify a single cut line, even though you can specify multiple lines to be split. |
|
|
Use the Split at Plane subpanel to split each of the input lines at the point where they are crossed by a user-defined plane. You must specify the lines to be split and define the plane, either via one of the coordinate axes with a base node, a vector entity with a base node, or by specifying three nodes and a base node.
Panel Inputs
Input
|
Action
|
lines
|
Use this collector to specify the lines that you wish to be split.
|
(plane and vector selector)
|
Use the standard plane and vector selector to define the plane that intersects the lines where you wish them to be split.
|
|
Use the Smooth Line subpanel to convert sharp angles or joints in the input lines into smooth curves instead. You can determine an upper limit allowed for angles, so that angles below than this limit will be smoothed into curves while the angles above the limit are preserved.
Panel Inputs
Input
|
Action
|
lines
|
Use this collector to specify the lines that you wish to be smoothed.
|
smooth corners / approximate lines
|
These three options determine the smoothing behavior:
| • | Smooth corners: only sharp angles in the lines will be converted to curves. |
| • | Approximate lines: the input lines will be converted to straight lines that approximate their current shapes, but still exactly connect their start and end points. |
|
min. tangent angle
|
This setting only displays when using the smooth corners option. Corners whose angle relative to the line is less than this value will not be smoothed.
|
tolerance =
|
This setting only displays when using the smooth entire line option.
|
approximation type:
|
This setting only displays when using the approximate lines option. The options are flat parabola and bezier simplify.
|
|
Use the Extend Line Criteria subpanel to make an existing line longer, following the general vector and/or curvature of the input line. You can specify the distance as a numeric value, or extend the line to a specified node, line, surface, or point.
Panel Inputs
Input
|
Action
|
line
|
Use this selector to specify the line that you wish to extend. Only one line is accepted.
Once selected, the beginning (origin) of the line is indicated with a red “V”. Clicking extend + will extend the line from the end point; clicking extend – will extend from the origin.
|
distance = / to:
|
Use the toggle to choose between a specific distance to extend, or extending the line to meet another entity.
If you choose to:, a new entity collector displays along with a switch. The switch allows you to choose between nodes, lines, surfs, and points as the destination. Once this entity type is chosen, use the entity collector to specify the entity to use as a target. Like the line collector, this collector accepts only one entity as input.
| Note: | Using extend – in this case will extend the line from the origin by the distance from the origin point to the selected destination geometry. The extended line will not necessarily meet the geometry. |
|
follow curvature
|
When extending a line, this option causes the extension to follow the existing line curvature. If disabled, the extension will form a straight extension.
|
capture radius =
|
This option only displays when using the to: extension distance option. The value indicates the range that the extended line must fall within to connect to the target geometry. If the end of the extended line is within the capture radius of the target geometry, then the coordinates are mapped to the target geometry.
|
|
The following action buttons appear throughout the subpanels:
Input
|
Action
|
reject
|
Undoes the most recent edit.
|
split
|
When splitting by a point, joint, line, or plane, this button performs the split provided that all necessary criteria are complete.
|
smooth
|
Smoothes the selected lines in accordance with the criteria specified.
|
extend +
|
Extends the line from the end point.
|
extend -
|
Extends the line from the origin.
|
return
|
Exits the panel.
|
|