Connection classes provide an easy method of organizing your calculations by name and color.
A connection class consists of a class name and corresponding color. The color is applied to the wire attached to the connector. For example, you can assign the class name PRESSURE to all connectors whose input and output signals relate to pressure calculations. All wires entering or exiting those connectors would then be displayed in the same color.
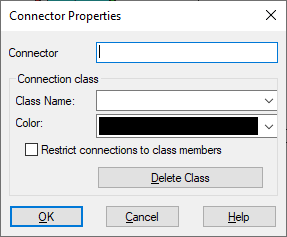
To assign a class
1. Hover over the connector tab to be classified and double-click.
2. In the Class Name box, enter a name, or click the DOWN ARROW to select an existing name.
Note: If you do not specify a connector label, the class name is used as the connector label.
3. In the Color box, click the DOWN ARROW and select from the drop-down color list.
4. Click OK, or press ENTER.
1. Hover over the connector tab whose class color you want to change and double-click.
2. In the Color box, click on the DOWN ARROW and select from the drop-down color list.
3. Click on the OK, or press ENTER.
To delete a class
1. Hover over the connector tab to be classified and double-click.
2. Click Delete Class.
3. Click OK, or press ENTER.
To restrict connections to class members
If you want to prevent wires from being drawn between connector tabs of different classes, activate the Restrict Connections to Class Members box in the Connector Properties dialog box.
1. Hover over the connector tab to be restricted to class members and double-click.
2. Activate Restrict Connections to Class Members.
3. Click OK, or press ENTER.