Linking to files, diagrams, and URLs
You can link to external files, diagrams, and URLs using
the label block. This is particularly useful for adding a requirements
traceability link to the diagram.
To create a link from a
document or website
1. Go to the
Microsoft-compatible document, such as a Word document, Excel spreadsheet, or
PowerPoint presentation document or the webiste.
a. Select the
text or URL to which the diagram will link.
b. For
documents, create a bookmark of the selected text.
c. Save
the document.
d. Select
Edit > Copy (CTRL+C).
2. Open the
diagram that will contain the link.
a. Insert a
label block into the diagram and right-click it..
b. Activate
Hyperlink.
c. Click
Paste Hyperlink.
d. Click OK
and save the diagram.
The label contains the link information, including the path
to the linked document or URL and whether the link is active. When you click the
label block, the document or website opens.
To create a bi-directional
link between two diagrams
1. Open
diagram1.
a. Insert a
label block into the diagram and right-click it.
b. Enter a
label name, activate Hyperlink, enter a unique name in the
Bookmark text box, and click Copy Hyperlink.
c. Click
OK and save the diagram.
2. Open
diagram2.
a. Insert a
label block into the diagram and right-click it.
b. Enter a
label name, activate Hyperlink, and click Paste Hyperlink.
The Link to
file, diagram, or URL and Bookmark text boxes are populated
with the link information from diagram1.
c. Click
Copy Hyperlink.
d. Click
OK and save the diagram.
3. Open
diagram1.
a. Right-click
the label block.
b. Click
Paste Hyperlink.
c. Click
OK and save the diagram.
The label blocks contain the link information of the two
diagrams. When you click the label block in diagram1, it opens
diagram2 at the linked location, and vice versa.
Example
The following 3 x 7 Excel spreadsheet lists sample
requirements for an automotive speed control system: column B lists the
requirements and column C describes the requirements. In this example, cell
B2 will be linked to the name that appears on the label block in the
Embed diagram and the contents of cell C2 will be highlighted when you
click on the label block.

1.
In your Embed diagram, go to Blocks > Annotation, and insert a
label block. If this is a new diagram, save it.
2.
Go to your requirements spreadsheet, right click cell B2, and select
Link from the pop-up menu.

3.
In the Insert Hyperlink dialog box, select the requirements
spreadsheet and click Bookmark. Note that the contents of cell
B2 (speedControl.stop) is displayed in the Text to display box.

4.
In the Select Place in Document dialog box, enter C2 (rather than
B2) to link to the description of speedControl.stop and click OK.

5.
In the requirements spreadsheet, cell B2 is highlighted.

6.
Right click cell B2 and select Copy from the pop-up menu.
7.
Return to the Embed diagram and right click the label block.
8.
In the Label Properties dialog box, activate Hyperlink and click
Paste Hyperlink.
The Label Properties
dialog box is updated with the hyperlink information.
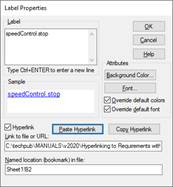
9.
To display the description of speedControl.stop, revise the bookmark location in
Named location (bookmark) in file to Sheet 1!C2 and click
OK.
10. In
the Embed diagram, the label block appears as a hyperlink named
speedControl.stop. When you click speedControl.stop, the
requirements spreadsheet opens with a border around cell C2.
