Embed provides a customizable toolbar named User. To activate the custom toolbar, click on Tools > Customize > Toolbars and click User.
You can create buttons for commands and blocks you use most frequently. You can also create your own images for the buttons. The images you create should be no larger than 16 x 15 pixels.
To create a custom toolbar button
1. Choose Tools > Customize > User Tool Bar.
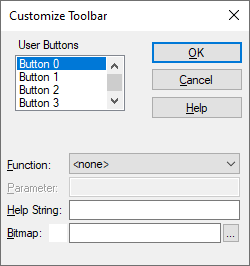
The Customize Toolbar dialog box appears.
2. Under User Buttons, select a button number.
3. In the Function box, click the DOWN ARROW and select the command to be assigned a toolbar button. If you select:
•Blocks-> (P), click the DOWN ARROW in the Parameter box and select a block to be associated with the toolbar button.
•Edit->Find (P) or File->Add (P), you can optionally enter a variable block name or file name in the Parameter box. If you do not enter anything, Embed opens the Find or File Add dialog box when you click on the toolbar button.
•In the Help String box, you can optionally enter text that will appear in the status bar when you point to the toolbar button. If you do not enter anything, Embed displays the default help string for the toolbar button.
4. Click … to choose a bitmap for the toolbar button. Pre-made button bitmap images are in \<install-directory>\BITMAPS\TOOLBAR.
5. When you choose a bitmap, its location is shown in the Bitmap box next to a preview of the image. Custom bitmaps should be 16-pixels wide by 15-pixels high for the best display.
6. Click OK, or press ENTER.
To remove a custom toolbar button
1. Choose Tools > Customize > User Tool Bar.
The Customize Toolbar dialog box appears.
2. Under User Buttons, select the toolbar number that corresponds to the toolbar button to be removed from the toolbar.
3. In the Function box, click the DOWN ARROW and select <none>.
4. Click OK, or press ENTER.