Projection
Project one or more curves onto one or more surfaces in a specified direction.
- On the ribbon, click the Curves tab.
-
Click the Projection icon.
-
Click the curves and surfaces. Right-click to confirm.
By default, the curves are projected along both the curve normal and its opposite. The curve normal is perpendicular to the plane in which the curve lies.In the case where a single line segment is being projected, Inspire Studio defines the curve normal in relation to the modeling view (Top, Right, Perspective, etc.) that was active when the line segment was selected and sets the projection direction to Custom.Note: Double-click the curve to edit.
- Optional:
You can adjust the projection direction by selecting one of the following
options:
- Global Axis X: Lock the x direction, so that the projection occurs in the y-z plane.
- Global Axis Y: Lock the y direction, so that the projection occurs in the x-z plane.
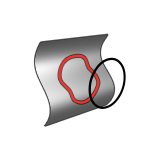
- Global Axis Z: Lock the z direction, so that the projection occurs in the x-y plane. In the example below it is not possible to lock the z direction, so the projected curves appear in red.
- Normal Direction: Set projection in the normal direction.
- Perpendicular to Surface: The source curves are projected straight "down" (perpendicular to) the target surfaces. You need to enter an Elevation value, and then press Enter.
- Positive Normal: Set projection in the positive normal direction.
- Negative Normal: Set projection in the negative normal direction.
- Custom: Set the projection in a custom direction by dragging the arrows or the direction point.
- Set as current view: Project the curves along the axis that is perpendicular (normal) to the active modeling view.
- Optional:
Define which surfaces are used for the projection:
- Right-click empty space.
- Select one of the following options on the context menu:
- Faces to ignore: Click one or more faces that you do not want the curves to be projected on.
- Use all faces: Use all faces for the projection.
- Invert selection: Invert which faces are used for the projection.
- Right-click and mouse through the check mark to exit, or double-right-click.