


|
OneTick
The OneTick connector allows connection to OneMarketData OneTick tick history databases on a polled basis. In general, it is used to retrieve conflated time series data sets. The connector supports either:
-
Execution of a specified OTQ
-
Execution of a specified parameterized OTQ
-
Execution of a custom SQL Query
To use the OneTick connector, the OneTick client software must be installed together with a set of dependencies that should be copied to the Panopticon Designer (Desktop) plugins folder.
Further details are provided in the Panopticon Designer (Desktop) Installation Guide.
Using OneTick
-
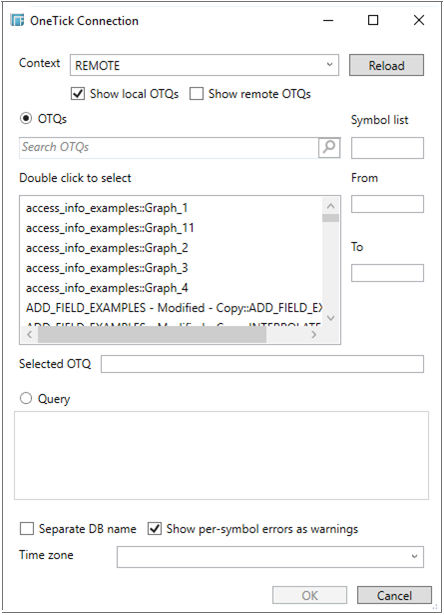
When creating a new data table, select OneTick from the Connect to data dialog. The OneTick Connection dialog displays.
-
Enter the Context, (for example, REMOTE), and click the Reload button.
This populates the list of available OTQs.
NOTE: This will initially be empty. Once defined, the entered Context, along with the returned OTQs will be saved for future usage.
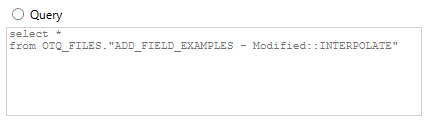
An OTQ can be specified for execution, or a custom SQL query can be executed, through selection of the appropriate radio button:
-
-
OTQs
-
Query
-
A text box above the list of OTQ list box can be used to filter the contents.
-
Double-click on the required OTQ to select it.
If an OTQ is selected, the list of input parameters that the OTQ expects is displayed.
Additionally the basic SQL query is generated allowing the OTQ to be executed.
As well as the input parameters specific to the selected OTQ, the following are generic to all OTQs.
-
-
Symbol List
-
From
-
To
-
These add additional filter criteria such as symbol, and time window onto the basic OTQ.
The Timezone selection by default is empty. If changed to a valid time zone, input From and To Date/Time constraints are assumed to be in this time zone, and are converted to UTC for incorporation into the query.

Similarly results returned from the query are converted from UTC to the selected time zone.

-
Check the Separate DB Name box to generate a separate field for the database name.
-
Check the Show per symbol errors as warnings box to proceed with warnings in the log if symbol errors are returned.

The result of the dialog is a fully generated OneTick SQL query which is listed at the bottom of the dialog. This can be edited as required.
-
Click OK. The source table is returned in the Edit Data Table view, with the title corresponding to the selected OTQ and all fields displayed in the Data Source Preview.
All fields are mapped to one of the following data types:
-
-
Text
-
Numeric (double)
-
Date/Time
-
NOTES:
-
-
The returned schema is based only on the first tuple/row returned from the query.
-
If subsequent rows present different schemas, only matching fields will be processed.
-
Starting version 13.8, saving the data source for OneTick saves the schema.
-
Consequently, any subsequent query with:
-
Modified data types for certain fields will be ignored. Also, NULL values will be returned for the corresponding fields that have changed data types.)
-
Missing fields will return NULL values.)
-
Extra fields will be ignored.)
To update the schema, user will have to go to Edit Data Table > Settings and then click OK in the Data Source Settings dialog.