


|
JDBC Database
The JDBC Database connector will only work when Panopticon Designer (Desktop) is connected to the Panopticon Visualization Server. The database must also have the appropriate JDBC driver .jar files and JNDI connections.
Refer to the Database section in the Panopticon Visualization Server Installation and Troubleshooting Guide for more information.
The star schema data model is now introduced to the JDBC Database connector wherein a large table (or fact table) is joined to one or several dimension tables. Consequently, instead of using a full table scan on large tables, joining the key of the fact table with the corresponding key of the dimension table reduces the data set processed. To further reduce the process time, you can also query the schema with on demand, or with selected aggregates, and parameters.
Using JDBC Database
-
Launch the Connect to Data dialog and then select JDBC Database.
The JDBC Database Connection dialog displays.

-
Set the connection settings. This can include Java connectivity, which will solely be used by the Panopticon Visualization Server for data retrieval.
For the connection to the Panopticon Visualization Server, set either of the following information:
-
-
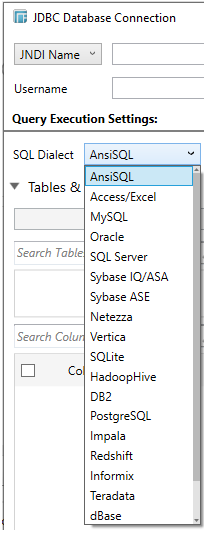
JNDI
-

-
-
Enter the JNDI resource name to be used, then the Username and Password.
-
-
-
URL
-
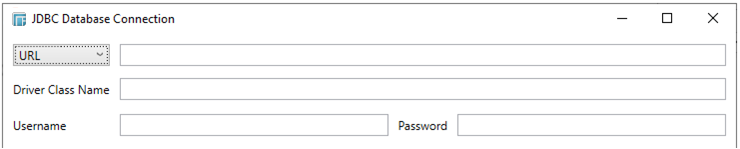
Enter the URL specific to the database’s JDBC driver, the Driver Class Name specific to the driver, and the Username and Password.
Note that these connection settings can be parameterized.
IMPORTANT:
In Designer, you are required to make certain settings related to the JNDI data source, even though Designer is not using for its own purpose. The settings are instructions for the Panopticon Visualization Server, telling it which data source to use for this particular data table in the Panopticon Designer (Desktop) workbook.
For example, in Designer, enter the following value:
Java:comp/env/jdbc/sqliteSABR
Where jdbc/sqliteSABR is the value of the name-attribute in the JNDI resource entry in panopticon.xml in Panopticon Visualization Server.
Refer to the Database section in the Panopticon Visualization Server Installation and Troubleshooting Guide for more information.
-
Select the appropriate SQL dialect to be able to generate the correct SQL for the required data repository. The default dialect is ANSI SQL.
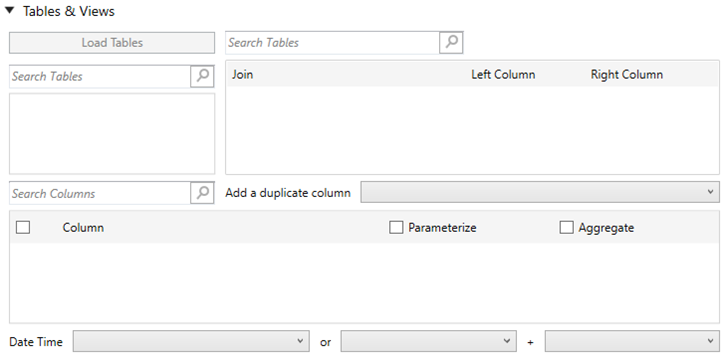
If Tables & Views is selected, the section below is enabled.
-
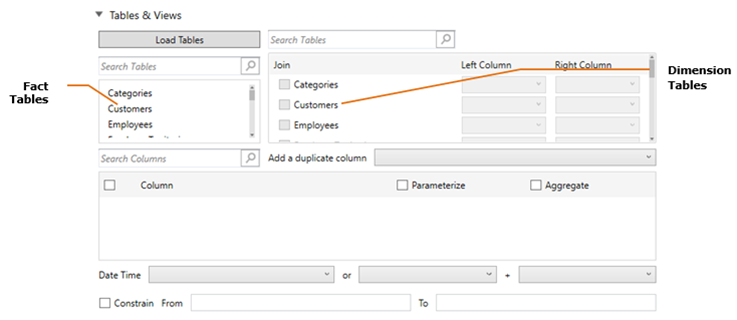
Clicking Load Tables loads the list of tables and views in the left list box (Fact Tables), which can be filtered by entering text in the Search Tables search box. The same list of tables and views is loaded in the right list box (Dimension Tables), which can be filtered by entering text in the Search Tables list box.
NOTE: Starting version 17.0, complex HadoopHive data types (STRUCT and ARRAY) will be supported, while the MAP data type is not.
-
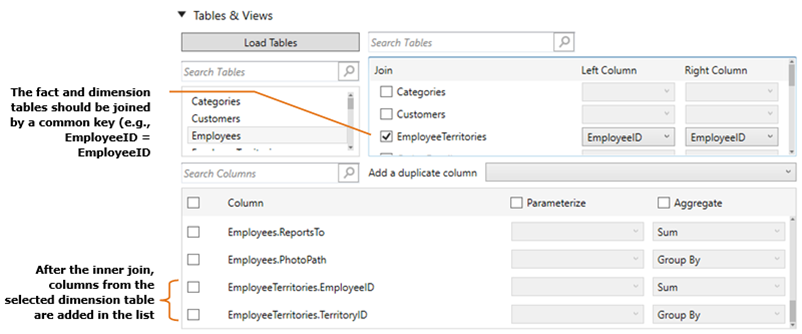
Select the fact table. This will be the “center” of the star schema data model. Consequently, the selected fact table will no longer be displayed in the Dimension Tables list box.
Also, the corresponding list of available columns (<Table name>.<Column name>) is displayed in the Search Columns section. By default, all columns are returned through SELECT * FROM TABLE.

Click the Query expander button to display the generated query:
-
Perform a join by checking one or more dimension tables.
-
You can also add duplicate columns (Numeric or Date/Time).
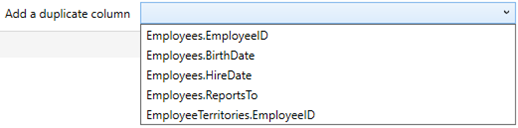
They are added in the Output Columns list.
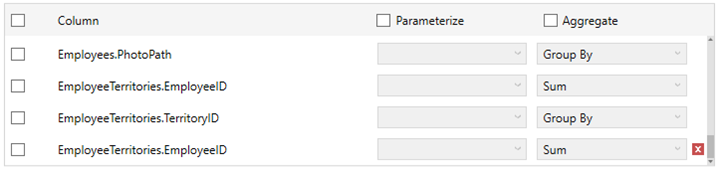
You
can opt to delete the duplicate columns by clicking  .
.
-
Limit the number of columns in the star schema by checking the corresponding Column box in the Output Columns listing. To add all columns, click the topmost check box.
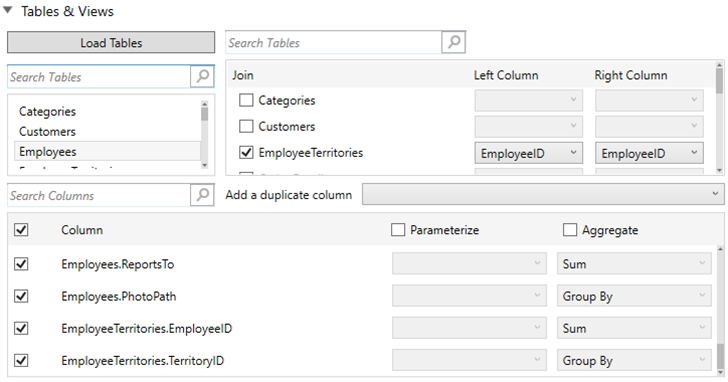
If you wish to parameterize a specific column, check the Parameterize check box, and match the parameter to the appropriate column. By default, they will be matched on name.

If a parameter has been defined in the data table, the SQL Query can automatically be modified to refer to it.
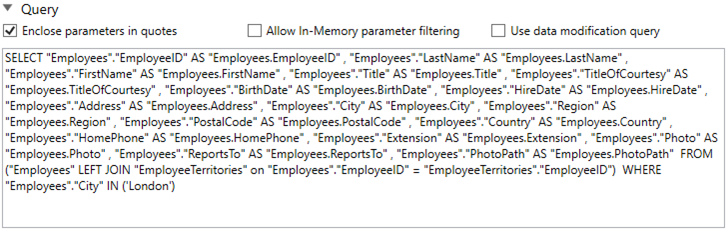
NOTE: The SQL Query can be manually defined or modified.
-
If the data returned is to be aggregated, then the Aggregate box should be checked.
For each selected column the possible aggregation methods are listed including:
-
-
Text Columns: Group By
-
Date Columns: Count, Min, Max, Group By
-
Numeric Columns: Sum, Count, Min, Max, Group By
-
The time zone of input parameters and output data is by default unchanged.

Changing the time zone is supported through the Timezone list box, based on the assumption that data is stored in UTC time and outputs are presented in the selected time zone.
As Panopticon Designer (Desktop) requires Date/Ttime fields, if timespan fields are returned from the database, they are converted to date times using the defined Timespan base time.

-
If only a selected Date/Time range of the table/view is to be queried, the selected time column or columns should be selected, then the constraint checkbox checked, and the From and To text boxes completed; either with values or with parameters.

It is more efficient to define the Date/Time constraint in the dialog, than by entering a manual query, especially if Panopticon Designer (Desktop) will be dynamically issuing on demand queries, as nested select statements will be avoided.
If a manual query has been selected, rather than using the Table & View query builder, three additional options are enabled.
-
-
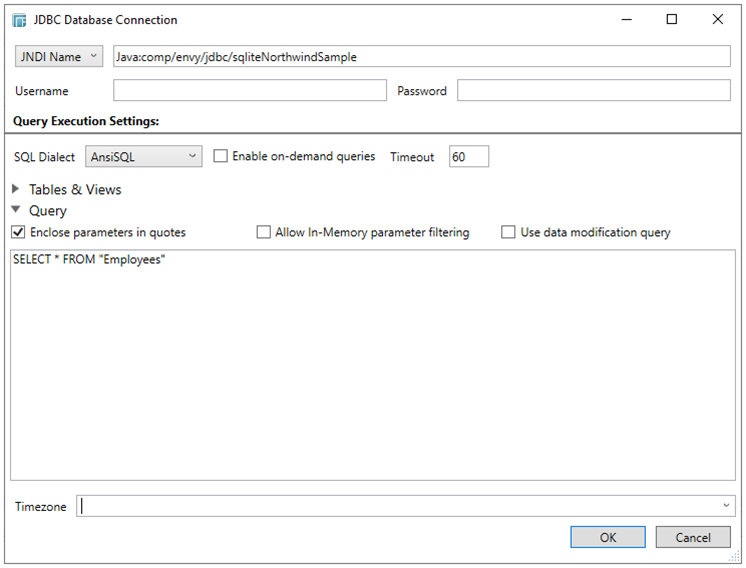
Enclose parameters in quotes
-
Allow in-memory parameter filtering
-
Use data modification query
-

-
You can select any of the following options:
-
-
Unchecking Enclose parameters in quotes, removes the quotes when adding parameter values, and is typically used when parameterizing returned column or table names. By default, this option is checked, as the common use case for parameters is a filter WHERE clause.
-
Checking Allow In-Memory parameter filtering allows the whole dataset to be returned, and then filtered in memory. This process is much less efficient than adding the parameter as a WHERE clause of the SQL query; however, it may be efficient in cases where small sets of records are returned on a very frequent basis.
-
Checking Use Data Modification Query signals that the table is created for writing data. This property is also used for filtering out target data tables for further data update action configuration.
-
-
Click OK to confirm the selection and retrieve the record set into Panopticon Designer (Desktop).
The flat record set corresponding to the executed SQL is returned from the source database and displayed in the Edit Data Table view, with the database name as the title, and all fields listed displayed in the Data Source Preview.