


|
Cloudant
The Cloudant connector allows for the retrieval and processing of JSON documents stored using a Cloudant server.
Using Cloudant files
-
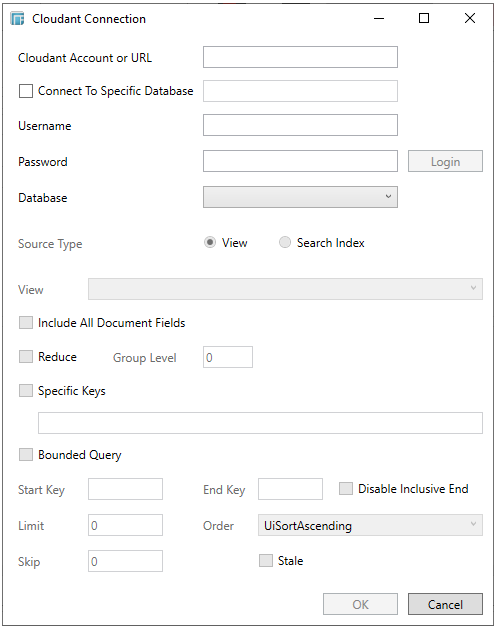
When creating a new data table, select IBM Cloudant from the Connect to Data dialog. The Cloudant Connection dialog is displayed.
-
You can enter either:
-
-
the Cloudant account that will be used, or
-
the URL that you will be connecting to.
-
-
Check the Connect to Specific Database box if you are logging into a specific database then enter the name of the database that you will be logging on to. Otherwise, you can leave this blank.
-
Enter the login credentials into the Username and Password fields and click the Login button. A message box is displayed confirming if the login was successful.
-
Select a Database that you will be connecting to in the dropdown box if a specific database was not used to login.
-
Select the Source Type. The corresponding sections will be enabled depending on the selected source type.
-
-
View
-
-
Select a View and configure how you wish documents will be returned from the view.
-
Check the Include All Document Fields box to include all documents in the view.
-
Check the Reduce box if you want to apply the view’s reduce function then enter the group level of the reduction.
-
Check the Specific Keys box if you want to limit the returned documents only to certain keys.
-
Filter the returned documents to a certain range of keys using upper and lower key bounds.
-
Enter the cutoff of the number of documents you want returned into the Limit box.
-
Enter the number of documents returned that will be skipped into the Skip box.
-
Select the order in which the documents will be returned: Ascending or Descending.
-
Check the Stale box to allow stale or not up to date documents to be returned to reduce latency.
-
-
Search Index
-
-
Select a search index from the dropdown and enter your query term.
-
Enter the cutoff of the number of documents you want returned into the Limit box.
-
Enter the sort order (Ascending or Descending) you want to apply to the returned documents.
-
Check the Include All Document fields to include all documents in the view.
-
Check the Stale box to allow stale or not up to date documents to be returned to reduce latency.
-
Click OK. The source table is returned in the Edit Data Table view with the title of the file selected and the fields displayed in the Data Source Preview.