Amazon Redshift
The Amazon Redshift connector allows you to connect to Amazon Redshift databases.
NOTE: Starting 16.2, this connector is deprecated. The Database connector or JDBC Database connector should be used. Existing workbooks will continue to operate for this 16.2 release, but connectivity will need to be migrated for subsequent releases.
Using Amazon Redshift
-
Launch the Connect to Data dialog and then select Amazon Redshift.
The Redshift Connection dialog displays.
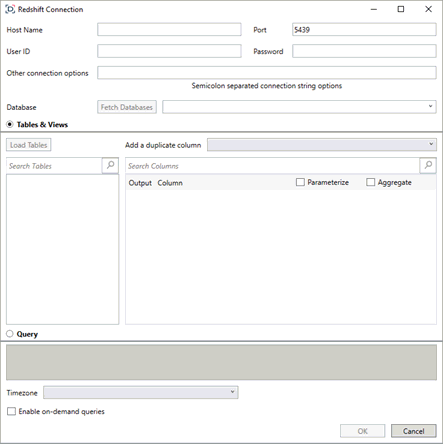
-
Provide the hostname, user ID, and password required to connect to the Amazon Redshift database you wish to access. If the port you wish to use is different from the default port, change the default value to the correct one.
-
Specify other connection options if desired, making sure to separate individual connection strings by a semi-colon.
The following table lists the connection string attributes supported by the Redshift Wire Protocol driver.
|
Attribute (Short Name) |
Default |
|
BatchMechanism |
2 |
|
UnboundNumericScale |
6 |
|
UnbroundNumericPrecision |
1000 |
|
KeepAlive |
0 |
|
KeysetCursorOptions |
0 |
|
EnableKeysetCursors |
0 |
|
LoadBalanceTimeout |
0 |
|
MinPoolSize |
0 |
|
MaxPoolSize |
100 |
|
ConnectionReset |
0 |
|
Pooling |
0 |
|
FailoverPreconnect |
0 |
|
FailoverGranularity |
0 |
|
FailoverMode |
0 |
|
QueryTimeout |
0 |
|
LoginTimeout |
15 |
|
ExtendedColumnMetadata |
0 |
|
FetchRefCursor |
1 |
|
FetchTWFSasTime |
0 |
|
FetchTSWTZasTimestamp |
0 |
|
XMLDescribeType |
-10 |
|
TransactionErrorBehavior |
1 |
|
ValidateServerCertificate |
1 |
|
EncryptionMethod |
0 |
|
ReportCodepageConversionErrors |
0 |
|
ConnectionRetryDelay |
3 |
|
ConnectionRetryCount |
0 |
|
LoadBalancing |
0 |
|
EnableDescribeParam |
1 |
|
ApplicationUsingThreads |
1 |
|
PortNumber |
5439 |
-
You can either:
-
-
click Fetch Databases to populate the drop-down list and select a database, or
-
enter the name of the database to which you want to connect.
-
-
The easiest way to select a table and/or view to load is by choosing from a set of predefined tables and views. To do so, ensure that the Tables & Views radio button is selected. If you wish to manually construct a SQL query to pull and load data, ensure that the Query button is selected. Once either a table or view or a query has been selected, the OK button at the bottom of the dialog is enabled.
-
Click Load Tables to load a list of predefined tables or views. This list can be filtered by entering an appropriate string in the Search Tables search box.
You can also add a duplicate column.
-
Select a table to display the available columns in the Search Columns list. Once a table has been selected, the Query text box is updated to reveal the results of a SELECT * FROM TABLE query. Any other selection made updates the Query text box accordingly.
-
Select the columns to add to your data table by checking their corresponding Output Column box.
-
If you wish to parameterize a specific column, check the Parameterize checkbox and, in the dropdowns that display, select the desired value.
-
If the data returned is to be aggregated, check the Aggregate checkbox. The following aggregation methods are possible:
-
-
Text Columns: Group By
-
Date Columns: Count, Min, Max, Group By
-
Numeric Columns: Sum, Count, Min, Max, Group By
-
Numeric Columns: Sum, Count, Min, Max, Group By.
-
The time zone of input parameters and output data is, by default, unchanged. Changing the time zone is supported by using the Timezone list box based on the assumption that data are stored in UTC time and outputs are presented in the selected time zone.
-
Check the box for Enable on-demand queries if you would like to enable this function.
-
Click OK to confirm the selection and retrieve the record set into Panopticon Designer (Desktop).
The flat record set corresponding to the executed SQL is returned from the source database and displayed in Data Prep with the database name as the title and all fields listed displayed in Data Source Preview.
-
If you wish to make changes to your fields, you may do so now and then click OK when you are finished. If you do not wish to make any changes to your data, simply select the OK button.