


|
AMPS
The AMPS connector allows connection to AMPS message bus on a real-time streaming basis. The connector allows Panopticon Designer (Desktop) to subscribe to the Native FIX and XML message support. The data format itself is arbitrary, and in turn the connection includes the message definition.
Using AMPS
-
When creating a new data table, select AMPS from the Connect to Data dialog.
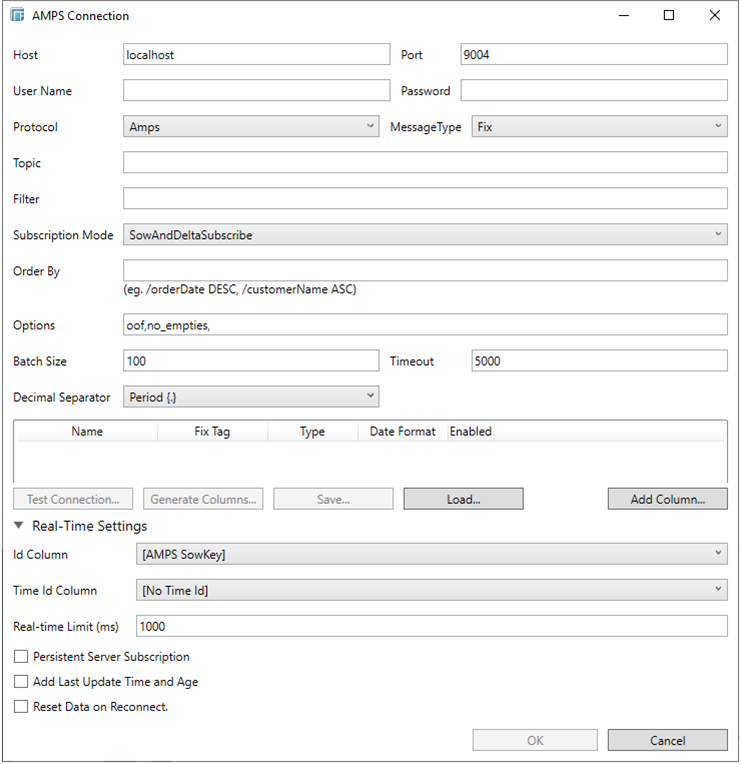
The AMPS Connection dialog is displayed.
-
Provide the following information:
-
-
Connection details including Host, Port (default is 9004), User Name, and Password
-
Topic
-
Filter
-
-
Select the Protocol. This will specify the format of the headers:
-
-
Amps (default)
-
Fix
-
NvFix
-
XML
-
-
Select the Message Type. This will specify the format of the data within the message:
-
-
Fix (default)
-
XML
-
NvFix
-
JSON
-
NOTE: Starting with AMPS 4.0, different formats for the protocol and message type can be specified. It is highly recommended to use the amps protocol for new applications, and a protocol that matches the message type (fix, nvfix, xml) for older ones.
-
Select from any of the following Subscription Modes:
-
-
Sow
-
SowAndSubscribe
-
SowAndDeltaSubscribe (default)
-
Subscribe
-
DeltaSubcribe
-
-
Enter the Order By Statement in order to limit the returned data. For example:
/orderDate DESC
/customerName ASC
-
Enter any of the following Options for the selected Subscription Mode:
-
-
cancel
-
live
-
no_empties
-
null
-
no_sowkey
-
oof
-
pause
-
replace
-
resume
-
send_keys
-
timestamp
-
NOTE: Leave the Options box blank if you selected the Subscribe subscription mode.
-
Enter the Batch Size. This is the number of messages that will be sent at a time as results are returned. Default is 100.
-
Enter the Timeout for the length of time to wait for the server response. Default is 5000.
-
Select either the dot (.) or comma (,) as the decimal separator.
-
After entering the valid connection settings, click the Test Connection button. A confirmation dialog displays to show that the connection was successfully established.
-
Modify the Real-time Limit to vary the data throttling. This defaults to 1000 milliseconds. (When data should be pushed through to the desktop.)
-
Click Generate Columns. This populates the list of columns with the data type found from inspecting the schema.
The retrieved schema can then be modified to:
-
-
Disable specific fields
-
Change data types (e.g., a Numeric value should be set to a Text or String)
-
Specify how to parse Date/Time format
-
-
NOTE:
-
To parse and format times with higher than millisecond precision, the format string needs to end with a period followed by sequence of lower case Fs. There can be no additional characters following them.
-
For example: yyyy-MM-dd HH:mm:ss.ffffff
-
-
Specify whether to retrieve the field
-
Once the schema has been adjusted accordingly, click OK. This will retrieve the whole file.
-
Click Add Column. This adds columns to the AMPS connection that will represent sections of the message.
-
Provide the following information:
-
-
Name
-
Fix Tag
-
Type (Numeric, Text, and Date/Time)
-
Date/Time Format when the Data Type is Time
-
Check the Enabled box to process the message field
-
If Message Type is set to Fix or NvFix, the Add Column will display as:

If Message Type is set to XML, the Add Column will display as:

If Message Type is set to JSON, the Add Column will display as:

Click
 to
delete a column in the list.
to
delete a column in the list.
-
You can opt to save the columns definition into an XML format by clicking the Save button. The saved XML files are placed in …\Public\Public Documents\Datawatch Desktop\Column Schemas.
-
Click Load to load the column schema.
-
Expand Real-Time Settings.
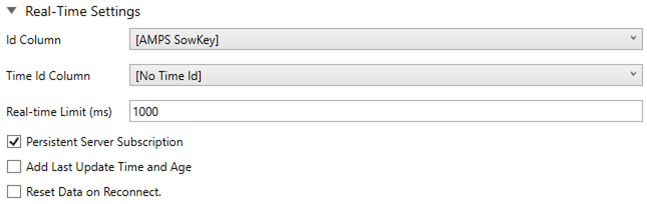
NOTE: The default Id Column for the AMPS connector is AMPS SowKey which is used by AMPS to identify a message by this unique key.
Refer to Defining Real-Time Settings for more information.
-
Click OK to confirm the selection and retrieve the record set into Panopticon Designer (Desktop).
Initially, there is no data displayed in the Data Source Preview section of the Edit Data Table window.
Click the Start Preview button to display the data and refresh the values depending on the defined Refresh Period.
-
IMPORTANT:
The default values in subscribing to AMPS are:
-
Real Time Limit = 1000 ms
-
Refresh Period = 900 s
The first client request initializes the subscription. Initially there is no data so an empty data table is returned.
This empty data set is cached on the server with a TTL set to 900 seconds.
The subscription being initialized updates the server in-memory table with the latest snapshot of the data (as defined in the data table definition).
Consequently, the end client will show no data.
Clicking Refresh in the end client will trigger a new data request, which will be checked against the TTL of the server, and then return the cached empty dataset.
Only after the cache has expired is a subsequent request passed down into the in-memory snapshot of the latest streaming data, which is again cached and delivered to the end client.
It is therefore recommended to set the Refresh Period to 1 second for streaming sources.
However, if the source is not frequently changing, the Refresh Period may be increased to a few seconds. This will reduce load on the server and more users can retrieve data from the cache.
-