


|
Adding a JavaScript Part
The JavaScript dashboard part allows the designer of a workbook to include a bespoke JavaScript code inside a dashboard.
Steps:
1. After double-clicking or drawing a rectangle
on the dashboard canvas, click  on the Select Part pane
then click the JavaScript Part
on the Select Part pane
then click the JavaScript Part  icon.
icon.
The JavaScript pane is displayed, and the JavaScript part is added on the dashboard canvas.

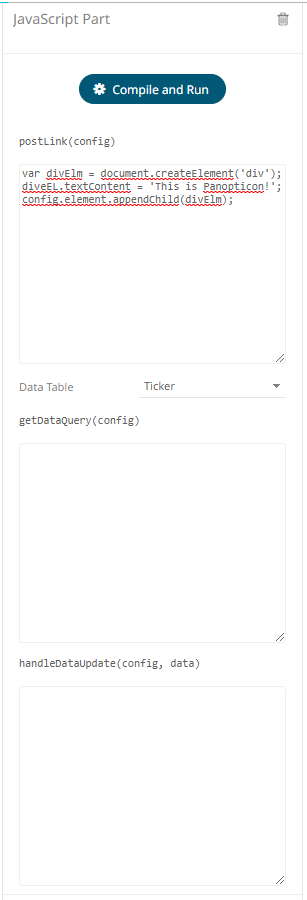
The JavaScript part settings support the following functions:
· postLink(config)
· getDataRequestObject(config)
· handleDataUpdate(config, data)
The argument config in all of the three functions will be an object with a single property element. config.element is the DOM element that is to be used if a UI is required. The same instance of config will be used throughout the lifetime of the JavaScript dashboard part. This means it can also be used to save references to other DOM elements, functions, or data.
2. Define the functions, as required:
· postLink(config) is called after the dashboard part is added to the DOM. The function can optionally return a destroy function. The return value is called when the dashboard part is disposed and removed from the DOM. This will happen when the user switches to another dashboard. Note that this is the only function that is required to implement this dashboard part.
Then select the Data Table.
· getDataRequestObject(config) is optional, and only used if the dashboard part needs to load data. The function specifies which columns to load, aggregation, and the shape of the data. The data table used for the dashboard part is selected in the Designer, in the drop-down list.
· handleDataUpdate(config, data) is the callback used when the data has finished loading from the Panopticon Visualization Server. If the data table consists of a realtime data source then this function will be called for each update from the Panopticon Visualization Server.
Below is a very simple JavaScript example, with no data loading:
3. Click  .
.
4. Click the Save  icon on the toolbar to save the
changes.
icon on the toolbar to save the
changes.
When
saved, the  notification is displayed.