


|
Exporting a Summary in Data Prep Studio
You can export a summary to Excel or CSV files.
Note that data exported in Data Prep Studio to Excel files are exported as named ranges. Thus, when the table is opened, the worksheet name displayed corresponds to that of the named range.
Exporting summaries to CSV files
Steps:
-
Click the Export tab to display the Export window.
-
Click on the
 Add Export button located to the right of the table from which you created a summary and then select Export As > Summary > CSV.
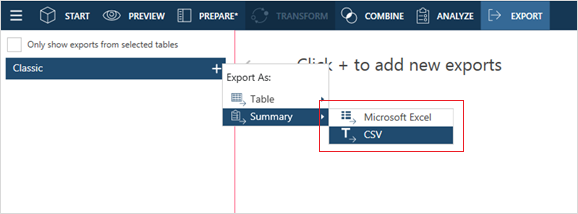
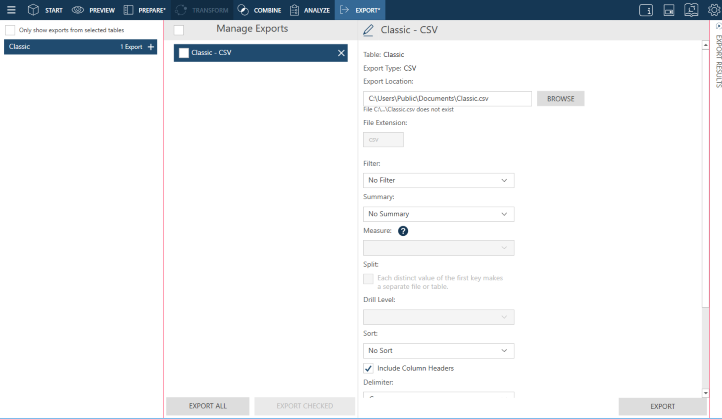
The table you selected displays in the Export Management panel and its properties display in the Export Properties panel.
-
Rename the export if you wish by clicking on the Edit
 button located to the left of the Export name and then entering a new name into the field.
 -
Specify general export settings as necessary. The table below describes these settings.
Field
Description
Export Location
This setting describes where the export file will be saved and what its name will be. Enter the path and name of the export file.
File Extension
This setting describes the extension of the export file being created.
Filter
This setting specifies which filter to apply to the summary being exported. Use the drop-down to select a filter.
Summary
This setting specifies which summary to export. Use the drop-down provided to select a summary.
Active Measure
When exporting an across-key summary, this setting specifies which measure to apply to the summary. If your summary is an ordinary one, this setting is inactive.
Split
Check Each distinct value of the first key makes a separate file or table to split the summary export according to each value change in the first key (i.e., the leftmost one).
Drill Level
This setting specifies what drill level to apply to the summary about to be exported. A lower drill level means fewer columns in the output table.
Sort
This setting specifies the sort order to apply to the summary being exported. Use the drop-down to select a sort.
Include Column Headers
Checking this setting instructs Data Prep Studio to include the column header in the export file. This header will become the first line in the export file.
Delimiter
This setting specifies data delimiter for CSV files. Select a delimiter from the drop-down. The delimiter will be used to separate column values.
Text Qualifier
This setting specifies a text qualifier for CSV files. Select a text qualifier from the drop-down. The text qualifier tells you where text values begin and end. This is useful when you have text values that may contain the delimiter character you selected above.
When File Exists
This setting specifies what Data Prep Studio should do if a file with the same name exists in the folder you specified in the Export Location field. Select an action if the export file already exists:
-
Overwrite the file.
-
Append records to the existing file
-
Skip the export operation.
Encoding Type
This setting specifies which encoding type to apply to the CSV file. At present, the encoding types Code Page, UTF-8, UTF-16LE, and UTF-16BE are accepted.
Code Page
When the encoding type selected is Code Page, this setting specifies which code page to apply to the CSV file.
-
-
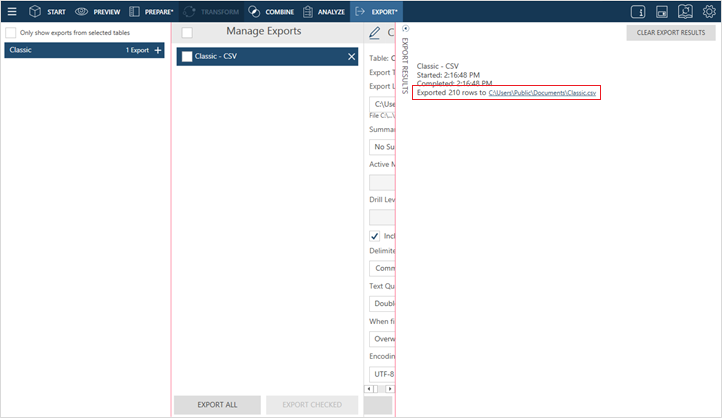
Click the Export button located at the bottom right of the window to execute the export operation.
When the export operation is completed, the Export Results panel displays. If the export was completed successfully, an export link will appear. Clicking on this link launches the folder to which you saved the exported summary.
Exporting summaries to Microsoft Excel files
Steps:
-
Click the Export tab to display the Export window.
-
Click on the
Add Export button located to the right of the table from which you created a summary and then select Export As > Summary > Microsoft Excel.The table you selected displays in the Export Management panel and its properties display in the Export Properties panel.
-
Rename the export if you wish by clicking on the Edit
button located to the left of the Export name and then entering a new name into the field. -
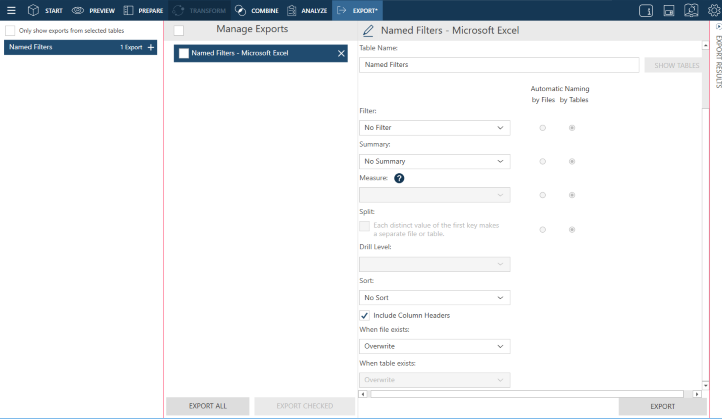
Specify general export settings as necessary. The table below describes these settings.
Field
Description
Export Location
This setting describes where the export file will be saved and what its name will be. Enter the path and name of the export file.
Table Name
This setting specifies a name to apply to the summary table. When All Filters is selected in the Filter setting, the Table Name setting is inactive.
Filter
This setting specifies the filter to apply to the summary table. Select the All Filters option to apply all of the available filters or the No Filter option to apply none of them.
If you choose the All Filters option, specify the desired Automatic Naming setting:
-
by Files: produces a file for each filter
-
by Tables: produces a table for each filter
Summary
This setting specifies which summary to export. Use the drop-down provided to select a summary. Select the "All summaries" option to export all of the available summaries.
If you choose the All Summaries option, specify the desired Automatic Naming setting:
-
by Files: produces a file for each summary
-
by Tables: produces a table for each summary
Active Measure
When exporting an across-key summary, this setting specifies which measure to apply to the summary. If your summary is an ordinary one, this setting is inactive.
Split
Check Each distinct value of the first key makes a separate file or table to split the summary export according to each value change in the first key (i.e., the leftmost one). If you choose this option, specify the desired Automatic Naming setting:
-
by Files: produces a file for each distinct first key
-
by Tables: produces a table for each distinct first
Drill Level
This setting specifies what drill level to apply to the summary about to be exported. A lower drill level means fewer columns in the output table.
Sort
This setting specifies the sort order to apply to the summary being exported. Use the drop-down to select a sort.
Include Column Headers
Checking this setting instructs Data Prep Studio to include the column header in the export file. This header will become the first line in the export file.
When File Exists
This setting specifies what Data Prep Studio should do if a file with the same name exists in the folder you specified in the Export Location field. Select an action if the export file already exists:
-
Overwrite the file.
-
Append records to the existing file
-
Skip the export operation.
When Table Exists
This setting is activated only when the When File Exists option selected is append or skip. It specifies what Data Prep Studio should do if a file with the same table exists in the export file you indicated. Select an action if the export table already exists:
-
Overwrite the table
-
Append records to the existing table
-
Skip the export operation.
-
-
Click the Export button located at the bottom right of the window to execute the export operation.
When the export operation is completed, the Export Results panel displays. If the export was completed successfully, an export link will appear. Clicking on this link launches the folder to which you saved the exported summary.
NOTE: Data exported in Data Prep Studio to Excel files are exported as named ranges. Thus, when the table is opened, the worksheet name displayed corresponds to that of the named range.