Video: Creating a Runner System

Learn how to create a runner system that is based on the number of part cavities that you specify.

  1. Click Open Model on the Files icon and browse to the Mobile_Case.x_b file in the installation directory, or drag-and-drop the file into the modeling window.


  2. Click the Designate Part Cavity icon.

    The part cavity turns red in the model and a microdialog appears for you to define a material for the part cavity.
  3. Review and keep the default material and temperature.


  4. Select the Materials icon.
  5. Review and keep the default material properties, then close the dialog.
  6. Double-right click to confirm the part cavity designation.
  7. Click the Runner System icon.

  8. Click the Runner icon from the secondary ribbon.

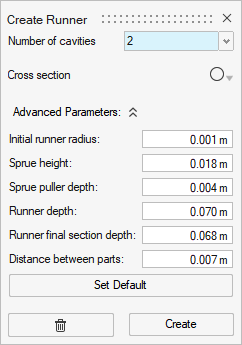
  9. Define the runner in the dialog:
    1. Enter 2for the number of cavities to create.
    2. Keep the default settings for the remaining parameters:


    3. Click the Create button.
  10. Click a surface on the model where you want to create the runner.
    The runner generates from that surface automatically.
  11. Return to the dialog and change the number of part cavities to 8.
    1. Click the Create button.
    2. Click Yes to delete the current runner.
    3. Click a surface on the model where you want to create the runner.
      A new runner with 8 part cavities is generated.
  12. Return to the dialog and change the number of part cavities back to 2.
    1. Click the Create button.
    2. Click Yes to delete the current runner.
    3. Click a surface on the model where you want to create the runner.
      A runner with 2 part cavities is generated.
    4. Double-right click to confirm the runner system.
You have completed the runner setup for this tutorial!