Concentrated Masses
Use the Masses tool to create a concentrated mass either on a part or at a point in space.
This is useful when you need to account for the mass of a part but you do not want the complexity of the geometry to slow down the run. An example would be when running an optimization using frequency constraints or when analyzing for normal modes.
In most cases you will want to create a concentrated mass at a distance. You can do this either by creating the mass at a point on your model and then moving it away, or by creating a point in space and then applying the mass to that point.
Create a Mass on a Part
-
On the Structures ribbon, select Masses tool.

-
Select a point, edge, or surface on your model.
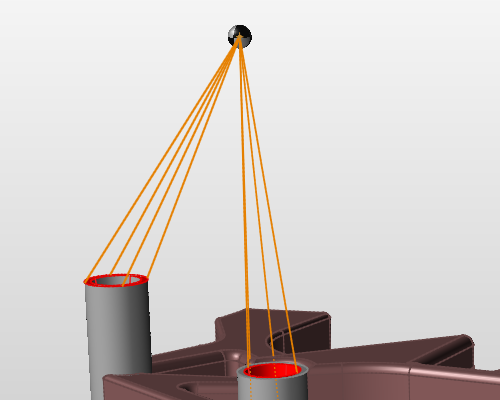
The mass is shown as a sphere, and a microdialog appears.
Note: To connect the concentrated mass to multiple features, click the icon on the microdialog. This will allow you to
apply the mass to additional points, edges, or surfaces by selecting them in
the modeling window. Press Ctrl as you click to
remove a feature from the selection.
icon on the microdialog. This will allow you to
apply the mass to additional points, edges, or surfaces by selecting them in
the modeling window. Press Ctrl as you click to
remove a feature from the selection. - Optional:
To place the concentrated mass at a distance, click the
 icon on the microdialog. The
Move tool appears, allowing you to move the
concentrated mass away from the model.
icon on the microdialog. The
Move tool appears, allowing you to move the
concentrated mass away from the model.
Create a Mass at a Point in Space
-
On the Sketch ribbon, select the Points tool.

-
On the Structure ribbon, select the
Masses tool.
-
Select the point you just created and extracted.
The mass is shown as a sphere, and a microdialog appears.
Note: To connect the concentrated mass to multiple features, click the icon on the microdialog. This will allow you to
apply the masss to additional points, edges, or surfaces by selecting them
in the modeling window. Press Ctrl as you click to
remove a feature from the selection.
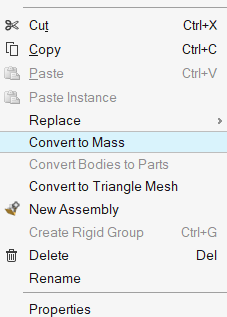
Convert Part to a Mass
Convert a part or parts to a point mass to simplify the simulation and make it run faster.
Applying Connectors
When you create a concentrated mass, you will generally want to connect it to geometry features on your model using connectors, which are shown as red features.

-
Double-click on a concentrated mass to access the microdialog.
-
Select to add or remove features by clicking them.