Create an ellipse to subtract from the horn. The ellipse is placed on the face of the
horn.
Create an ellipse.
-
On the Construct tab, in the Create surface group, click the
 Ellipse icon.
-
On the Create ellipse dialog, click the Workplane tab.
The workplane will be placed on the underside of the flare by snapping it
to the surface of the flare.
-
Press Ctrl+Shift while moving the mouse
cursor over the flare.
Note: View the change in the Origin, U
vector and V vector fields as the
mouse cursor is moved. Special snapping points are indicated in blue.
-
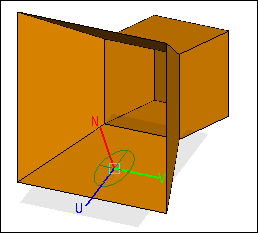
Move the mouse cursor over the flare while holding down Ctrl+Shift until the local workplane is
orientated as displayed in the image.
-
Move the cursor closer to an edge, then to the face centre.
-
Now move the mouse cursor to a different edge and return back to the face
centre.
Note: The history of where the mouse cursor was moved to the face centre,
affects the orientation of the workplane.
-
On the Create ellipse dialog, click the Geometry tab and set the following dimensions:
| Dimension |
Value |
| Radius (U) |
0.3 |
| Radius (V) |
0.2 |
-
Click Create to create the ellipse and to close
the dialog.